
1. Introduction
This manual provides detailed instructions for the installation, operation, and maintenance of your Korky Standard 2-inch Complete Toilet Repair Kit, Model 4010MP. This kit is designed to address common toilet issues such as running, noisy, no/slow refill, and no/weak flush problems in toilets with a standard 2-inch flush valve opening. Please read all instructions carefully before beginning the installation process.
2. Before You Begin
2.1 Confirm Flapper Size
It is crucial to confirm that your toilet has a standard 2-inch flush valve opening. This kit is specifically designed for 2-inch flappers. Using it with a 3-inch flush valve will result in improper function and leaks.

Image 2.1: Diagram illustrating how to measure the flush valve opening. A 2-inch opening is standard, while a 3-inch opening requires a different kit.
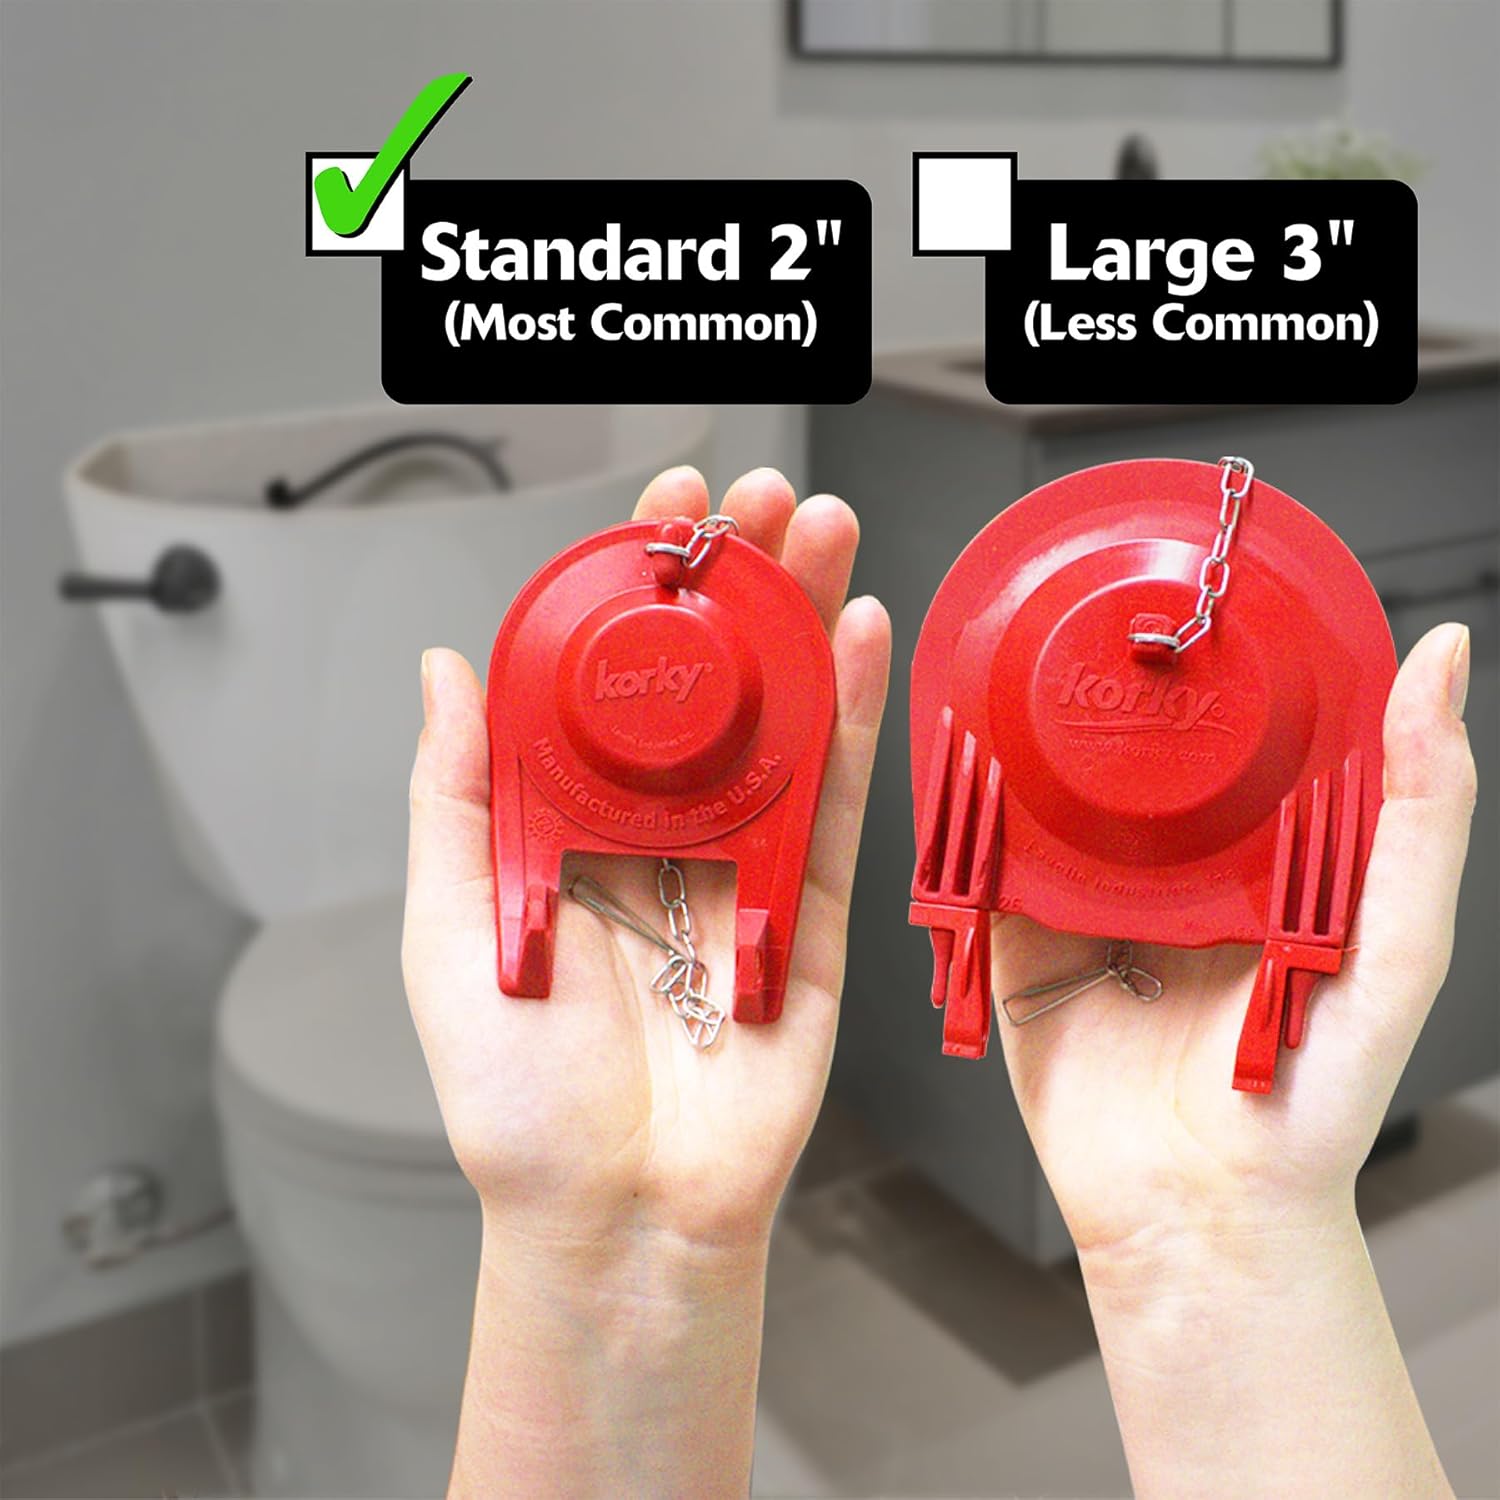
Image 2.2: Comparison of a standard 2-inch flapper (left) and a large 3-inch flapper (right).
2.2 Tools Required
- Adjustable wrench or pliers
- Sponge or towel for water cleanup
- Bucket (optional, for draining tank)
3. Installation Guide
Follow these steps carefully to install your Korky toilet repair kit.
3.1 Preparation
- Turn off the water supply to the toilet at the shut-off valve located near the base of the toilet.
- Flush the toilet to drain most of the water from the tank. Use a sponge to remove any remaining water.
- Disconnect the water supply line from the bottom of the toilet tank.
- Remove the old fill valve and flapper assembly from the tank.
3.2 Install New Fill Valve
- Insert the new Korky QuietFILL fill valve into the hole at the bottom of the toilet tank. Ensure the shank washer is on the outside of the tank.
- Secure the fill valve with the locknut from underneath the tank. Hand-tighten the locknut, then use an adjustable wrench to tighten it an additional 1/4 turn. Do not overtighten.
- Adjust the height of the fill valve by twisting the upper section to unlock, extending or retracting it, then twisting to lock. The top of the fill valve should be approximately 1 inch above the overflow tube.

Image 3.1: The fill valve height can be easily adjusted from 8.5 inches to 13.5 inches to fit various tank sizes.
3.3 Install New Flapper and Tank-to-Bowl Gasket
- Install the new 2-inch flapper onto the overflow tube. Ensure it seats properly.
- Attach the flapper chain to the toilet trip lever, ensuring there is a small amount of slack (1-2 links) when the flapper is closed.
- Replace the tank-to-bowl gasket and bolts. Ensure the gasket is properly seated for a watertight seal.

Image 3.2: The standard 2-inch gasket replaces virtually all shapes and thicknesses of old gaskets.
3.4 Final Steps
- Reconnect the water supply line to the fill valve.
- Turn the water supply back on slowly. Allow the tank to fill.
- Check for any leaks around the fill valve, flapper, and tank-to-bowl connections. Tighten connections slightly if necessary.
3.5 Installation Video
Video 3.1: Official Korky installation guide for the QuietFILL Platinum Complete Kit, demonstrating the step-by-step process for replacing toilet components.
4. Adjustments
4.1 Water Level Adjustment
The water level in the tank is controlled by the height of the fill valve. To adjust the water level:
- Turn off the water supply to the toilet.
- Flush the toilet to drain the tank.
- Twist the top section of the fill valve to unlock it.
- Raise or lower the fill valve to achieve the desired water level, typically about 1 inch below the top of the overflow tube or the water line marked inside the tank.
- Twist the top section to lock the fill valve in place.
- Turn the water supply back on and allow the tank to fill. Test the flush and readjust if necessary.

Image 4.1: The Korky QuietFILL fill valve features a protected float, which helps maintain consistent water levels and prevents sticking.
5. Operation
Once installed and adjusted, your toilet should operate normally. Press the flush handle to activate the flapper, allowing water to flow from the tank into the bowl. The fill valve will then refill the tank to the set water level. Ensure the flapper closes completely after each flush to prevent continuous running water.
6. Maintenance
Regular maintenance can extend the life of your toilet repair kit and prevent common issues.
- Inspect Annually: Periodically check the flapper and fill valve for wear, cracks, or mineral buildup.
- Clean Components: If mineral deposits accumulate, turn off the water supply, drain the tank, and gently clean the fill valve and flapper with a soft brush and mild cleaner. Avoid harsh chemicals that can damage rubber components.
- Check for Leaks: Listen for continuous running water or observe if the water level in the bowl drops over time, indicating a leak. Address leaks promptly to conserve water.
7. Troubleshooting
This kit is designed to fix several common toilet problems. Refer to the table below for solutions to potential issues.
| Problem | Possible Cause | Solution |
|---|---|---|
| Running Toilet | Flapper not sealing properly, fill valve set too high, or refill tube too long. | Check flapper for debris or wear. Ensure flapper chain has slight slack. Adjust fill valve height. Ensure refill tube is not inserted too far into overflow pipe. |
| Noisy Refill | Water pressure issues or fill valve adjustment. | Ensure water supply valve is fully open. Check for debris in fill valve filter. Adjust fill valve height. |
| No/Slow Refill | Water supply off, clogged fill valve, or low water pressure. | Check water supply valve. Inspect fill valve for clogs or debris. Ensure adequate water pressure to the toilet. |
| No/Weak Flush | Low water level in tank, flapper closing too quickly, or clogged rim jets/siphon. | Adjust fill valve to increase water level. Ensure flapper chain has correct slack. Clean rim jets and siphon hole in toilet bowl. |
8. Specifications
- Model Number: 4010MP
- Brand: Korky
- Product Dimensions: 4"D x 8"W x 13"H
- Material: Plastic & Rubber
- Item Weight: 16 ounces
- Flapper Size: Standard 2-inch
- Fill Valve Type: QuietFILL, adjustable height
- UPC: 049057104866
9. Warranty and Support
9.1 Manufacturer Warranty
This Korky product comes with a manufacturer's warranty. For specific details regarding coverage and duration, please refer to the warranty information included in your product packaging or visit the official Korky website.
9.2 Customer Support
If you encounter any issues not covered in this manual or require further assistance, please contact Korky customer support. Contact information can typically be found on the product packaging or the official Korky website.


