
Bosal BOS010-178
Instruction Manual: Bosal 010-178 Electrical Trailer Hitch Kit
Model: BOS010-178
1. Introduction
This manual provides comprehensive instructions for the installation, operation, and maintenance of the Bosal 010-178 Electrical Trailer Hitch Kit. This kit is designed to establish the necessary electrical connection between a towing vehicle and a trailer, ensuring proper functioning of trailer lights and signals. Please read this manual thoroughly before beginning installation or use to ensure safety and optimal performance.
2. Safety Information
Always prioritize safety during installation and operation. Failure to follow these instructions could result in property damage, injury, or death.
- Disconnect the vehicle's battery before performing any electrical work to prevent short circuits or electrical shock.
- Ensure all wiring connections are secure and properly insulated to prevent corrosion and electrical faults.
- Verify that the vehicle's electrical system can support the additional load of the trailer lights. Consult your vehicle's manufacturer specifications if unsure.
- Wear appropriate personal protective equipment (PPE), such as safety glasses and gloves, during installation.
- If you are not confident in your ability to perform the installation, seek assistance from a qualified automotive technician.
- Do not modify the components of this kit. Use only as intended by the manufacturer.
3. Package Contents
Carefully unpack the kit and verify that all components are present and undamaged. Refer to the image below for visual confirmation of the kit contents.
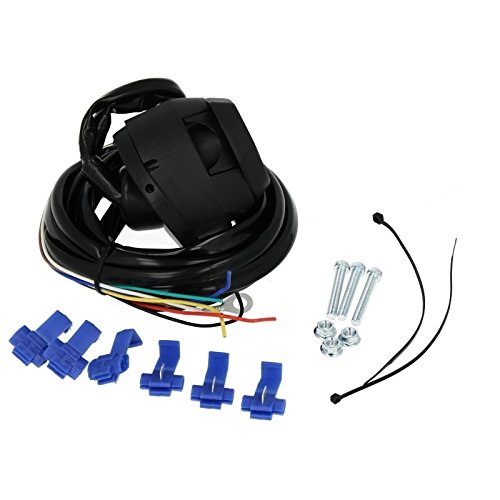
Figure 1: Bosal 010-178 Electrical Trailer Hitch Kit Components
This image displays the complete contents of the Bosal 010-178 electrical trailer hitch kit, including the main electrical connector (trailer socket), a pre-wired harness with multiple colored wires, several blue quick splice connectors, three mounting bolts, three nuts, and two black cable ties.
- 1x Trailer Electrical Socket (e.g., 7-pin or 13-pin, depending on model variant)
- 1x Pre-wired Harness
- Multiple Quick Splice Connectors
- Mounting Hardware (Bolts, Nuts)
- Cable Ties
4. Setup and Installation
Installation of the electrical trailer hitch kit requires basic automotive electrical knowledge. If you are unsure about any step, consult a professional.
4.1. Pre-Installation Steps
- Park the vehicle on a level surface and engage the parking brake.
- Turn off the ignition and remove the key.
- Disconnect the negative terminal of the vehicle's battery.
- Gather necessary tools: wire strippers, crimpers, multimeter, drill (if mounting new holes), wrenches, electrical tape, zip ties.
4.2. Wiring Connection
Refer to your vehicle's specific wiring diagram and the included wiring diagram for the trailer socket (not provided in this general manual, but typically included with the product) to identify the correct wires for each function (e.g., tail lights, brake lights, turn signals, ground).
- Locate the vehicle's rear light wiring harness.
- Using the quick splice connectors or by stripping and crimping, connect the wires from the Bosal harness to the corresponding wires on the vehicle's harness. Ensure a secure and insulated connection for each wire.
- Connect the ground wire from the Bosal harness to a clean, unpainted metal surface on the vehicle chassis, ensuring a solid electrical ground.
4.3. Mounting the Trailer Socket
- Choose a suitable location near the trailer hitch for mounting the electrical socket, ensuring it is easily accessible and protected from road debris.
- Use the provided mounting hardware (bolts and nuts) to securely attach the socket to the vehicle's frame or a dedicated mounting bracket. If no existing holes are available, drill new ones carefully, avoiding any existing wiring or fuel lines.
- Route the wiring harness away from hot exhaust components, moving parts, and sharp edges. Use the provided cable ties to secure the harness along the vehicle's undercarriage.
4.4. Post-Installation Check
- Reconnect the negative terminal of the vehicle's battery.
- Test all trailer light functions (tail lights, brake lights, left turn signal, right turn signal, reverse lights if applicable) using a trailer or a trailer light tester.
- Ensure all connections are firm and there are no loose wires.
5. Operating Instructions
Once installed, operating the electrical trailer hitch kit is straightforward.
- Ensure the trailer is properly hitched to the vehicle's tow bar.
- Align the trailer's electrical plug with the vehicle's electrical socket.
- Firmly push the trailer plug into the vehicle's socket until it clicks into place or feels secure.
- Before driving, perform a quick check of all trailer lights (tail lights, brake lights, turn signals) to ensure they are functioning correctly.
- To disconnect, firmly grasp the trailer plug and pull it straight out from the vehicle's socket. Avoid pulling by the wires.
6. Maintenance
Regular maintenance will extend the life of your electrical trailer hitch kit and ensure reliable performance.
- Periodically inspect the electrical socket for dirt, debris, or corrosion. Clean with a non-conductive cleaner and a soft brush if necessary.
- Apply dielectric grease to the electrical contacts inside the socket to prevent corrosion, especially in humid or corrosive environments.
- Check the wiring harness for any signs of wear, fraying, or damage. Secure any loose wires with cable ties.
- Ensure the mounting hardware for the socket remains tight and secure.
- If the vehicle is frequently exposed to harsh weather conditions or road salt, consider more frequent inspections.
7. Troubleshooting
If you encounter issues with your electrical trailer hitch kit, refer to the following common problems and solutions:
| Problem | Possible Cause | Solution |
|---|---|---|
| No trailer lights working. | Blown fuse in vehicle or trailer; poor ground connection; disconnected wiring. | Check vehicle and trailer fuses; inspect ground wire connection; verify all wiring connections are secure. |
| Only some trailer lights working. | Specific wire connection is loose or corroded; faulty bulb in trailer. | Inspect the specific wire connection for the non-working light; check and replace trailer bulb if necessary. |
| Intermittent light function. | Loose connection at the socket or within the wiring harness; corroded contacts. | Ensure trailer plug is fully seated in the socket; clean and apply dielectric grease to contacts; check for loose wiring. |
| Trailer lights are dim. | Poor ground connection; insufficient voltage. | Verify ground connection is solid; check vehicle's electrical system for proper voltage output. |
If troubleshooting steps do not resolve the issue, it is recommended to consult a qualified automotive electrician.
8. Specifications
Key specifications for the Bosal 010-178 Electrical Trailer Hitch Kit:
- Brand: Bosal
- Model Number: BOS010-178
- Manufacturer: Bosal Deutschland GmbH
- Item Weight: 300 g
- Part Number: BOS010-178
- Position: Left (as per product specification, likely referring to a specific component's orientation or side of vehicle)
- Assembly Required: No (refers to the kit itself, not the vehicle installation)
- ASIN: B072VTQ8Z3
- First Available Date: January 15, 2020
9. Warranty and Support
This product is covered by the manufacturer's standard warranty. For specific warranty terms and conditions, please refer to the documentation included with your purchase or visit the official Bosal website. For technical support, installation assistance, or to report a defective product, please contact Bosal customer service through their official channels.
Note: Warranty terms may vary by region and retailer. Keep your proof of purchase for warranty claims.
Ask a question about this manual
Ask about setup, troubleshooting, compatibility, parts, safety, or missing instructions. Manuals+ will review the question and use this page’s manual context to help answer it.