
1. Product Overview
This complete belt kit is specifically designed for the Onkyo TA-RW11 dual cassette deck. It includes all three necessary belts required to restore the proper function of your unit's tape transport mechanism. These belts are manufactured to meet original equipment manufacturer (OEM) specifications, ensuring optimal performance, durability, and a precise fit for your audio equipment.
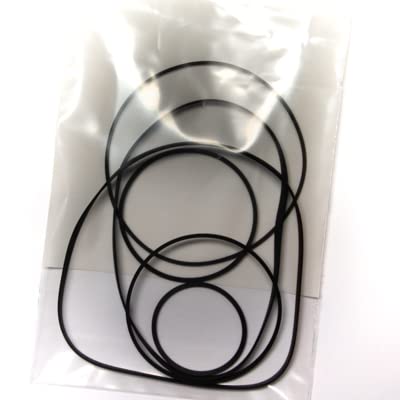
Figure 1: Vintage Electronics Complete Belt Kit for Onkyo TA-RW11. The kit contains three belts of varying sizes, designed for the specific mechanisms within the cassette deck.
2. Installation Instructions (Setup)
Replacing the drive belts in your Onkyo TA-RW11 requires careful attention. If you are not comfortable performing this procedure, it is recommended to seek assistance from a qualified technician.
2.1 Safety Precautions
- Always disconnect the power cord from the wall outlet before opening the unit to prevent electrical shock.
- Work in a clean, well-lit area to avoid losing small components.
- Use appropriate tools to prevent damage to the unit.
2.2 Recommended Tools
- Small Phillips head screwdriver
- Tweezers or small pliers (for belt manipulation)
- Cotton swabs and isopropyl alcohol (for cleaning pulleys)
- Small container for screws
2.3 Step-by-Step Installation
- Disassembly: Carefully remove the outer casing of your Onkyo TA-RW11. This typically involves unscrewing several screws on the back and sides. Note the location of each screw for reassembly.
- Locate Old Belts: Identify the existing belts within the tape transport mechanism. There are usually three belts: a main drive belt, a counter belt, and sometimes an idler or assist belt. Observe how the old belts are routed around the motor pulley, flywheels, and other mechanisms.
- Remove Old Belts: Gently remove the old, worn-out belts. They may be stretched, cracked, or melted.
- Clean Pulleys: Using cotton swabs lightly dampened with isopropyl alcohol, thoroughly clean all pulleys, flywheels, and surfaces where the new belts will make contact. This removes old rubber residue and grease, which can cause new belts to slip. Allow surfaces to dry completely.
- Install New Belts: Carefully install the new belts, matching their sizes to the appropriate pulleys and flywheels. Refer to your observations from step 2. Use tweezers if necessary to guide the belts into place without stretching them excessively. Ensure the belts are seated correctly and are not twisted.
- Test Mechanism: Before reassembling the casing, briefly connect the power and test the basic functions (Play, Fast Forward, Rewind) to ensure the belts are installed correctly and the mechanism moves freely. Disconnect power again after testing.
- Reassembly: Carefully reattach the outer casing, ensuring all screws are tightened securely but not overtightened.
3. Operating Instructions
Once the new belts are correctly installed, your Onkyo TA-RW11 dual cassette deck should operate according to its original specifications. This belt kit restores the mechanical functionality of the tape transport system. For detailed instructions on how to operate your Onkyo TA-RW11, including recording, playback, and other features, please refer to the original owner's manual provided with your cassette deck.
4. Maintenance
The belts themselves are designed for long-term durability and generally require no specific maintenance after installation. However, to ensure the longevity of the new belts and the overall performance of your Onkyo TA-RW11, consider the following:
- Keep Unit Clean: Regularly clean the exterior of your cassette deck. Periodically, if comfortable, open the unit to gently remove any accumulated dust from the internal mechanisms using compressed air or a soft brush.
- Avoid Extreme Conditions: Do not expose the cassette deck to extreme temperatures, direct sunlight, or high humidity, as these conditions can degrade rubber components over time.
- Tape Head Cleaning: While not directly related to the belts, regularly cleaning the tape heads and pinch rollers with appropriate cleaning solutions will ensure optimal audio quality and prevent unnecessary strain on the tape transport mechanism.
5. Troubleshooting
If you encounter issues after installing the new belt kit, consider the following troubleshooting steps:
- Tape Speed Inconsistencies (Wow and Flutter):
- Ensure all belts are correctly seated on their respective pulleys and flywheels.
- Verify that all pulleys and shafts are clean and free of old rubber residue or lubricant.
- Check for any obstructions preventing smooth movement of the mechanism.
- Tapes Not Playing / No Movement:
- Confirm that all three belts are installed and properly tensioned.
- Check if the motor is receiving power and attempting to spin.
- Ensure no wires were accidentally disconnected during reassembly.
- Squeaking Noises:
- This can indicate friction. Re-check belt routing and ensure no parts are rubbing.
- Ensure all moving parts are clean.
If problems persist, please refer to the Support section for assistance.
6. Specifications
| Product | Complete Belt Kit |
| Compatibility | Onkyo TA-RW11 Dual Cassette Deck |
| Number of Belts | 3 |
| Material | High-quality rubber, manufactured to OEM specifications |
| Brand | Vintage Electronics |
| Model Number | TA-RW11 (for compatible device) |
| UPC | 710827789254 |
7. Warranty Information
This Vintage Electronics Complete Belt Kit for Onkyo TA-RW11 is backed by a Lifetime Warranty. This warranty covers defects in materials and workmanship under normal use. For warranty claims or further details, please contact Vintage Electronics customer support.
8. Support
For technical assistance, installation guidance, or any questions regarding your Vintage Electronics belt kit, please do not hesitate to contact our customer support team. With over 45 years of experience in vintage electronics, we are dedicated to providing outstanding technical support to ensure your satisfaction.
Please visit the Vintage Electronics website or refer to your purchase documentation for contact information.