1. Introduction
This manual provides detailed instructions for the installation, operation, and maintenance of your eMylo Smart RF Relay Switch. This 433Mhz RF wireless light switch system allows you to control lamps or other household electric appliances remotely. It features a long control distance, high sensitivity, strong anti-interference performance, and stability. Please read this manual thoroughly before use to ensure proper and safe operation.

Image 1.1: The eMylo Smart RF Relay Switch module and two accompanying remote controls.
2. Safety Information
- Always disconnect power before installing or servicing the device.
- Installation should be performed by a qualified electrician or in accordance with local electrical codes.
- Do not expose the device to moisture or extreme temperatures.
- Ensure correct voltage (DC 12V) is supplied to the relay module.
- Keep remote controls away from children.
3. Product Overview
3.1 Components
- 1 x eMylo RF Relay Receiver Module (DC 12V, 1-Channel)
- 2 x RF Remote Transmitters (433Mhz)
3.2 Key Features
- 433Mhz RF wireless control for various appliances.
- Long control distance and strong anti-interference performance.
- Two operating modes: Momentary and Toggle (programmable).
- Non-directional wireless encoding technology for independent control.
- Flexible configuration of receivers and transmitters.
3.3 Dimensions

Image 3.1: Dimensions of the eMylo RF Relay Receiver module and the remote control.
3.4 Internal View

Image 3.2: Internal view of the eMylo RF Relay Receiver module, displaying the circuit board and relay components.
4. Setup and Installation
4.1 Wiring Diagram
Refer to the following diagrams for proper wiring of the relay module with your light or appliance. Ensure power is disconnected before wiring.

Image 4.1: Wiring diagrams for connecting the relay module to a light source, including configurations for DC 6/12/24V and AC 110V/240V.
4.2 Pairing Transmitter and Receiver
The transmitter and receiver are typically pre-paired from the factory. If re-pairing is needed or you wish to add more transmitters, follow these steps:
- Connect to Power Source: Connect the receiver to its power source. The green power indicator will turn on after the receiver is connected.
- Clear Code (Optional): To clear existing pairings, press the Programming Button on the receiver for 5 seconds until the red signal indicator turns ON and then OFF. Release the key. This indicates that the code clearance is complete, and all previous pairings are removed.
- Choose Operating Mode: After clearing the code (or if not clearing), press the programming button for a few seconds until the red and green indicators start to flash.
- Momentary (Jog): Release the key after the indicators blink once.
- Latched: Release the key after the indicators blink twice.
- Toggle: Release the key after the indicators blink three times.
- Pairing: After choosing the operating mode, press the programming button on the receiver until the red indicator is lit up. Then, press the button on the transmitter you wish to pair. The red indicator on the receiver will blink once and go out, indicating successful pairing. You will hear a click sound from the relay.

Image 4.2: Step-by-step guide for switching modes and pairing the transmitter and receiver.
5. Operating Modes
The eMylo RF Relay Switch supports different operating modes, which determine how the relay responds to remote control presses. The available modes depend on the number of buttons on your transmitter and the number of channels on the receiver.
5.1 Mode Descriptions
- Momentary Mode: The relay remains active only as long as the remote button is pressed. Releasing the button turns the relay off.
- Latched Mode: Pressing the remote button turns the relay ON. Pressing the same button again turns the relay OFF.
- Toggle Mode: Pressing button A turns the relay ON. Pressing button B turns the relay OFF. (Requires a 2-button transmitter).
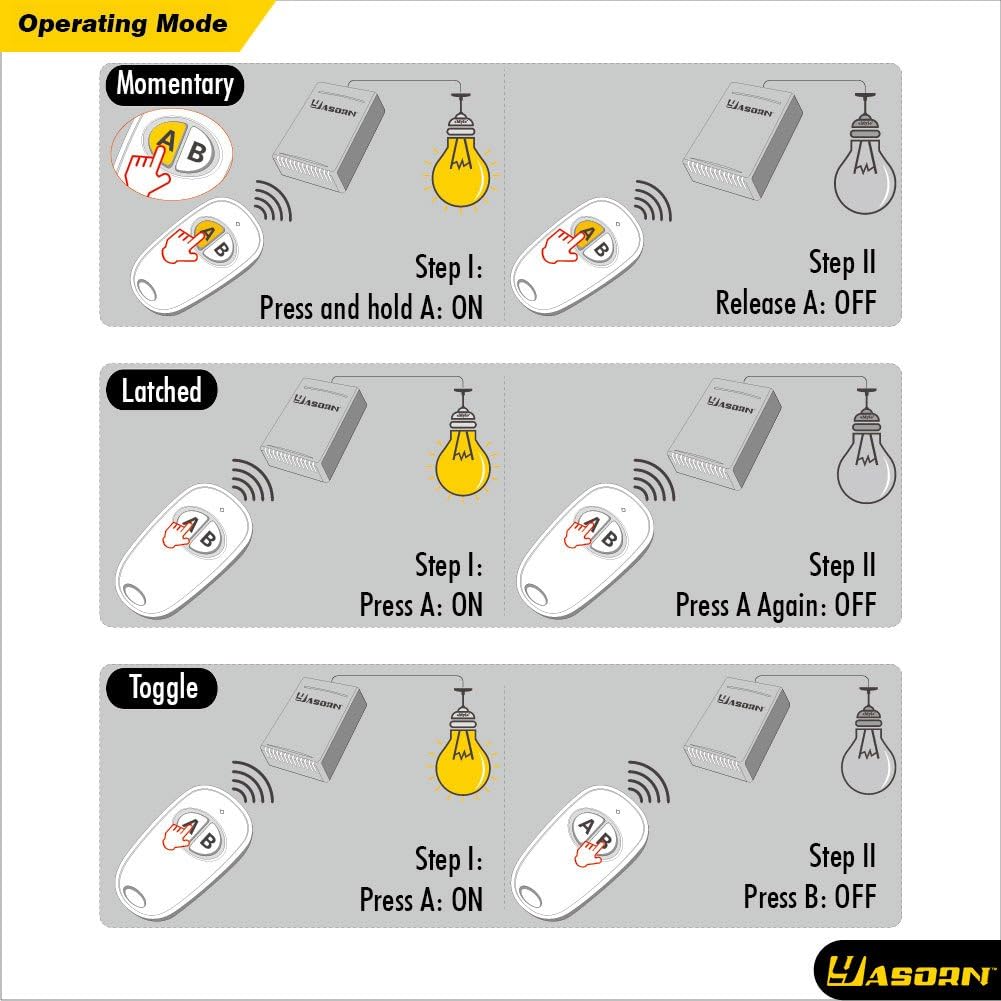
Image 5.1: Visual representation of Momentary, Latched, and Toggle operating modes.
5.2 Mode Setting Table
Use the table below to understand which modes are available based on your transmitter and receiver configuration.

Image 5.2: Mode setting table for single and multiple receivers, showing settable modes and default modes.
6. Maintenance
- Keep the relay module and remote controls clean and dry.
- Avoid dropping the devices or exposing them to strong impacts.
- If remote control range decreases, consider replacing the battery in the remote.
- Do not attempt to repair the internal components unless you are a qualified professional.
7. Troubleshooting
| Problem | Possible Cause | Solution |
|---|---|---|
| Relay not responding to remote. | Not paired, out of range, low remote battery, power issue to receiver. | Re-pair the remote and receiver. Check remote battery. Ensure receiver has power. Reduce distance between remote and receiver. |
| Intermittent operation. | Interference, weak signal, loose wiring. | Check wiring connections. Relocate receiver to minimize interference. |
| Relay clicks but appliance doesn't turn on/off. | Incorrect wiring to appliance, appliance fault. | Verify appliance wiring according to diagram. Test appliance independently. |
8. Specifications
| Feature | Specification |
|---|---|
| Brand | Yasorn |
| Model Number | YSL116D4N-FBA |
| Receiver Voltage | DC 12V |
| Operating Frequency | 433Mhz |
| Channel | 1-Channel |
| Contact Material | Silver |
| Contact Type | Normally Open |
| Current Rating | 10 Amps |
| Maximum Switching Current | 10 Amps |
| Maximum Switching Voltage | 12 Volts |
| Minimum Switching Voltage | 12 Volts (DC) |
| Wattage | 12 watts |
| Operation Mode | Manual |
| Mounting Type | Wall Mount |
| Item Weight | 3.52 ounces |
| Package Dimensions | 4.09 x 3.43 x 1.73 inches |
| Batteries Included? | Yes (for remotes) |
8.1 Applications
The eMylo RF Relay Switch is versatile and can be used in various applications, including:
- Motor control (e.g., garage doors, automated curtains)
- Lighting control (indoor and outdoor)
- Water pumps
- Electronic locks
- Industrial control and security fields

Image 8.1: Examples of common applications for the eMylo RF Relay Switch.
9. Warranty and Support
For warranty information or technical support, please contact Yasorn customer service. You can find contact details on the official Yasorn website or through your purchase platform.
Yasorn Customer Service: Visit Yasorn Store on Amazon


