
1. Introduction
The SunFounder LCD2004 display is a dot matrix module designed to display 20 characters across 4 lines. It supports both 4-bit and 8-bit data transmission modes, making it versatile for various microcontroller projects. This module is compatible with Arduino IDE, allowing for convenient integration using the built-in Liquid Crystal library.
The module operates at a working voltage of 5V. Its contrast can be adjusted using an onboard 50K potentiometer. For backlight operation, connect pin A to 3.3V and pin K to GND.

Image 1.1: The SunFounder LCD2004 Module, a 20x4 character display with a blue background and white characters.
2. Product Features
- Displays 20 characters per line across 4 lines, including letters, numbers, and symbols.
- Operates at a working voltage of 5V.
- Features an adjustable contrast via an onboard 50K potentiometer.
- Equipped with a bright backlight for clear character display.
- Module dimensions: 97 x 59 x 12 mm; Viewing area size: 71 x 21 mm.
- Compatible with Arduino and other microcontrollers.
3. Package Contents
- 1 x LCD2004 Module (Pin headers are not included and must be soldered separately).
4. Pin Functions
Understanding the function of each pin is crucial for proper connection and operation of the LCD2004 module.
| Pin | Function | Description |
|---|---|---|
| VSS | Ground | Connect to the ground (GND) of your power supply. |
| VDD | Power Supply | Connect to a +5V power supply. |
| VO | Contrast Adjustment | Connect to the wiper of a potentiometer (e.g., 10KΩ) to adjust display contrast. |
| RS | Register Select | Controls whether data is written to the data register (for display) or instruction register (for commands). |
| R/W | Read/Write Select | Selects between reading data from or writing data to the LCD module. Typically connected to GND for write-only operations. |
| E | Enable | An enabling pin that, when a low-level energy pulse is supplied, causes the LCD module to execute relevant instructions. |
| D0-D7 | Data Bus Lines | Used for reading and writing data to the LCD. Can be used in 4-bit or 8-bit mode. |
| A | Backlight Anode | Connect to the positive voltage supply for the backlight (e.g., 3.3V). |
| K | Backlight Cathode | Connect to ground (GND) for the backlight. |

Image 4.1: Close-up view of the LCD2004 module's pins, showing their labels for connection.
5. Setup
5.1. Physical Inspection
Before proceeding, carefully inspect the LCD2004 module for any physical damage. Ensure all components are securely attached.
5.2. Soldering Pin Headers
The LCD2004 module typically comes without pre-soldered pin headers. You will need to solder a 16-pin header strip to the module's pinholes to facilitate connection to a breadboard or microcontroller. Ensure proper soldering techniques are used to avoid short circuits or cold solder joints.

Image 5.1: Illustrates the process of soldering pin headers onto the LCD2004 module for easier breadboard integration.
5.3. Connecting to a Microcontroller (e.g., Arduino)
Connect the LCD2004 module to your microcontroller following the pinout diagram. A common setup for 4-bit mode with Arduino involves connecting RS, E, D4, D5, D6, D7 to digital pins on the Arduino, and VSS, VDD, VO, R/W, A, K to power and ground as described in Section 4.
For contrast adjustment, connect a 10KΩ potentiometer: one outer pin to 5V, the other outer pin to GND, and the middle (wiper) pin to the LCD's VO pin.
For the backlight, connect pin A to a 3.3V source (or 5V with a current-limiting resistor) and pin K to GND.

Image 5.2: The LCD2004 module connected to an Arduino Uno on a breadboard, displaying text.
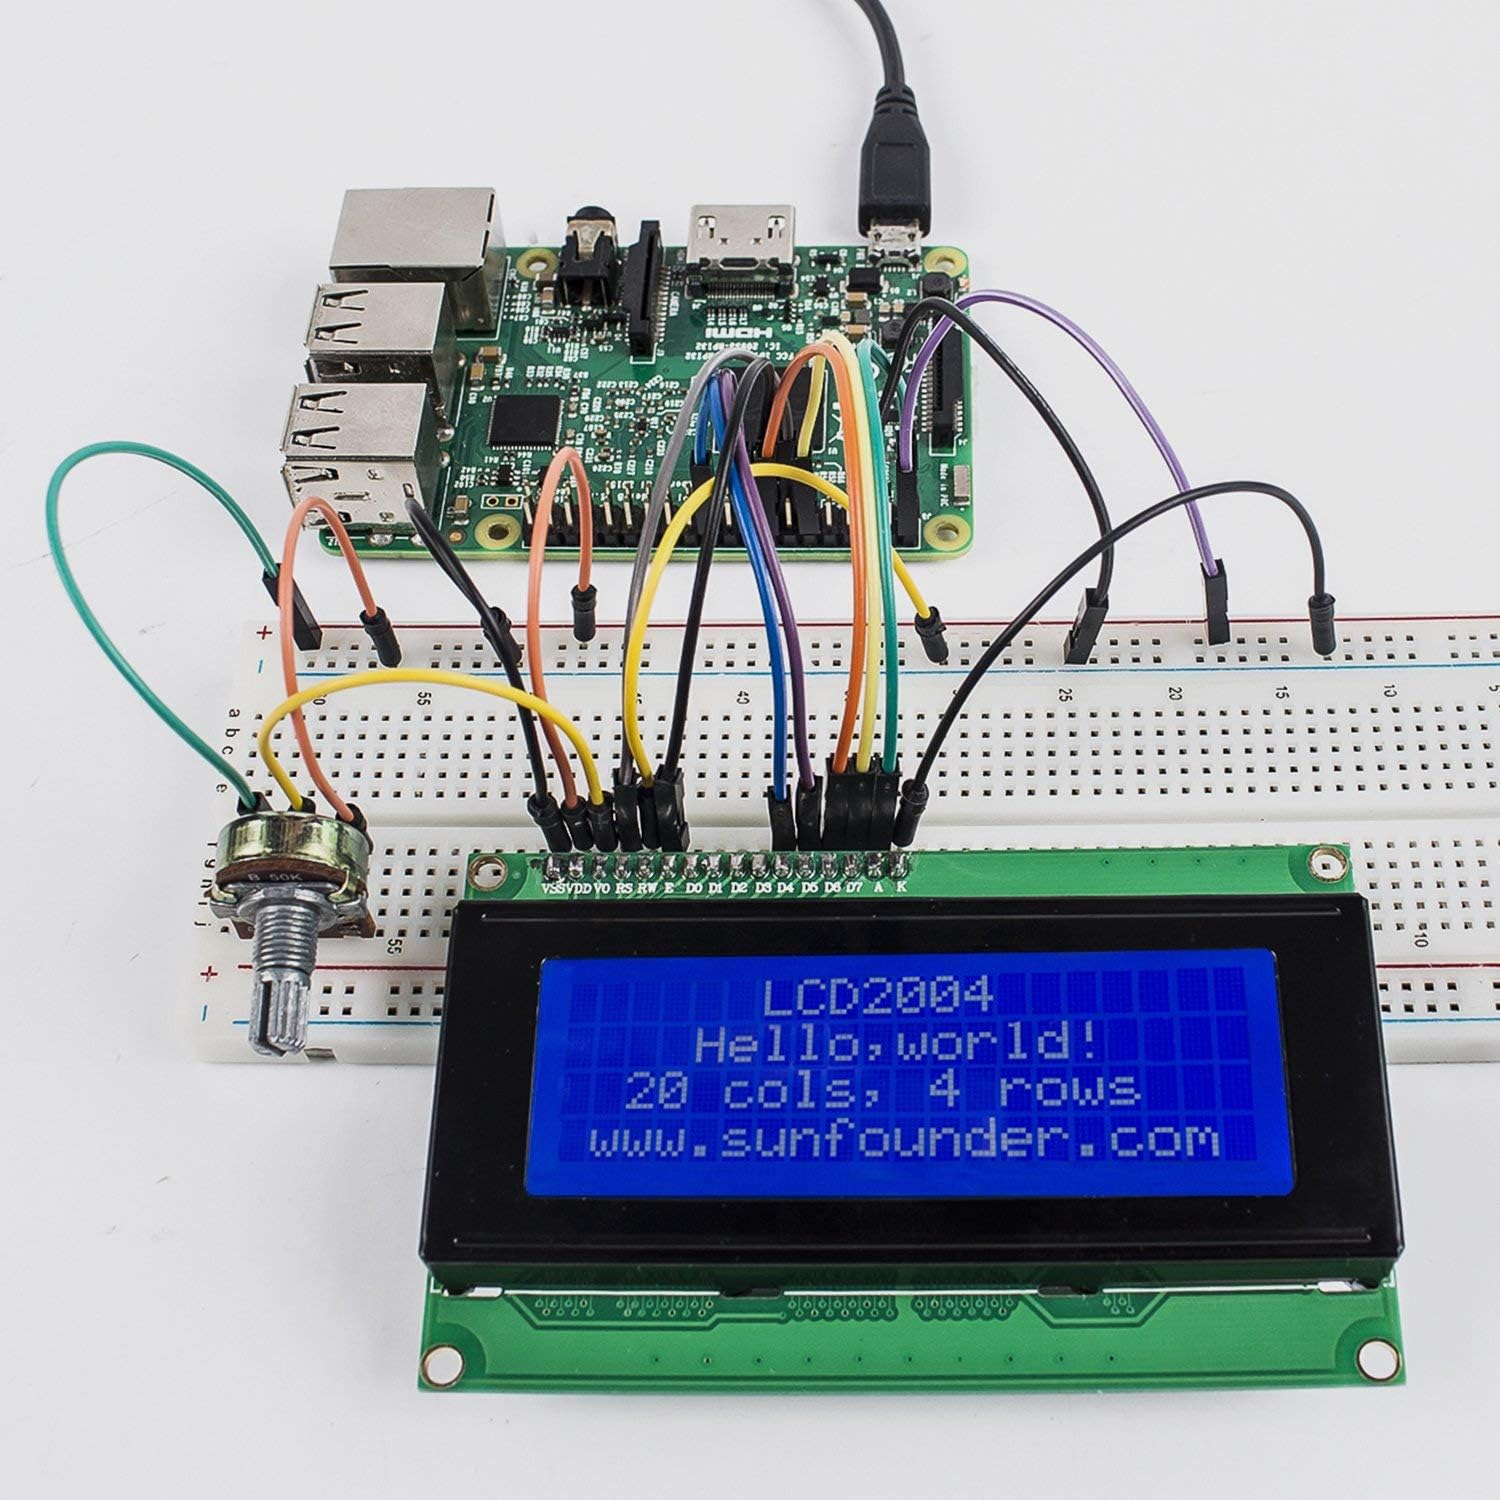
Image 5.3: The LCD2004 module connected to a Raspberry Pi on a breadboard, displaying text.
6. Operating Instructions
6.1. Using with Arduino IDE
The LCD2004 module is highly compatible with the Arduino Liquid Crystal library. This library simplifies the process of controlling the LCD. You will need to include the library and initialize the LCD object with the correct pin assignments.
A typical initialization might look like this (adjust pin numbers as per your wiring):
#include <LiquidCrystal.h>

// Initialize the library with the numbers of the interface pins
LiquidCrystal lcd(RS, E, D4, D5, D6, D7);

void setup() {
  // Set up the LCD's number of columns and rows:
  lcd.begin(20, 4);
  // Print a message to the LCD.
  lcd.print("Hello, world!");
}

void loop() {
  // Set the cursor to column 0, line 1
  // (note: line 1 is the second row, since counting begins with 0):
  lcd.setCursor(0, 1);
  // Print the number of seconds since reset:
  lcd.print(millis()/1000);
}
6.2. Basic Display Operations
- `lcd.begin(cols, rows)`: Initializes the LCD with the specified number of columns and rows. For LCD2004, use `lcd.begin(20, 4);`.
- `lcd.print("text")`: Displays text on the LCD at the current cursor position.
- `lcd.setCursor(col, row)`: Sets the cursor position to the specified column and row (0-indexed).
- `lcd.clear()`: Clears the LCD screen and sets the cursor to the home position (0,0).
- `lcd.home()`: Sets the cursor to the home position (0,0) without clearing the display.
- `lcd.noDisplay()` / `lcd.display()`: Turns the display on or off.
- `lcd.noBacklight()` / `lcd.backlight()`: (If using an I2C adapter, otherwise control backlight via A/K pins).
7. Maintenance
- Cleaning: Use a soft, dry, anti-static cloth to gently wipe the display surface. Avoid using harsh chemicals or abrasive materials.
- Storage: Store the module in a dry, dust-free environment, away from direct sunlight and extreme temperatures.
- Handling: Handle the module by its edges to avoid touching the display area or damaging the electronic components.
- Power Supply: Always ensure the correct voltage (5V) is supplied to prevent damage to the module.
8. Troubleshooting
- Blank Screen / No Display:
- Check power connections (VSS, VDD).
- Adjust the contrast potentiometer (VO pin). A completely blank or completely filled screen often indicates incorrect contrast.
- Verify backlight connections (A, K pins).
- Ensure the `lcd.begin()` function is called in your code.
- Garbled Characters / Incorrect Text:
- Double-check all data pin connections (D0-D7, RS, E).
- Ensure the correct pin assignments are used in your `LiquidCrystal` object initialization.
- Verify that the R/W pin is correctly connected (usually to GND for write-only).
- Check for timing issues if you are not using a standard library or if your microcontroller is very fast.
- Backlight Not Working:
- Confirm that pin A is connected to a positive voltage (e.g., 3.3V) and pin K to GND.
- Check for continuity in the backlight circuit.
9. Specifications
| Specification | Value |
|---|---|
| Brand | SunFounder |
| Model Name | LCD2004 |
| Model Number | 2004LCD |
| Display Type | Dot Matrix LCD |
| Characters x Lines | 20 x 4 |
| Backlight Color | White characters on Blue background |
| Working Voltage | 5V |
| Contrast | Adjustable via 50K potentiometer |
| Module Dimensions | 97 x 59 x 12 mm |
| Viewing Area Size | 71 x 21 mm |
| Compatible Devices | Arduino, other microcontrollers |
| Item Weight | 0.09 Pounds |
| UPC | 701715370166 |
10. Warranty
This product comes with a 1-Year Guarantee from SunFounder. Please retain your proof of purchase for warranty claims.
11. Support
For additional information, detailed tutorials, and community support, please visit the official SunFounder Wiki:
http://wiki.sunfounder.cc/index.php?title=LCD2004_Module
You can also visit the SunFounder Store on Amazon for more products and resources.


