1. Introduction
The YXQ PG29 Cable Gland Joints are designed to provide secure and waterproof sealing for cables passing through machinery control boxes, distribution panels, electrical appliances, and other equipment. Featuring a special design for the clamping die and rubber part, these glands offer a wide clamping range and strong stretching resistance, ensuring no damage to cables or devices during installation and use. The design allows for direct cable insertion without disassembly, simplifying the installation process and saving time.

Figure 1: Three YXQ PG29 Cable Gland Joints. These black plastic connectors are designed for securing and sealing cables.
2. Product Overview and Components
The PG29 cable gland consists of several key components that work together to provide a secure and waterproof seal. Understanding each part is crucial for proper installation.

Figure 2: Exploded view of the PG29 Cable Gland components. From left to right: sealing washer, lock nut, main body (with thread), clamping claw/rubber insert, and cap nut.
- Cap Nut: The top part that tightens down to compress the clamping claw and rubber insert.
- Clamping Claw / Rubber Insert: This flexible component compresses around the cable to provide strain relief and a watertight seal.
- Main Body: The threaded part that passes through the equipment panel, housing the clamping components.
- Lock Nut: Secures the main body to the equipment panel from the inside.
- Sealing Washer: Placed between the main body and the equipment panel to enhance the waterproof seal.
3. Technical Specifications
The YXQ PG29 Cable Gland is engineered with precise dimensions and material properties to ensure optimal performance.
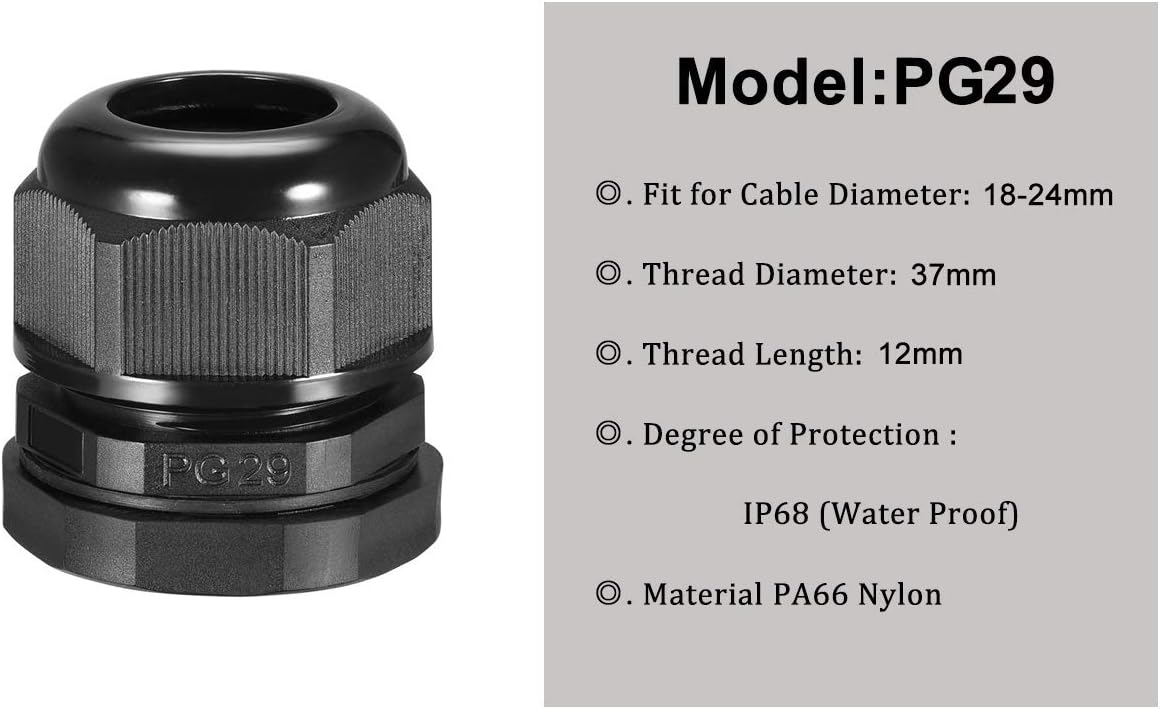
Figure 3: Specific dimensions and features for the PG29 Cable Gland, including cable diameter range, thread diameter, thread length, and IP68 waterproof rating.
- Product Name: Cable Gland
- Model: PG29
- Cable Range: 18-24mm / 0.71" - 0.94"
- Thread Diameter: 37mm
- Thread Length: 12mm
- Total Size (H*D): 48 x 49mm / 1.9" x 2.0"
- Material: PA66 Nylon Plastic
- Color: Black
- Degree of Protection: IP68 (Waterproof)
- Weight (per piece): Approximately 36g (108g for 3 pieces)
- Package Content: 3 x PG29 Cable Gland
For reference, a comprehensive table of specifications for various PG models is provided below:

Figure 4: Detailed product specifications table for different PG model cable glands, including cable range, thread outer diameter, and thread length.
4. Setup and Installation
Follow these steps for proper installation of the YXQ PG29 Cable Gland to ensure a secure and waterproof connection.

Figure 5: Visual guide demonstrating the installation method for cable glands, from preparing the hole to securing the cable.
- Prepare the Mounting Hole: Ensure the panel or enclosure has a circular hole with a diameter appropriate for the PG29 thread (approximately 37mm). Use a caliper to verify the hole size (as shown in Figure 5, step 1).
- Disassemble the Gland (Optional): While the design allows for direct cable insertion, for initial mounting, you may separate the main body from the cap nut and clamping components.
- Insert Main Body: Insert the threaded main body of the cable gland through the prepared hole from the outside of the enclosure. Place the sealing washer on the outside of the enclosure, between the gland body and the panel, if not already integrated.
- Secure with Lock Nut: From the inside of the enclosure, thread the lock nut onto the main body and tighten it firmly to secure the gland to the panel (as shown in Figure 5, step 4).
- Insert Cable: Pass the cable through the cap nut, then through the clamping claw/rubber insert, and finally through the main body of the gland (as shown in Figure 5, step 5). Ensure the cable is centered.
- Tighten Cap Nut: Hand-tighten the cap nut onto the main body. As you tighten, the clamping claw and rubber insert will compress around the cable, providing strain relief and a waterproof seal. Continue tightening until the cable is firmly gripped and the seal is secure (as shown in Figure 5, step 6). Do not overtighten, as this can damage the gland or the cable.
5. Operating Instructions
Once installed, the PG29 cable gland operates by maintaining a tight seal around the cable. No further operational steps are typically required beyond initial installation.
- Verify Seal: After installation, gently tug on the cable to ensure it is securely held and cannot be easily pulled out. Visually inspect the area where the cable enters the gland for any gaps.
- Waterproof Integrity: For applications requiring IP68 protection, ensure all components are correctly seated and tightened. The IP68 rating signifies protection against dust ingress and continuous immersion in water under specified conditions.
- Cable Adjustment: If the cable needs to be adjusted or replaced, loosen the cap nut, make the necessary changes, and then re-tighten the cap nut to re-establish the seal.
6. Maintenance
The YXQ PG29 Cable Gland is designed for durability and requires minimal maintenance. Regular inspection can help ensure its long-term performance.
- Periodic Inspection: Periodically check the cable gland for any signs of wear, cracking, or damage, especially in environments exposed to extreme temperatures, UV radiation, or chemicals.
- Tightness Check: Over time, vibrations or temperature fluctuations might slightly loosen the cap nut. Periodically check and re-tighten the cap nut if necessary to maintain the seal.
- Cleaning: Clean the exterior of the cable gland with a damp cloth if dirt or debris accumulates. Avoid using harsh chemicals that could degrade the plastic material.
- Replacement: If any component of the cable gland appears damaged or the seal is compromised, replace the entire gland to ensure continued protection.
7. Troubleshooting
If you encounter issues with your YXQ PG29 Cable Gland, consider the following common problems and their solutions.
| Problem | Possible Cause | Solution |
|---|---|---|
| Cable is not secure / Slips out | Cap nut not tightened sufficiently. Cable diameter is too small for the gland's range. | Tighten the cap nut firmly. Ensure the cable diameter is within the 18-24mm range for PG29. Use a smaller gland size if necessary. |
| Water leakage / Not waterproof | Cap nut not tightened enough. Sealing washer is missing or damaged. Cable insulation is damaged. Incorrect cable diameter. | Re-tighten the cap nut. Check for and replace missing/damaged sealing washer. Inspect cable for damage; repair or replace if necessary. Verify cable diameter is within specified range. |
| Difficulty inserting cable | Cable diameter is too large for the gland's range. Clamping claw/rubber insert is misaligned. | Ensure cable diameter is within 18-24mm. Use a larger gland size if needed. Check alignment of internal components. |
| Gland does not fit mounting hole | Mounting hole diameter is incorrect. | Verify mounting hole diameter is approximately 37mm. Adjust hole size if necessary. |
8. Warranty and Support
YXQ products are manufactured to high quality standards. While specific warranty details are not provided in this manual, customers are encouraged to refer to the retailer's return policy or contact YXQ customer support for assistance with product-related inquiries or issues.
For further support, please visit the official YXQ store or contact your point of purchase.
- Online Store: YXQ Official Store on Amazon


