AUTOOL C100
AUTOOL C100 Fuel Injector Cleaner Kit User Manual
Model: AUTOOL C100 | Brand: AUTOOL
Product Overview
The AUTOOL C100 Fuel Injector Cleaner Kit is a professional automotive tool designed for non-dismantle cleaning of fuel systems in gasoline engines. This comprehensive kit facilitates the removal of carbon deposits from fuel injectors, air intake systems, and three-way catalytic converters, improving engine performance and reducing emissions. It features high and low-pressure cleaning functions with an adjustable pressure gauge up to 150 PSI, and includes a 1000ml stainless steel cleaning canister. The kit comes with a wide range of adapters, making it compatible with most cars and light trucks in the EU, Asia, and the USA.
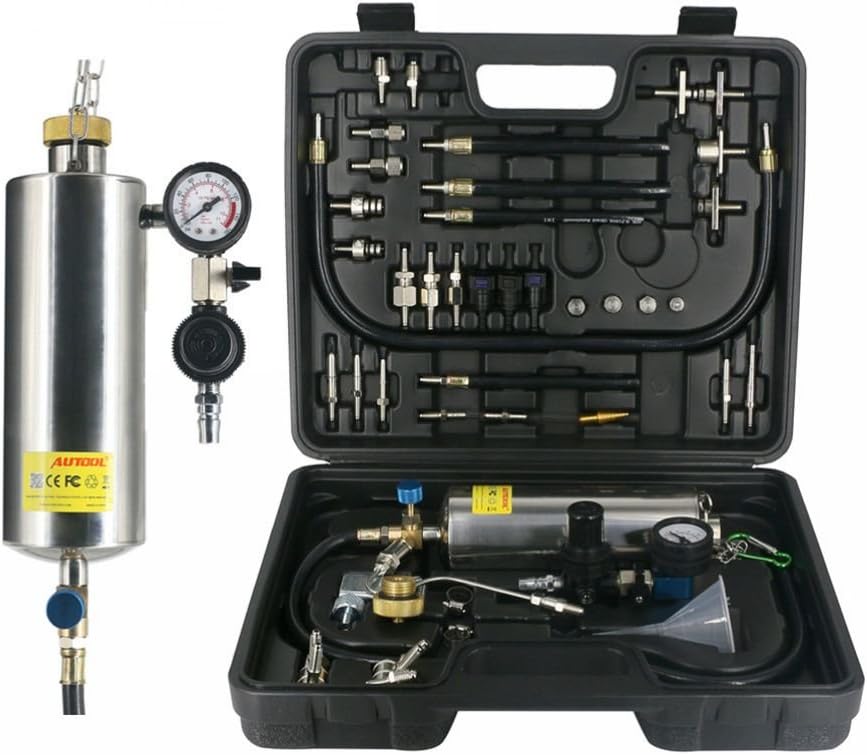
Image: The AUTOOL C100 Fuel Injector Cleaner Kit, showcasing the main cleaning canister and the comprehensive adapter set within its durable carrying case.

Image: Overview of the AUTOOL C100 Fuel System Cleaner's key features, including fuel system cleaning, intake system cleaning, TWC cleaning, working pressure adjustment, ease of operation, and non-dismantling design.
Safety Precautions
- Always ensure the engine is cool before starting any cleaning procedure.
- Wear appropriate personal protective equipment (PPE), including safety glasses and gloves.
- Perform cleaning in a well-ventilated area to avoid inhaling fumes.
- Ensure all connections are secure to prevent leaks of cleaning fluid or fuel.
- DO NOT use with diesel engines or diesel cleaning fluids.
- The kit is designed for gasoline engines only. Use only recommended automotive fuel system cleaning solutions.
Kit Contents
The AUTOOL C100 kit includes the following main components and accessories:
- 1000ml Stainless Steel Cleaning Canister with Pressure Gauge and Regulator
- High-Pressure and Low-Pressure Cleaning Hoses
- Various Adapters and Connectors for different vehicle models (EU, Asia, USA)
- One-Way Valves
- Durable Blow-Molded Carrying Case
- Addition Funnel

Image: A detailed view of the various adapters and connectors included in the AUTOOL C100 kit, designed for broad compatibility with different vehicle fuel systems.

Image: A diagram illustrating the main components of the AUTOOL C100 kit, including the cleaning canister, pressure gauge, air supply connection, and various hoses and adapters.
Setup and Preparation
- Prepare the Vehicle: Ensure the engine is off and cool. Locate the fuel rail and identify the fuel inlet and return lines.
- Hang the Device: Use the integrated chain and hook to securely hang the cleaning canister under the vehicle's hood.
Video: Demonstrates the setup process, including hanging the cleaning canister and connecting the air source.
- Add Cleaning Detergent: Unscrew the top cap of the cleaning canister and carefully pour the appropriate gasoline fuel system cleaning detergent into the 1000ml tank. Securely close the cap.
- Connect Air Source: Connect an external air compressor to the air supply connection on the cleaning canister. The pressure gauge will display the current pressure.
- Select and Install Cleaning Connector: Choose the correct adapter from the kit that matches your vehicle's fuel system. Install the cleaning connector onto the appropriate hose.
- Connect to Vehicle: Connect the cleaning hose with the selected adapter to the vehicle's fuel system. Ensure all connections are tight and secure to prevent leaks.
Operating Instructions
Fuel System Cleaning (Non-Dismantle)
- Bypass Fuel Pump: Disable the vehicle's fuel pump by removing its fuse or relay. This prevents the vehicle's fuel pump from interfering with the cleaning process.
- Connect to Fuel Rail: Connect the appropriate adapter and hose from the AUTOOL C100 kit to the vehicle's fuel rail. For vehicles with a fuel return line, ensure it is properly blocked or connected to a suitable return container to prevent backflow.
- Adjust Pressure: Slowly adjust the pressure regulator on the cleaning canister to the recommended pressure for your vehicle's fuel system (typically between 40-60 PSI, but refer to vehicle service manual). The maximum adjustable pressure is 150 PSI.

Image: Illustration of the working pressure adjustment feature on the AUTOOL C100, showing the pressure gauge and the 1000ml stainless steel tank.
- Start Engine: Start the vehicle's engine. The engine will now run on the cleaning fluid from the AUTOOL C100 kit.
- Monitor Cleaning: Allow the engine to run until the cleaning fluid in the canister is nearly depleted. Monitor the pressure gauge to ensure consistent pressure. The cleaning process typically takes 10-20 minutes depending on the amount of fluid and engine size.
- Shut Down: Once cleaning is complete, turn off the engine. Close the valve on the cleaning canister.
- Disconnect: Carefully disconnect the cleaning kit from the vehicle's fuel system. Reinstall the fuel pump fuse/relay and reconnect the original fuel lines.
- Test Run: Start the vehicle and check for any leaks or abnormal operation.
Air Intake System Cleaning
- Prepare: Ensure the engine is off and cool. Locate the air intake manifold.
- Connect: Use the appropriate cleaning connector to spray cleaning fluid directly into the air intake system. This may involve removing an air hose or accessing a vacuum port.
- Apply Fluid: With the engine running at idle, slowly spray the cleaning fluid into the air intake. Follow the cleaning fluid manufacturer's instructions for application rate and duration.
- Post-Cleaning: After applying the fluid, allow the engine to run for a few minutes to ensure all fluid is consumed and carbon deposits are burned off.
Three-Way Catalytic Converter (TWC) Cleaning
TWC cleaning is typically performed in conjunction with fuel system cleaning, as the cleaning fluid passes through the catalytic converter during the process. Ensure the engine reaches operating temperature during the fuel system cleaning to facilitate the TWC cleaning.

Image: Visual representation of the three primary cleaning functions: Fuel System Cleaning, Intake System Cleaning, and TWC Converter Cleaning.

Image: Before and after comparison images demonstrating the effectiveness of the cleaning process on engine components, showing reduced carbon deposits.
Maintenance
- Clean After Use: After each use, thoroughly clean the cleaning canister, hoses, and adapters to remove any residual cleaning fluid. This prevents corrosion and extends the lifespan of the kit.
- Store Properly: Store all components in the provided blow-molded plastic case in a dry, cool place, away from direct sunlight and extreme temperatures.
- Inspect Regularly: Periodically inspect hoses for cracks or wear, and check adapters for damage. Replace any worn or damaged parts immediately.
- Pressure Gauge Calibration: While the pressure gauge is durable, consider professional calibration if you suspect inaccuracies over time.
Troubleshooting
| Problem | Possible Cause | Solution |
|---|---|---|
| No pressure or low pressure from canister. |
|
|
| Cleaning fluid not flowing. |
|
|
| Engine not starting or running rough after cleaning. |
|
|
Specifications
- Model: AUTOOL C100
- Canister Capacity: 1000 ml
- Max. Pressure: 150 PSI (10 kg/cm²)
- Material: High-pressure, high-quality stainless steel (canister), Brass (main parts/fittings), High-quality rubber (connecting hose)
- Compatibility: Gasoline engines only (not for diesel injectors)
- Application: Fuel Injector Cleaning, Air Intake System Cleaning, Three-Way Catalytic Converter Cleaning
- Item Weight: 8.58 pounds
- Package Dimensions: 17.5 x 13 x 4.5 inches
- Country of Origin: China
Warranty and Support
For warranty information, technical support, or any inquiries regarding your AUTOOL C100 Fuel Injector Cleaner Kit, please refer to the official AUTOOL documentation or contact AUTOOL customer service directly.
A digital version of the user guide is available for download: User Guide (PDF)
You can also visit the official AUTOOL store for more information: AUTOOL Store
Related Documents - C100
 |
AUTOOL CT500 GDI Fuel Injector Cleaner & Tester User Manual This user manual provides comprehensive instructions for the AUTOOL CT500 GDI Fuel Injector Cleaner & Tester, a professional automotive diagnostic and cleaning equipment. It details operation, safety guidelines, product features, and maintenance procedures for efficient fuel injector servicing. |
 |
AUTOOL CT500 GDI Fuel Injector Cleaner & Tester User Manual The AUTOOL CT500 GDI Fuel Injector Cleaner & Tester User Manual provides comprehensive instructions for operating and maintaining this mechatronics product, designed for ultrasonic cleaning and diagnostic testing of fuel injectors in automobiles and motorcycles. |
 |
AUTOOL CT160 User Manual: Auto Fuel Injector Cleaner & Tester Comprehensive user manual for the AUTOOL CT160, a professional mechatronics device for ultrasonic cleaning and diagnostic testing of automotive and motorcycle fuel injectors. Learn about its functions, features, operation, and maintenance for optimal vehicle performance. |
 |
AUTOOL CT500 GDI Fuel Injector Cleaner & Tester User Manual Explore the AUTOOL CT500 GDI Fuel Injector Cleaner & Tester, a professional mechatronics device for comprehensive cleaning and diagnostic testing of fuel injectors in automobiles and motorcycles. This user manual provides detailed instructions for operation, maintenance, and troubleshooting. |
 |
AUTOOL CT450 Fuel Injector Cleaner & Tester User Manual Comprehensive user manual for the AUTOOL CT450 Fuel Injector Cleaner & Tester, detailing its functions, operation, safety precautions, and maintenance for automotive professionals. |
 |
AUTOOL CT450 Fuel Injector Cleaner & Tester User Manual User manual for the AUTOOL CT450, a fuel injector cleaner and tester. This guide provides detailed information on product overview, safety rules, operating instructions, and technical specifications for automotive repair professionals. |
Ask a question about this manual
Ask about setup, troubleshooting, compatibility, parts, safety, or missing instructions. Manuals+ will review the question and use this page’s manual context to help answer it.