
Hansa 40559173
Hansa Varox Pro Square Built-in Shower Mixer Instruction Manual
Model: 40559173
1. Introduction
Thank you for choosing the Hansa Varox Pro Square Built-in Shower Mixer. This manual provides essential information for the safe and efficient installation, operation, and maintenance of your new shower mixer. Please read these instructions carefully before installation and retain them for future reference.
2. Safety Information
Always observe the following safety precautions to prevent injury or damage to the product:
- Installation should only be performed by a qualified professional plumber in accordance with local plumbing codes and regulations.
- Ensure the main water supply is turned off before beginning any installation or maintenance work.
- Protect the product from frost. Freezing water can cause damage.
- Do not use abrasive cleaners, solvents, or scouring pads on the chrome finish, as this can cause irreparable damage.
- Check all connections for leaks after installation and before concealing the unit.
3. Package Contents
Please verify that all components are present and undamaged before proceeding with installation.
- Hansa Varox Pro Built-in Shower Mixer Unit (Model: 40559173)
- Mounting hardware (screws, seals, etc.)
- Installation template (if applicable)
- Instruction Manual (this document)
Note: The shower handle/trim kit is typically sold separately for built-in mixers.
4. Installation and Setup
This section outlines the general steps for installing your Hansa Varox Pro Built-in Shower Mixer. Due to the complexity of built-in plumbing, professional installation is highly recommended.
4.1 Pre-Installation Checks
- Ensure adequate space within the wall for the mixer body.
- Verify water supply lines (hot and cold) are accessible and correctly positioned.
- Flush water lines thoroughly to remove any debris before connecting the mixer.
4.2 Mounting the Mixer Body
- Turn off the main water supply.
- Using the provided template (if any), mark the precise location for the mixer body within the wall.
- Secure the mixer body firmly to the wall studs or a suitable mounting frame, ensuring it is level and at the correct depth for the finished wall surface.
- Connect the hot and cold water supply lines to the designated inlets on the mixer body. Ensure proper sealing with appropriate plumbing tape or sealant.
- Connect the outlet pipe(s) to the showerhead or other shower components.
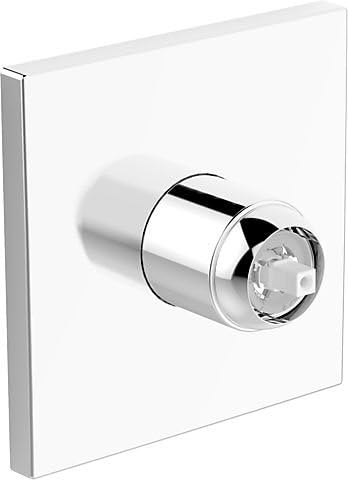
Image: The Hansa Varox Pro Square Built-in Shower Mixer, model 40559173, featuring its sleek chrome finish and square backplate, designed for concealed installation within a wall. The central cylindrical component houses the internal mixing mechanism.
4.3 Testing for Leaks
- Once all connections are made, slowly turn on the main water supply.
- Carefully inspect all connections for any signs of leaks. Tighten connections as necessary.
- Allow water to run through the mixer for a few minutes to flush out any air or debris.
5. Operation
The Hansa Varox Pro Built-in Shower Mixer is designed for intuitive control of water flow and temperature. While the handle is sold separately, the internal mechanism supports single-handle operation.
- Flow Control: Typically, pushing the handle towards the wall or rotating it controls the water flow.
- Temperature Control: Rotating the handle left or right adjusts the water temperature. Left for hotter, right for colder (standard plumbing configuration).
- Familiarize yourself with the specific operation of your chosen trim kit and handle.
6. Maintenance
Regular cleaning and maintenance will ensure the longevity and optimal performance of your shower mixer.
6.1 Cleaning the Chrome Finish
- Clean the chrome surfaces regularly with a soft cloth and mild soap or a non-abrasive cleaner specifically designed for chrome fixtures.
- Rinse thoroughly with clean water and dry immediately with a soft cloth to prevent water spots.
- Do NOT use: Abrasive cleaners, scouring pads, acids, ammonia-based cleaners, or harsh chemicals, as these will damage the chrome finish.
6.2 Descaling
- In areas with hard water, limescale buildup can affect performance.
- If water flow is reduced or temperature control becomes erratic, the internal cartridge may need descaling or replacement. This should be performed by a qualified professional.
7. Troubleshooting
Before contacting customer service, please refer to the following common issues and their potential solutions:
| Problem | Possible Cause | Solution |
|---|---|---|
| Low water flow | Clogged aerator/showerhead, debris in pipes, limescale buildup in cartridge. | Clean or replace showerhead/aerator. Flush water lines. Descale or replace cartridge (professional service recommended). |
| Inconsistent water temperature | Imbalance in hot/cold water pressure, faulty thermostatic cartridge, limescale buildup. | Check water pressure. Descale or replace cartridge (professional service recommended). |
| Leaks from mixer body | Loose connections, damaged seals/O-rings, faulty cartridge. | Turn off water supply. Check and tighten connections. Inspect and replace seals/O-rings. Replace cartridge (professional service recommended). |
| No water flow | Main water supply off, clogged pipes, severely damaged cartridge. | Check main water supply. Inspect pipes for blockages. Replace cartridge (professional service recommended). |
If the problem persists after attempting these solutions, please contact a qualified plumber or Hansa customer support.
8. Specifications
| Brand | Hansa |
| Model Number | 40559173 |
| Product Type | Built-in Shower Mixer (without handle) |
| Finish | Chrome |
| Item Weight | 1.64 kilograms |
| Number of Handles Supported | 1 (for single-handle operation) |
| ASIN | B071DT51CK |
9. Warranty and Support
For information regarding the product warranty, please refer to the warranty card included with your purchase or visit the official Hansa website.
For technical support or spare parts inquiries, please contact Hansa customer service through their official channels. Keep your proof of purchase and model number (40559173) ready when contacting support.
Hansa Official Website: www.hansa.com (Please note: This is a general placeholder link. Refer to your product documentation for the exact regional website.)
Related documents40559173


Ask a question about this manual
Ask about setup, troubleshooting, compatibility, parts, safety, or missing instructions. Manuals+ will review the question and use this page’s manual context to help answer it.