
1. Introduction
This manual provides comprehensive instructions for the safe and effective use of your Bialetti Moka Express Espresso Maker, Model 4942. Designed for stovetop use, this 3-cup capacity espresso maker is crafted from aluminum and features a plastic handle and knob. It is compatible with all stovetops except induction. Please read these instructions carefully before first use and retain them for future reference.

Image: The Bialetti Moka Express Espresso Maker in Passion Red, showcasing its classic design and components.
2. Setup and First Use
Before using your Moka Express for the first time, it is essential to clean it thoroughly to remove any manufacturing residues and prepare it for optimal performance.
- Disassembly: Unscrew the upper chamber from the base. Remove the filter funnel and the rubber gasket and filter plate from the upper chamber.
- Initial Cleaning: Wash all parts with warm water without using detergents. Detergents can damage the aluminum and affect the coffee flavor. Rinse thoroughly.
- First Brews (Seasoning): To season the Moka pot, brew coffee 2-3 times and discard the coffee. This process helps to build up a protective layer inside the pot, enhancing future coffee flavor.
- Assembly: Ensure all parts are dry. Reassemble the filter plate and gasket into the upper chamber, then insert the filter funnel into the base. Screw the upper chamber firmly onto the base.


Image: Close-up views of the Moka Express safety valve and handle, highlighting key components.
3. Operating Instructions
Follow these steps to brew a perfect cup of espresso with your Bialetti Moka Express.
- Fill the Base: Fill the lower chamber with cold water up to the level of the safety valve. Do not exceed the valve.
- Add Coffee: Insert the filter funnel into the lower chamber. Fill the funnel with medium-fine ground coffee. Do not tamp the coffee. Level the grounds gently.
- Assemble and Heat: Screw the upper chamber firmly onto the base, ensuring a tight seal. Place the Moka Express on a stovetop burner over medium heat. Keep the handle away from direct heat.
- Brewing: Water will heat and rise through the coffee grounds into the upper chamber. You will hear a gurgling sound as the coffee brews. Once the upper chamber is full, remove the Moka Express from the heat immediately.
- Serve: Pour the freshly brewed espresso into cups and enjoy.

Image: Illustration showing the water filling step for the Moka pot.
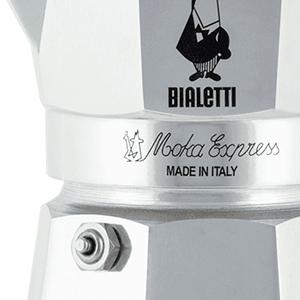
Image: Illustration showing the ground coffee adding step for the Moka pot.

Image: Illustration showing the heating step for the Moka pot on a stovetop.

Image: Illustration showing a person enjoying coffee brewed with a Moka pot.
Note on Induction Cooktops: This Moka Express model is not compatible with induction cooktops. An induction adapter plate (sold separately) is required for use on induction surfaces.

Image: An induction adapter plate, necessary for using aluminum Moka pots on induction cooktops.
4. Maintenance and Cleaning
Proper maintenance ensures the longevity and optimal performance of your Moka Express.
- After Each Use: Allow the Moka Express to cool completely. Disassemble all parts. Wash with warm water only. Do not use detergents or abrasive materials, as they can damage the aluminum and affect the coffee flavor.
- Drying: Dry all components thoroughly before reassembling and storing to prevent oxidation and mineral buildup.
- Gasket and Filter Replacement: Periodically inspect the rubber gasket and filter plate for wear. Replace them if they appear brittle, cracked, or if you notice leaks during brewing. Genuine Bialetti replacement parts are recommended.
- Storage: Store the disassembled Moka Express in a dry place.

Image: Graphic indicating the recommendation to use zero detergents for cleaning the Moka pot.
5. Troubleshooting
Refer to this section for solutions to common issues.
| Problem | Possible Cause | Solution |
|---|---|---|
| Coffee does not brew or brews slowly. |
|
|
| Water leaks from the side. |
|
|
| Coffee tastes burnt or bitter. |
|
|
6. Specifications
- Model Name: Moka Express
- Model Number: 4942
- Brand: Bialetti
- Capacity: 3 Cups
- Material: Aluminum, Plastic (handle/knob)
- Color: Passion Red
- Product Dimensions: 3"D x 3"W x 5"H
- Item Weight: 1.01 pounds
- Compatibility: All stovetops except induction (induction adapter required for induction cooktops)
- Origin: Made in Italy
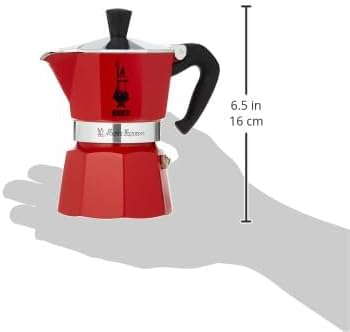
Image: The Moka Express held in a hand, illustrating its compact size and providing approximate dimensions (6.5 inches / 16 cm height).
7. Warranty and Support
Specific warranty details for the Bialetti Moka Express Model 4942 are not provided in this document. For warranty information, product support, or to purchase replacement parts, please refer to the official Bialetti website or contact Bialetti customer service directly.
Manufacturer: Bialetti
Website: www.bialetti.com (Please note: This is a placeholder link. Refer to the product packaging or official brand information for the correct support website.)


