1. Introduction and Overview
The eSSL KartString Biometric Time Attendance Machine is designed to provide efficient and secure time management and access control for organizations. This device utilizes fingerprint recognition technology to accurately record employee attendance, ensuring only authorized individuals are tracked. It features a clear display, a user-friendly keypad, and robust data storage capabilities, making it an essential tool for modern workforce management.
This manual provides detailed instructions for the setup, operation, and maintenance of your eSSL KartString Biometric Time Attendance Machine.
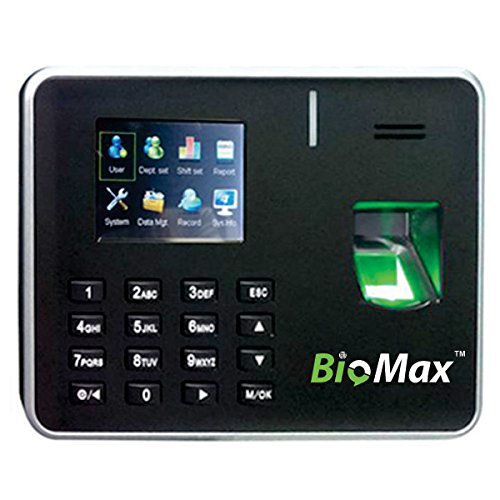
Figure 1: Front view of the eSSL KartString Biometric Time Attendance Machine, showing the display, keypad, and fingerprint sensor.
2. Product Features
- Fingerprint Recognition: Secure and accurate biometric identification for attendance.
- High Transaction Storage: Capable of storing up to 100,000 attendance records.
- Color TFT Display: A 2.8-inch color display for clear user interface and information display.
- Multiple Communication Methods: Supports TCP/IP for network connectivity and USB-host for data transfer.
- Integrated Keypad: Soft buttons for password entry and menu navigation.
- Compact Design: Measures approximately 183 x 45 x 138 mm, suitable for various installation environments.
- Cloud-Based Software: Includes 6 months of cloud-based attendance management software by KartString for enhanced data management and reporting.
3. Setup Instructions
Follow these steps to set up your eSSL KartString Biometric Time Attendance Machine:
- Unpacking: Carefully remove the device from its packaging and ensure all components are present.
- Mounting (Optional): Choose a suitable location for installation, typically near an entrance or exit. Secure the device to a wall using appropriate mounting hardware (not included, consult a professional if unsure).
- Power Connection: Connect the provided power adapter to the device's power input port and then plug it into a standard electrical outlet. The device will power on automatically.
- Network Connection (TCP/IP): For network-based data management, connect an Ethernet cable from your network router or switch to the device's LAN port.
- Initial Configuration: Upon first power-on, the device may prompt for initial setup, such as date, time, and administrator registration. Follow the on-screen instructions.
4. Operating Instructions
4.1 Administrator Registration
Before employees can use the system, an administrator must be registered to manage settings and user data.
- Press the M/OK button to access the main menu.
- Navigate to User Management or Enroll User using the arrow keys.
- Select Register Admin or similar option.
- Follow the on-screen prompts to scan the administrator's fingerprint multiple times for accurate registration.
- Assign administrator privileges as required.
4.2 Employee Fingerprint Enrollment
Each employee needs to register their fingerprint(s) to use the attendance system.
- Access the main menu as an administrator.
- Navigate to User Management or Enroll User.
- Select New User or Enroll Fingerprint.
- Enter the employee ID (if prompted) and then instruct the employee to place their finger on the sensor.
- The device will prompt the employee to lift and place their finger several times for a complete scan.
- Confirm successful enrollment.
4.3 Recording Attendance
Employees can record their attendance by simply placing their registered finger on the sensor.
- Ensure the device is powered on and in standby mode.
- The employee places their registered finger firmly on the fingerprint sensor.
- Upon successful recognition, the device will display a confirmation message (e.g., "Thank You" or "Punch In/Out Successful") and an audible prompt.
4.4 Data Management
Attendance data can be retrieved via TCP/IP network or USB-host.
- Via TCP/IP: Connect the device to your network. Use the provided cloud-based attendance management software or compatible third-party software to connect to the device and download attendance logs. Refer to the software's documentation for specific instructions.
- Via USB-Host: Insert a USB flash drive into the device's USB-host port. Navigate to Data Management or Download Data in the menu. Select the desired data (e.g., attendance logs, user data) and initiate the transfer to the USB drive.
5. Maintenance
Regular maintenance ensures optimal performance and longevity of your device.
- Cleaning the Sensor: Gently wipe the fingerprint sensor with a soft, dry, lint-free cloth. Avoid using abrasive materials or liquid cleaners directly on the sensor.
- Cleaning the Device: Use a soft, slightly damp cloth to clean the exterior of the device. Do not allow water or cleaning solutions to enter the device.
- Data Backup: Regularly back up attendance data to an external storage device (USB) or through the network software to prevent data loss.
- Software Updates: Check the eSSL website or contact support for any available firmware or software updates to ensure your device operates with the latest features and security enhancements.
6. Troubleshooting
This section addresses common issues you might encounter.
- Device Not Powering On:
- Ensure the power adapter is securely connected to both the device and a working electrical outlet.
- Verify the power outlet is functional by plugging in another device.
- Fingerprint Not Recognized:
- Ensure the finger is clean and dry.
- Place the entire pad of the registered finger firmly on the sensor.
- Try re-enrolling the fingerprint if recognition issues persist.
- Clean the fingerprint sensor as described in the Maintenance section.
- Cannot Connect to Network (TCP/IP):
- Verify the Ethernet cable is properly connected to both the device and the network router/switch.
- Check network settings on the device to ensure correct IP address, subnet mask, and gateway.
- Ensure your network router is functioning correctly.
- USB Data Transfer Failure:
- Ensure the USB flash drive is properly inserted and formatted to a compatible file system (e.g., FAT32).
- Try a different USB flash drive.
- Verify there is sufficient space on the USB drive.
If you encounter issues not covered here, please refer to the support section.
7. Specifications
| Model | KartString Biomax K 21 |
| Brand | eSSL |
| Fingerprint Sensor | Optical Sensor |
| Transaction Capacity | 100,000 Records |
| Display | 2.8 Inch Color TFT |
| Communication | TCP/IP, USB-host |
| Dimensions (L x W x H) | 183 x 45 x 138 mm (approx.) |
| Item Weight | 650 g |
| Color | Black |
8. Warranty and Support
The eSSL KartString Biometric Time Attendance Machine comes with standard manufacturer warranty. Please refer to your purchase documentation for specific warranty terms and conditions.
For technical assistance, troubleshooting, or inquiries regarding the included 6-month cloud-based attendance management software by KartString, please contact eSSL customer support or your authorized dealer. Contact information can typically be found on the eSSL official website or on your product packaging.
When contacting support, please have your product model (KartString Biomax K 21) and any relevant purchase details ready.


