1. Introduction
This manual provides essential information for the safe and efficient use of your BenQ HT8050 4K DLP UHD THX Certified Home Cinema Projector. The HT8050 delivers stunning 4K UHD resolution with 8.3 million distinct pixels, ensuring exceptional clarity and detail for an immersive home cinema experience. Its THX certification guarantees precise cinematic performance, reproducing colors and tones as intended by filmmakers.

Image: Front view of the BenQ HT8050 projector, showcasing its central lens and ventilation grilles.
2. What's in the Box
Verify that all items are present in the packaging before proceeding with setup.
- BenQ HT8050 Projector Unit
- Power Cord
- Remote Control with Batteries
- Lens Cap
- User Manual (this document)
3. Setup
3.1 Projector Placement
Position the projector on a stable, level surface or mount it securely to the ceiling. Ensure adequate ventilation around the unit. The distance from the screen will determine the image size. Refer to the specifications section for throw ratio details.

Image: BenQ HT8050 projector installed in a home cinema environment, projecting an image onto a large screen.
3.2 Connecting Power
- Connect the power cord to the projector's power inlet.
- Plug the other end of the power cord into a grounded electrical outlet.
- Ensure the power switch on the projector (if present) is in the 'On' position.
3.3 Connecting Input Sources
The HT8050 features multiple input ports for various devices. Use HDMI for high-definition video and audio sources such as Blu-ray players, gaming consoles, and streaming devices.
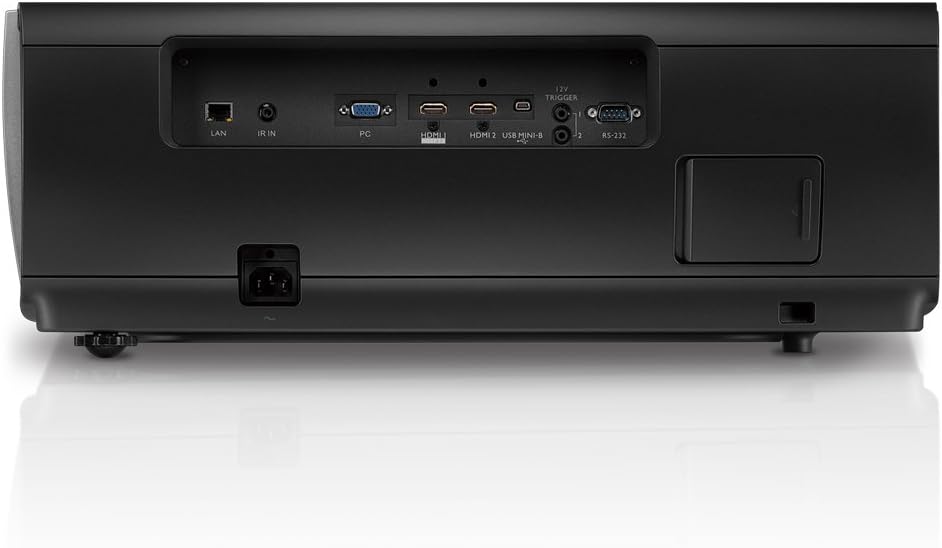
Image: Rear panel of the BenQ HT8050 projector, displaying various input and output ports including HDMI, LAN, PC, and RS-232.
- Connect an HDMI cable from your source device to one of the HDMI ports on the projector.
- For other devices, use the appropriate cables and ports (e.g., PC input).
3.4 Initial Image Adjustment
After powering on, adjust the image for optimal clarity and alignment.

Image: Top view of the BenQ HT8050 projector, highlighting the manual lens shift and zoom adjustment dials.
- Focus Ring: Rotate the focus ring around the lens until the image is sharp.
- Zoom Ring: Adjust the zoom ring to achieve the desired image size.
- Lens Shift: Use the lens shift controls (typically dials on the top or side) to vertically and horizontally adjust the image position without moving the projector.
- Keystone Correction: If the image appears trapezoidal, use the keystone correction feature in the projector's menu to square the image.
4. Operating the Projector
4.1 Power On/Off
- Power On: Press the power button on the projector or the remote control. The power indicator light will change.
- Power Off: Press the power button twice. The projector will enter a cooling down cycle before completely shutting off. Do not unplug the projector during the cooling cycle.
4.2 Remote Control Functions
The remote control provides full access to all projector functions. Point the remote control towards the projector's IR receiver.
- Input Source: Press the "Source" button to cycle through available input connections (HDMI 1, HDMI 2, PC, etc.).
- Menu: Access the On-Screen Display (OSD) menu for advanced settings.
- Navigation Buttons: Use the arrow keys to navigate through menu options.
- Enter/OK: Confirm selections.
- Back/Exit: Return to the previous menu or exit the OSD.
- Picture Mode: Select predefined picture settings (e.g., Cinema, THX, User).
4.3 On-Screen Display (OSD) Menu
The OSD menu allows for detailed configuration of the projector's settings.
- Picture: Adjust brightness, contrast, color, tint, sharpness, and select picture modes.
- Display: Configure aspect ratio, resolution, and keystone correction.
- Installation: Settings for projector orientation (front/rear, ceiling/table), lens shift, and test patterns.
- Lamp: View lamp hours and select lamp modes (Normal, Eco, SmartEco).
- System: General settings like language, menu position, and factory reset.
5. Maintenance
5.1 Cleaning the Projector
- Exterior: Use a soft, lint-free cloth dampened with a mild cleaning solution. Do not use abrasive cleaners or solvents.
- Lens: Gently wipe the lens with a lens cleaning cloth or lens paper. Avoid touching the lens surface with your fingers.
- Ventilation Grilles: Periodically clean the ventilation grilles with a soft brush or vacuum cleaner to prevent dust buildup, which can affect cooling performance.
5.2 Lamp Replacement
The projector lamp has a finite lifespan. When the lamp life is nearing its end, a warning message may appear, or the image brightness may decrease significantly. Refer to the full service manual for detailed lamp replacement instructions. Always use genuine BenQ replacement lamps.
- Power off the projector and unplug the power cord.
- Allow the projector to cool down completely (at least 30 minutes).
- Locate the lamp cover (refer to the diagram in the full manual).
- Remove the screw(s) securing the lamp cover and open it.
- Carefully remove the old lamp module.
- Insert the new lamp module, ensuring it is seated correctly.
- Replace the lamp cover and secure it with the screw(s).
- Plug in the power cord and power on the projector. Reset the lamp timer in the OSD menu.
6. Troubleshooting
This section addresses common issues you might encounter. For more complex problems, contact BenQ customer support.
| Problem | Possible Cause | Solution |
|---|---|---|
| No image on screen |
|
|
| Remote control not working |
|
|
| Image is blurry |
|
|
7. Specifications
Key technical specifications for the BenQ HT8050 projector.
| Feature | Detail |
|---|---|
| Brand | BenQ |
| Model Number | HT8050 |
| Display Resolution | 3840 x 2160 (4K UHD) |
| Connectivity Technology | HDMI |
| Recommended Uses | Home Cinema |
| Item Weight | 32.6 pounds |
| Product Dimensions | 22.2 x 18.5 x 8.9 inches |
| Special Features | 4K UHD with 8.3 million Pixel detail, THX certification, Optimized lens, True zoom and focus sync |
8. Warranty and Support
BenQ provides a limited warranty for this product. For detailed warranty terms and conditions, please refer to the warranty card included with your product or visit the official BenQ website. For technical support, service, or inquiries, please contact BenQ customer service through their official channels.
Official BenQ Website: www.benq.com


