Introduction
Welcome to the user manual for your iRV Technology iRV66 RV Radio Stereo. This comprehensive guide provides detailed instructions for the installation, operation, and maintenance of your new entertainment system. The iRV66 is designed to provide high-quality audio and video entertainment in your recreational vehicle, featuring AM/FM radio, CD/DVD playback, MP3/MP4/USB/SD compatibility, HDMI connectivity, Digital 5.1 Surround Sound, and Bluetooth capabilities across three independent zones.
Please read this manual thoroughly before operating the unit to ensure proper use and to maximize your enjoyment of its features. Keep this manual for future reference.
Key Features
- RV DVD Player with 5.1 channels Surround sound for an immersive audio experience.
- Bluetooth 4.1 with phone app control for seamless wireless audio streaming and device management.
- Three HDMI outputs with Audio Return Channel (ARC) for versatile display connections.
- Two HDMI inputs, including one conveniently located on the front panel for easy access.
- USB port for media playback and device charging.
- SD card slot for additional media playback options.
- AM/FM tuner for radio reception.
- Three independent speaker zones for customized audio distribution.
What's in the Box
Upon unpacking, please verify that all the following items are included:
- iRV66 RV Radio Stereo Unit
- Remote Control
- Wiring Harnesses (including adaptors for Concertone ZX500/600/690/700 and Genesis GT-3.0)
- Operation Manual

Image: The iRV66 unit's included accessories, showing the remote control, various wiring harnesses, and the operation manual.
Product Overview
Front Panel

Image: Front panel of the iRV66 unit, displaying the power button, speaker zone selectors, disc slot, display screen, control buttons (SRC, AM/FM, Clock, Setup, Mute, Audio), volume and select knobs, and front input ports.
The front panel provides access to all primary controls and inputs. Key elements include:
- Power Button: Turns the unit on or off.
- Speaker Zone Buttons (1, 2, 3): Activates or deactivates individual speaker zones.
- BT Button: Initiates Bluetooth pairing mode.
- Disc Slot: For inserting CDs and DVDs.
- Eject Button: Ejects discs from the slot.
- SRC (Source) Button: Cycles through input sources (AM/FM, CD, DVD, USB, SD, HDMI, Bluetooth).
- AM/FM Button: Selects between AM and FM radio bands.
- Clock Button: Displays and sets the time.
- Setup Button: Accesses system settings and configurations.
- Mute Button: Mutes or unmutes audio output.
- Audio Button: Adjusts audio settings like bass, treble, balance, and fader.
- Volume Knob: Adjusts the master volume level.
- Select Knob: Navigates menus and confirms selections.
- Playback Control Buttons: Play/Pause, Stop, Skip Forward/Backward, Fast Forward/Rewind.
Front Input Ports
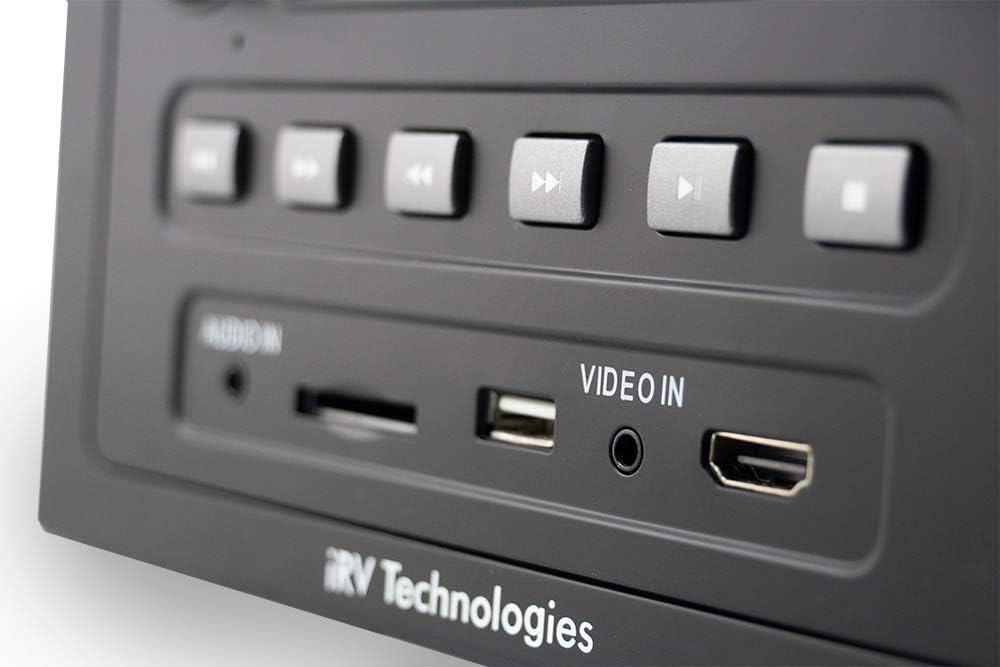
Image: A detailed view of the front panel's input section, highlighting the Audio In (3.5mm jack), SD card slot, USB port, Video In (3.5mm jack), and HDMI In port.
The front panel features convenient input ports for various media and devices:
- Audio In: 3.5mm auxiliary input for external audio devices.
- SD: SD card slot for playing media files.
- USB: USB port for playing media files from USB drives and charging compatible devices.
- Video In: 3.5mm auxiliary input for external video sources.
- HDMI In: HDMI input for connecting external HDMI devices like game consoles or streaming sticks.
Rear Panel and Connections

Image: The back of the iRV66 unit, displaying multiple RCA audio and video output jacks, along with other connectors for power and speakers.
The rear panel houses the main power, speaker, and additional audio/video connections. These are crucial for integrating the iRV66 into your RV's entertainment system.
Setup & Installation
Proper installation is key to the performance of your iRV66 unit. It is recommended that installation be performed by a qualified technician.
Wiring Diagram
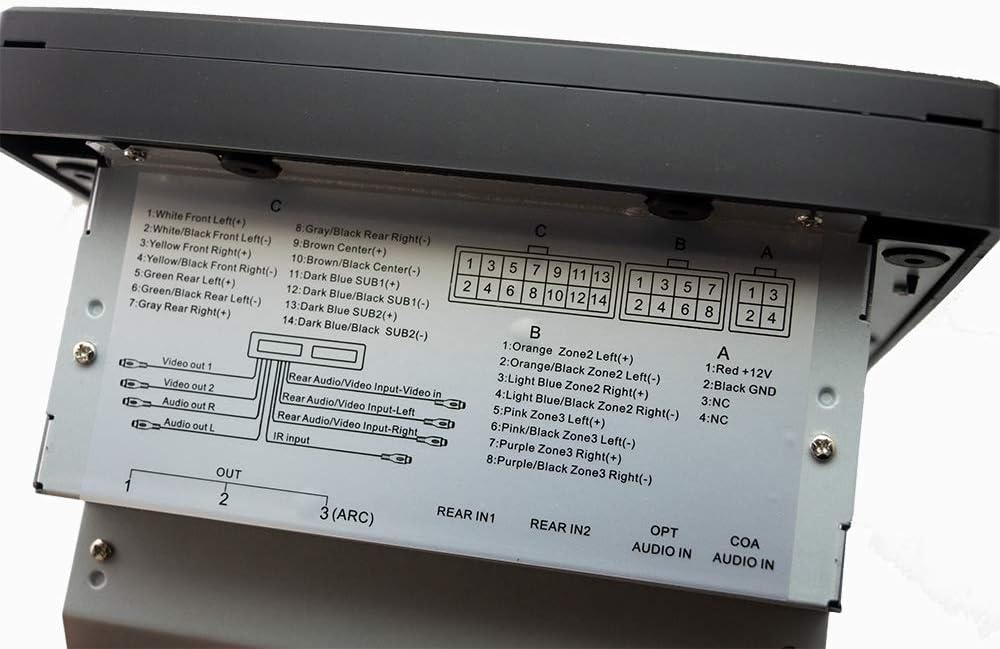
Image: A close-up of the wiring label on the top of the iRV66 unit, detailing the pin assignments for power, ground, speaker zones (Front, Rear, Center, Subwoofer), and various audio/video inputs and outputs.
Refer to the wiring diagram located on the top of the unit for precise connection details. Ensure all connections are secure and correctly matched to prevent damage to the unit or your RV's electrical system.
- Power (A1): Red wire for +12V constant power.
- Ground (A2): Black wire for ground connection.
- Speaker Zone 1 (C): White/Black (Front Left), White (Front Left+), Gray/Black (Rear Right), Gray (Rear Right+), Yellow/Black (Front Right), Yellow (Front Right+), Green/Black (Rear Left), Green (Rear Left+), Brown (Center+), Brown/Black (Center-), Dark Blue (SUB1+), Dark Blue/Black (SUB1-), Dark Blue (SUB2+), Dark Blue/Black (SUB2-).
- Speaker Zone 2 (B): Orange/Black (Zone2 Left+), Orange (Zone2 Left-), Light Blue/Black (Zone2 Right+), Light Blue (Zone2 Right-).
- Speaker Zone 3 (B): Pink/Black (Zone3 Left+), Pink (Zone3 Left-), Purple/Black (Zone3 Right+), Purple (Zone3 Right-).
- Video Outputs: Video Out 1, Video Out 2.
- Audio Outputs: Audio Out R, Audio Out L.
- Rear Audio/Video Inputs: Rear Audio/Video Input-Left, Rear Audio/Video Input-Right, Rear Video Input.
- IR Input: For external IR receiver.
- HDMI Outputs: HDMI 1, HDMI 2, HDMI 3 (ARC).
- Optical Audio Input: OPT AUDIO IN.
- Coaxial Audio Input: COA AUDIO IN.
Replacement for Existing Units
The iRV66 is designed as a direct replacement for Concertone ZX500, ZX600, ZX690, ZX700, and Genesis GT-3.0 units. It includes specific wire adaptors to facilitate a plug-and-play installation, minimizing the need for re-wiring.

Image: Two sets of wire adaptor harnesses, one labeled for Concertone ZX500/ZX600/ZX690 and the other for Concertone ZX700/Genesis GT-3.0, designed to simplify the replacement process.
To replace your old unit:
- Carefully remove the existing unit from its mounting location.
- Disconnect all existing wiring harnesses.
- Identify the correct adaptor harness provided with your iRV66 that matches your old unit's wiring.
- Connect the adaptor harness to your RV's existing wiring.
- Connect the other end of the adaptor harness to the iRV66 unit.
- Slide the iRV66 unit into the mounting opening and secure it.
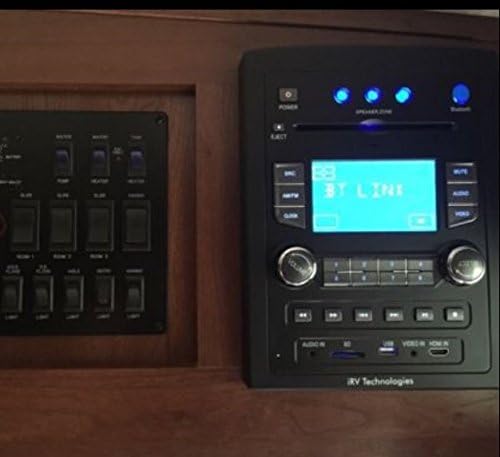
Image: The iRV66 unit seamlessly installed in an RV's interior panel, demonstrating its fit and integration with other vehicle controls.
Operating Instructions
Basic Operation
- Power On/Off: Press the POWER button on the front panel or remote control.
- Volume Control: Rotate the VOLUME knob clockwise to increase volume, counter-clockwise to decrease.
- Source Selection: Press the SRC button repeatedly to cycle through available input sources (AM/FM, CD, DVD, USB, SD, HDMI, Bluetooth).
- Mute: Press the MUTE button to temporarily silence the audio. Press again to restore.
Media Playback (CD/DVD/USB/SD)
- Inserting Media: Gently insert a CD or DVD into the disc slot. The unit will automatically begin playback. For USB drives or SD cards, insert them into the respective front panel ports.
- Playback Controls: Use the Play/Pause, Stop, Skip Forward/Backward, and Fast Forward/Rewind buttons on the front panel or remote for media control.
- Ejecting Discs: Press the EJECT button to remove a disc.
Bluetooth Pairing
- Ensure Bluetooth is enabled on your mobile device.
- Press the BT button on the iRV66 front panel. The display will show "BT PAIRING" or similar.
- On your mobile device, search for available Bluetooth devices and select "iRV66".
- Once paired, the unit will confirm the connection, and you can stream audio wirelessly.
HDMI Connectivity
The iRV66 supports multiple HDMI connections for both input and output.
- HDMI Input: Connect external HDMI devices (e.g., game console, streaming stick) to the front HDMI input or one of the rear HDMI inputs. Select the corresponding HDMI source using the SRC button.
- HDMI Output: Connect the iRV66 to your RV's display(s) using the HDMI output ports on the rear. HDMI Output 3 supports ARC (Audio Return Channel) for simplified audio routing from compatible TVs.
Speaker Zones
The iRV66 features three independent speaker zones, allowing you to control audio output to different areas of your RV.
- Press the numbered speaker zone buttons (1, 2, 3) on the front panel to toggle each zone on or off.
- Zone 1 supports Digital 5.1 Surround Sound, while Zones 2 and 3 provide stereo output.
Maintenance
To ensure the longevity and optimal performance of your iRV66 unit, follow these maintenance guidelines:
- Cleaning: Use a soft, dry cloth to clean the exterior of the unit. For stubborn marks, slightly dampen the cloth with water. Avoid using harsh chemicals, solvents, or abrasive cleaners, as they can damage the finish.
- Disc Care: Handle CDs and DVDs by their edges. Clean discs with a soft, lint-free cloth, wiping from the center outwards. Avoid scratched or dirty discs, as they can cause playback issues and potentially damage the disc drive.
- Ventilation: Ensure the unit has adequate ventilation. Do not block any ventilation openings, as this can lead to overheating.
- Power Off When Not in Use: If the RV will be stored for an extended period, it is advisable to power off the unit and disconnect it from the main power source if possible.
Troubleshooting
If you encounter issues with your iRV66 unit, refer to the following table for common problems and their solutions.
| Problem | Possible Cause | Solution |
|---|---|---|
| Unit does not power on. | No power supply; Blown fuse; Incorrect wiring. | Check RV's 12V power supply; Inspect and replace fuse if necessary; Verify wiring connections. |
| No sound output. | Volume too low; Mute activated; Incorrect source selected; Speaker zones off; Speaker wiring issues. | Increase volume; Deactivate mute; Select correct source; Activate desired speaker zones; Check speaker connections. |
| Disc not playing or ejecting. | Disc inserted incorrectly; Disc is dirty or scratched; Unit malfunction. | Ensure disc is inserted correctly; Clean or try a different disc; Power cycle the unit. |
| Bluetooth not connecting. | Bluetooth not in pairing mode; Device too far; Interference; Previously paired device connected. | Ensure iRV66 is in pairing mode; Move device closer; Reduce interference; Disconnect from other devices. |
| Remote control not working. | Dead batteries; Obstruction; Incorrect angle. | Replace batteries; Remove obstructions; Point remote directly at the unit's IR receiver. |
If the problem persists after attempting these solutions, please contact iRV Technologies customer support or a qualified service technician.
Specifications
| Feature | Specification |
|---|---|
| Model Number | iRV66 |
| Product Dimensions (L x W x H) | 8 x 6 x 11 inches |
| Item Weight | 6 pounds |
| Power Source | Corded Electric (12V DC) |
| Connectivity Technology | Bluetooth 4.1, USB, SD, HDMI, Optical, Coaxial |
| Speaker Type | Surround (Zone 1), Stereo (Zones 2 & 3) |
| Audio Output | 200 watts total peak power |
| HDMI Outputs | 3 (with ARC support) |
| HDMI Inputs | 2 (1 front, 1 rear) |
| Supported Media | CD, DVD, MP3, MP4, JPEG |
| Manufacturer | ATP Products, Inc. |
Warranty & Support
The iRV66 unit is manufactured by ATP Products, Inc. For specific warranty information, including coverage duration and terms, please refer to the warranty card included with your purchase or visit the official iRV Technologies website. Keep your proof of purchase for warranty claims.
For technical support, troubleshooting assistance beyond this manual, or service inquiries, please contact iRV Technologies customer support directly. Contact information can typically be found on the manufacturer's website or in the product packaging.
You can also refer to the official User Manual in PDF format for more detailed information: Download User Manual (PDF)


