
1. Introduction
Thank you for choosing the Jeken 3.2L Professional Ultrasonic Cleaner PS-20A. This device utilizes ultrasonic waves to clean various items effectively and efficiently. Equipped with a digital timer and heater, it offers precise control over the cleaning process. Please read this manual thoroughly before operating the unit to ensure safe and optimal performance.
2. Safety Instructions
To prevent personal injury or damage to the unit, always observe the following safety precautions:
- Electrical Safety: Ensure the power supply matches the unit's requirements (AC100~120V or AC220~240V, 50/60Hz). Do not operate with wet hands. Do not immerse the main unit in water.
- Grounding: The unit must be properly grounded to prevent electric shock.
- Water Level: Always fill the tank with cleaning solution above the "MIN" mark and below the "MAX" mark before turning on the heater or ultrasonic function. Operating without liquid or with insufficient liquid can damage the unit.
- Heat: The heating function can make the tank and solution hot. Exercise caution when handling. Allow the unit to cool before draining or cleaning.
- Flammable Liquids: Never use flammable, explosive, or corrosive liquids in the tank. Use only recommended ultrasonic cleaning solutions.
- Ventilation: Ensure adequate ventilation around the unit during operation.
- Children and Pets: Keep the unit out of reach of children and pets.
- Maintenance: Disconnect power before performing any maintenance or cleaning.
- Damage: If the unit is damaged, do not operate it. Contact customer support.
3. Package Contents
Carefully unpack the box and ensure all items are present and in good condition. If any items are missing or damaged, please contact your supplier.

Image 3.1: The Jeken 3.2L Professional Ultrasonic Cleaner unit and its accompanying stainless steel cleaning basket.
- Ultrasonic Cleaner Unit (PS-20A)
- Stainless Steel Cleaning Basket
- Power Cord
- User Manual (this document)
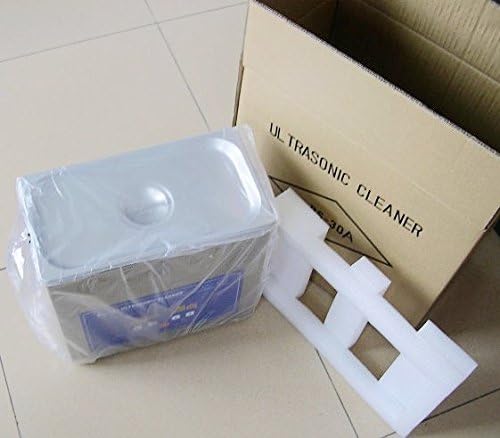
Image 3.2: The ultrasonic cleaner unit as it appears when first unpacked, secured with protective foam inserts within its cardboard box.
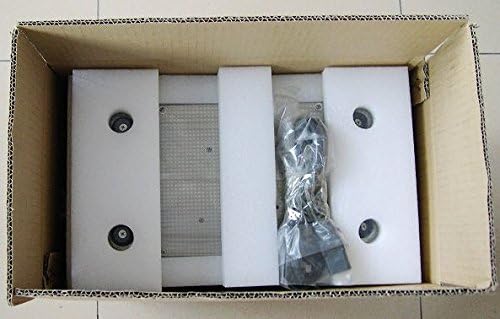
Image 3.3: A top-down view of the unpacked ultrasonic cleaner, revealing the power cord and additional protective packaging.
4. Setup
- Placement: Place the ultrasonic cleaner on a stable, flat, and dry surface, away from direct sunlight and heat sources. Ensure there is adequate space around the unit for ventilation.
- Power Connection: Connect the power cord to the unit and then to a properly grounded electrical outlet.
- Fill Tank: Open the lid and fill the stainless steel tank with the appropriate cleaning solution. Ensure the liquid level is between the "MIN" and "MAX" marks. Do not operate the unit without liquid.
- Insert Basket: If using, place the cleaning basket into the tank.
5. Operating Instructions
The Jeken PS-20A features a digital control panel for setting temperature and cleaning time.
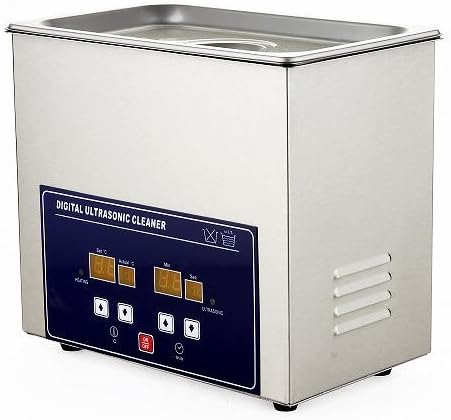
Image 5.1: The front control panel of the ultrasonic cleaner, showing digital displays for temperature and time, along with control buttons.
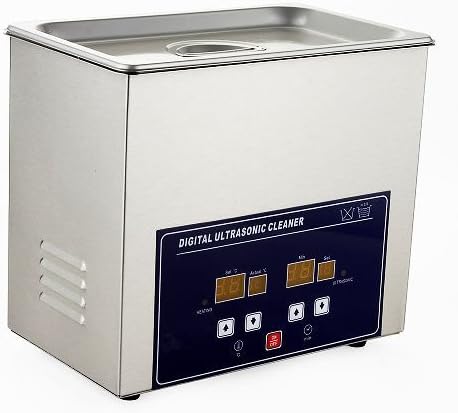
Image 5.2: An angled view highlighting the digital display and button layout for setting cleaning parameters.
5.1. Control Panel Overview
- HEATING Display: Shows set temperature (Set °C) and actual temperature (Actual °C).
- ULTRASONIC Display: Shows set cleaning time (Min) and actual remaining time (Sec).
- Temperature Control Buttons: Up/Down arrows to adjust set temperature.
- Time Control Buttons: Up/Down arrows to adjust set cleaning time.
- ON/OFF Button: Powers the unit on or off.
- HEAT Button: Toggles the heating function.
- ULTRASONIC Button: Toggles the ultrasonic cleaning function.
5.2. Cleaning Procedure
- Prepare Items: Ensure items to be cleaned are suitable for ultrasonic cleaning. Remove any loose debris.
- Place Items: Place items into the cleaning basket. Do not overload the basket. Ensure items are fully submerged in the cleaning solution but do not touch the bottom of the tank directly.
- Set Temperature (Optional):
- Press the HEAT button to activate the heating function. The "Set °C" display will flash.
- Use the temperature Up/Down arrows to set the desired temperature.
- The "Actual °C" display will show the current liquid temperature. The heater will work until the set temperature is reached.
- Set Cleaning Time:
- Press the ULTRASONIC button. The "Min" display will flash.
- Use the time Up/Down arrows to set the desired cleaning duration (in minutes).
- Start Cleaning: Press the ULTRASONIC button again to start the ultrasonic cleaning cycle. The "Sec" display will count down the remaining time.
- During Cleaning: The unit will emit a buzzing sound, indicating the ultrasonic function is active.
- End of Cycle: The unit will automatically stop when the timer reaches zero.
- Remove Items: Carefully remove the cleaning basket from the tank. Rinse cleaned items with clean water if necessary and dry them thoroughly.
- Drain Solution: Once the unit has cooled, drain the used cleaning solution through the drain valve (if present) or by carefully pouring it out.
6. Maintenance
Proper maintenance ensures the longevity and optimal performance of your ultrasonic cleaner.
- Draining: Always drain the cleaning solution after each use, especially if it's heavily soiled.
- Cleaning the Tank: After draining, wipe the inside of the stainless steel tank with a soft cloth. For stubborn residues, use a mild, non-abrasive cleaner. Rinse thoroughly with clean water.
- Exterior Cleaning: Wipe the exterior of the unit with a damp cloth. Do not use abrasive cleaners or immerse the unit in water.
- Storage: Store the unit in a cool, dry place when not in use. Ensure the tank is empty and dry.
- Avoid Damage: Do not drop the unit or subject it to strong impacts.
7. Troubleshooting
If you encounter issues with your ultrasonic cleaner, refer to the table below for common problems and solutions.
| Problem | Possible Cause | Solution |
|---|---|---|
| Unit does not power on. | No power supply; power cord not connected; unit switch off. | Check power cord connection; ensure outlet is functional; press ON/OFF button. |
| Ultrasonic function not working. | Ultrasonic function not activated; insufficient liquid in tank. | Press the ULTRASONIC button; ensure liquid level is between MIN and MAX marks. |
| Heating function not working. | Heating function not activated; insufficient liquid in tank. | Press the HEAT button; ensure liquid level is between MIN and MAX marks. |
| Poor cleaning results. | Incorrect cleaning solution; items too dirty; insufficient cleaning time; tank overloaded. | Use appropriate cleaning solution; pre-clean heavily soiled items; increase cleaning time; clean fewer items per cycle. |
| Unit makes unusual noise. | Normal operating sound (buzzing); unit vibrating on surface. | A buzzing sound is normal during ultrasonic operation. Ensure unit is on a stable surface. If noise is excessive or unusual, discontinue use and contact support. |
If the problem persists after attempting these solutions, please contact customer support for further assistance.
8. Specifications
The following table outlines the technical specifications for the Jeken PS-20A Ultrasonic Cleaner:
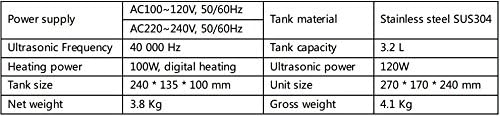
Image 8.1: Detailed technical specifications including power supply, tank material, frequency, power, and dimensions.
| Feature | Specification |
|---|---|
| Power supply | AC100~120V, 50/60Hz or AC220~240V, 50/60Hz |
| Tank material | Stainless steel SUS304 |
| Ultrasonic Frequency | 40 000 Hz |
| Tank capacity | 3.2 L |
| Heating power | 100W, digital heating |
| Ultrasonic power | 120W |
| Tank size | 240 * 135 * 100 mm |
| Unit size | 270 * 170 * 240 mm |
| Net weight | 3.8 Kg |
| Gross weight | 4.1 Kg |
9. Warranty and Support
For warranty information, please refer to the documentation provided with your purchase or contact the retailer/manufacturer directly. If you require technical support, have questions about operation, or need assistance with troubleshooting beyond what is covered in this manual, please contact Jeken customer service or your authorized dealer.
Please have your model number (PS-20A) and purchase date available when contacting support.
