
1. Introduction
Welcome to the world of homemade ice cream with your new Boretti B101 2L Compressor Ice Cream Machine. This fully automatic appliance is designed to create delicious frozen desserts with ease and efficiency. Please read this manual thoroughly before first use to ensure safe operation and optimal performance.
Key Features:
- Delicious homemade ice cream in 30 minutes
- Fully automatic operation with powerful built-in compressor
- LCD screen with easy-to-use controls
- Generous 2-liter capacity
- No pre-freezing required; simply add ingredients and let the machine do the work
2. Important Safety Instructions
When using electrical appliances, basic safety precautions should always be followed to reduce the risk of fire, electric shock, and/or injury to persons, including the following:
- Read all instructions before operating the appliance.
- Do not immerse the appliance, cord, or plug in water or other liquids.
- Close supervision is necessary when any appliance is used by or near children.
- Unplug from outlet when not in use and before cleaning. Allow to cool before putting on or taking off parts.
- Avoid contact with moving parts. Keep hands, hair, clothing, as well as spatulas and other utensils away during operation to reduce the risk of injury and/or damage to the appliance.
- Do not operate any appliance with a damaged cord or plug, or after the appliance malfunctions or has been dropped or damaged in any manner.
- The use of accessory attachments not recommended by the manufacturer may cause fire, electric shock, or injury.
- Do not use outdoors.
- Do not let cord hang over edge of table or counter or touch hot surfaces.
- Do not place on or near a hot gas or electric burner, or in a heated oven.
- Always ensure the lid is securely locked in place before operation.
- Do not fill the mixing bowl beyond its maximum capacity to prevent overflow.
3. Product Overview
Familiarize yourself with the components of your Boretti B101 Ice Cream Machine.
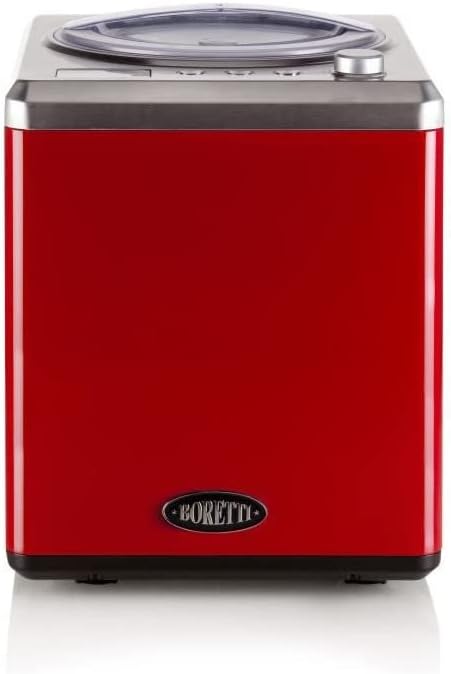
Figure 3.1: Front view of the Boretti B101 Ice Cream Machine, showcasing its sleek red metal body and stainless steel top panel.
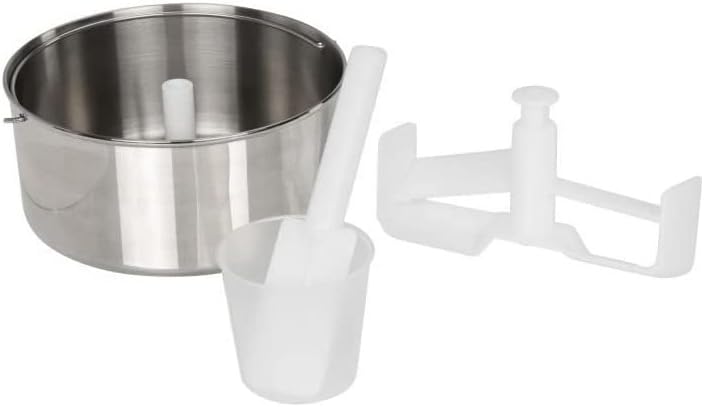
Figure 3.2: Key components including the removable stainless steel mixing bowl, the plastic mixing paddle, and a measuring cup.
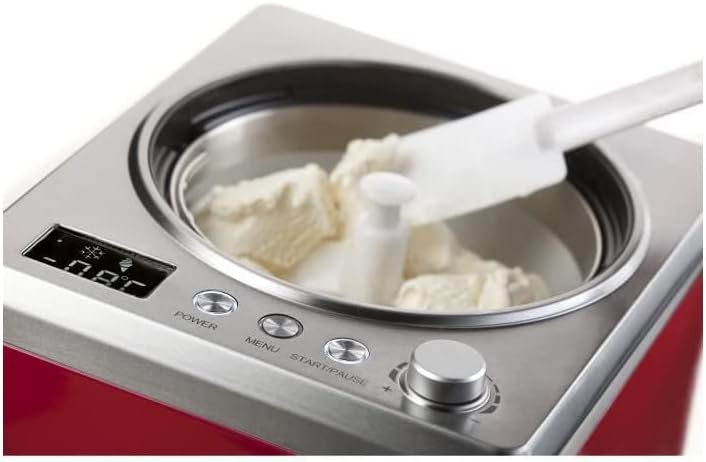
Figure 3.3: Close-up of the control panel featuring an LCD display, Power, Menu, Start/Pause buttons, and a rotary knob for adjustments.
4. Setup
Before first use, follow these steps to prepare your ice cream machine:
- Unpack: Carefully remove all packaging materials and accessories from the box.
- Clean: Wash the removable mixing bowl, mixing paddle, and lid in warm, soapy water. Rinse thoroughly and dry completely. Wipe the main unit with a damp cloth. Do not immerse the main unit in water.
- Assemble: Place the mixing bowl into the main unit. Insert the mixing paddle into the center of the mixing bowl, ensuring it is properly seated.
- Position: Place the appliance on a stable, flat, and dry surface, away from heat sources and direct sunlight. Ensure there is adequate ventilation around the unit.
- Connect Power: Plug the power cord into a grounded electrical outlet. The LCD display will illuminate.
5. Operating Instructions
Preparing Ingredients:
Ensure all ingredients are chilled to refrigerator temperature (4°C / 40°F) before adding them to the machine. This will help achieve the best consistency and reduce processing time. Do not use warm or hot ingredients.
Making Ice Cream:
- Add Ingredients: Pour your chilled ice cream mixture into the mixing bowl. Do not exceed the MAX fill line (approximately 2/3 of the bowl's capacity) to allow for expansion during freezing.
- Secure Lid: Place the lid onto the mixing bowl and twist to lock it securely in place. Ensure the opening for adding ingredients is properly aligned if you plan to add mix-ins later.
- Select Mode: Press the 'Menu' button to cycle through the available modes (e.g., Ice Cream, Cooling, Mixing). Select 'Ice Cream' for standard operation.
- Set Time: Use the rotary knob to adjust the desired processing time. For most recipes, 30-60 minutes is sufficient. The display will show the remaining time.
- Start Operation: Press the 'Start/Pause' button to begin the churning process. The compressor will activate, and the paddle will start rotating.
- Add Mix-ins (Optional): If your recipe includes mix-ins like chocolate chips, nuts, or fruit, add them through the ingredient chute in the lid during the last 5-10 minutes of churning.
- Monitor Progress: The machine will automatically stop when the set time expires. You can check the consistency of the ice cream through the transparent lid.
- Serve: Once complete, unplug the machine. Remove the lid and mixing paddle. Use a plastic or wooden spatula to scoop the ice cream into a serving dish. Avoid using metal utensils to prevent scratching the bowl.
- Store: For firmer ice cream, transfer it to an airtight container and place it in the freezer for 1-2 hours.
6. Maintenance and Cleaning
Regular cleaning ensures the longevity and hygiene of your ice cream machine.
Daily Cleaning:
- After each use, unplug the appliance.
- Remove the mixing bowl, mixing paddle, and lid.
- Wash these removable parts in warm, soapy water. Rinse thoroughly and dry completely with a soft cloth.
- Wipe the exterior of the main unit with a damp cloth. Do not use abrasive cleaners or scouring pads.
- Ensure all parts are dry before reassembling or storing.
Deep Cleaning:
- If any residue builds up inside the main unit (e.g., from spills), use a slightly damp cloth to wipe it clean.
- For stubborn stains on the stainless steel bowl, a mild non-abrasive cleaner can be used, followed by thorough rinsing.
- Care instructions: Wipe with a dry cloth.
7. Troubleshooting
If you encounter any issues with your ice cream machine, refer to the table below for common problems and solutions.
| Problem | Possible Cause | Solution |
|---|---|---|
| Machine does not turn on. | Not plugged in; power outage; faulty outlet. | Ensure plug is securely in a working outlet. Check circuit breaker. |
| Ice cream is too soft. | Ingredients not cold enough; insufficient churning time; too much liquid. | Pre-chill ingredients thoroughly. Increase churning time. Reduce liquid content in recipe. Transfer to freezer for firmer consistency. |
| Paddle stops rotating. | Mixture is too thick; paddle not installed correctly. | Ensure mixture is not overly thick. Check that the paddle is correctly seated. If mixture is too thick, it may indicate the ice cream is done. |
| Loud noise during operation. | Paddle or bowl not seated correctly; foreign object. | Ensure paddle and bowl are correctly installed. Check for any foreign objects. If noise persists, contact customer support. |
8. Technical Specifications
Detailed specifications for your Boretti B101 Ice Cream Machine:
| Feature | Detail |
|---|---|
| Brand | Boretti |
| Model Number | B101 |
| Model Name | BORETTI ICECREAM MACHINE COMPRESSOR 2L RED |
| Color | Red |
| Product Dimensions (L x W x H) | 35 x 44 x 35 cm (13.78 x 17.32 x 13.78 inches) |
| Item Weight | 13.4 Kilograms (29.54 pounds) |
| Capacity | 2 Liters |
| Power | 180 Watts |
| Voltage | 240 Volts |
| Material | Metal |
| Special Feature | Integrated Compressor |
| Operating Mode | Automatic |
| Recommended Uses | Making ice cream |
9. Warranty and Customer Support
Boretti products are manufactured to high-quality standards. For information regarding warranty coverage, please refer to the warranty card included with your product or visit the official Boretti website.
For technical assistance, troubleshooting beyond this manual, or to inquire about spare parts, please contact Boretti customer service. Keep your purchase receipt as proof of purchase for warranty claims.
You can find more information and contact details on the official Boretti website:

