Introduction
This manual provides essential information for the safe and efficient operation, maintenance, and troubleshooting of your Stanley FatMax SXFPW25E High Pressure Washer. Please read this manual thoroughly before using the appliance and keep it for future reference.
The Stanley FatMax SXFPW25E is a semi-professional cold water pressure washer designed to remove stubborn dirt from large outdoor areas, walls, ceilings, motorhomes, boats, and swimming pools. It features a powerful induction motor and a Total-Stop system for enhanced durability and energy efficiency.
Safety Information
Always observe basic safety precautions when using electrical appliances to reduce the risk of fire, electric shock, and personal injury.
- Read all instructions: Familiarize yourself with the controls and proper use of the pressure washer.
- Electrical Safety: Ensure the power supply matches the voltage specified on the rating label. Use a residual current device (RCD) for added protection.
- Water Connection: Connect the pressure washer to a cold water supply only. Do not use hot water.
- Personal Protective Equipment: Always wear appropriate eye protection, hearing protection, and protective clothing when operating the pressure washer.
- Keep Area Clear: Ensure the work area is clear of people, pets, and obstacles.
- Nozzle Safety: Never direct the water jet at people, animals, electrical equipment, or the appliance itself.
- Chemicals: Use only detergents recommended for pressure washers. Follow detergent manufacturer's instructions.
- Maintenance: Disconnect from power supply before performing any maintenance or cleaning.
Product Overview and Components
The Stanley FatMax SXFPW25E comes with several key components designed for effective cleaning. Understanding each part will help in proper assembly and operation.

Figure 1: Overview of the Stanley FatMax SXFPW25E High Pressure Washer and its included accessories. This image displays the main unit, high-pressure gun, various lances, and a surface cleaner attachment.

Figure 2: Detailed view of the pressure washer's integrated high-pressure hose reel and detergent tank. The hose reel allows for convenient storage and deployment of the 10-meter high-pressure hose.
Key Components:
- Main Unit: Houses the motor, pump, and controls.
- High-Pressure Gun: The primary control for water flow and pressure.
- Adjustable Nozzle Lance: Allows varying the water jet from cylindrical to fan spray.
- Red Mouth Lance (Rotary Nozzle): Creates a very strong, concentrated beam for stubborn dirt.
- High-Pressure Hose (10m): Connects the gun to the main unit. Features an integrated hose drum for storage.
- Detergent Tank: Integrated for easy application of cleaning solutions.
- Water Inlet Filter: Inspectable filter to prevent contaminants from entering the pump.
- Wheels and Handle: For easy transport and maneuverability.
Setup
Follow these steps for the initial setup of your pressure washer:
- Unpack the Unit: Carefully remove all components from the packaging. Check for any damage.
- Attach Wheels and Handle (if not pre-assembled): Secure the wheels and handle according to the diagrams in the quick start guide (not included in this manual).
- Connect Water Supply: Connect a garden hose (not supplied) to the water inlet on the pressure washer. Ensure the water inlet filter is clean and properly seated. Connect the other end of the garden hose to a cold water tap. Turn on the water supply fully.
- Connect High-Pressure Hose: Unwind the high-pressure hose from the integrated drum. Connect one end to the high-pressure outlet on the main unit and the other end to the high-pressure gun. Ensure connections are secure.
- Attach Lance: Select the desired lance (adjustable nozzle or red mouth lance) and attach it to the high-pressure gun.
- Purge Air from System: Before connecting to power, squeeze the trigger on the high-pressure gun to allow water to flow through the system and purge any air. Continue until a steady stream of water emerges.
- Connect to Power: Plug the power cord into a suitable grounded electrical outlet.
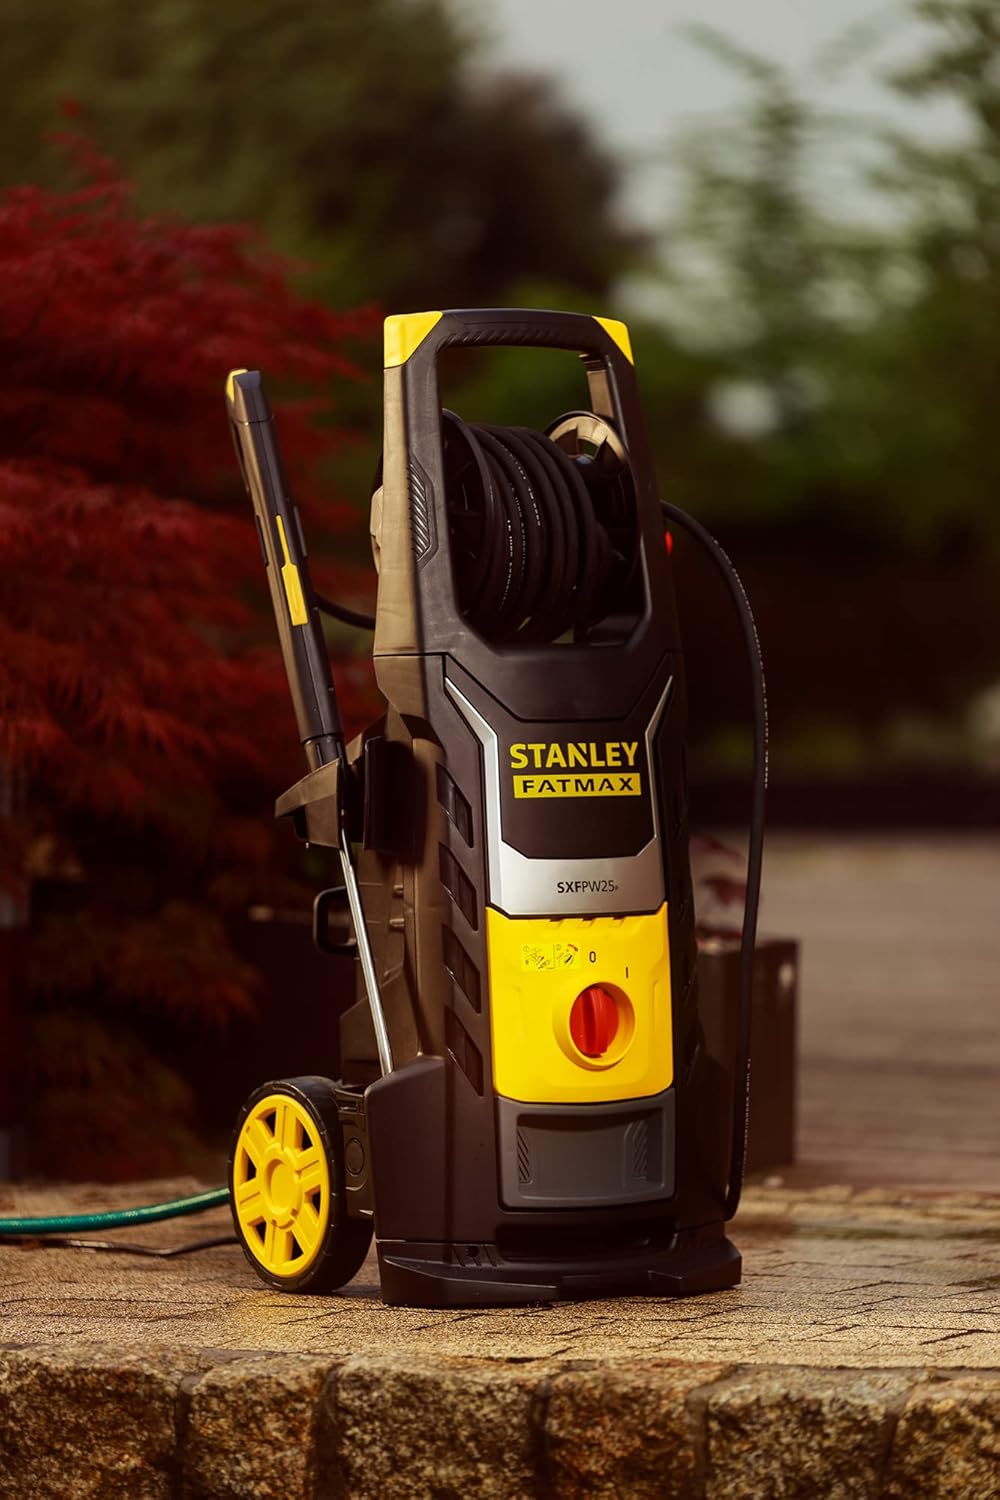
Figure 3: The pressure washer ready for operation, showing the water inlet and high-pressure hose connections. Ensure all connections are tight to prevent leaks.
Operating Instructions
Starting the Pressure Washer:
- Ensure the water supply is fully open and the unit is plugged in.
- Turn the ON/OFF switch to the "ON" (I) position. The motor will start briefly and then stop due to the Total-Stop system.
- Squeeze the trigger on the high-pressure gun to start the motor and begin spraying. The motor will run only when the trigger is squeezed.
Using Detergent:
- Fill the integrated detergent tank with a suitable pressure washer detergent.
- Attach the low-pressure nozzle or adjust the multi-purpose nozzle to the detergent setting (if applicable). High pressure will not draw detergent.
- Spray the detergent onto the surface to be cleaned. Allow it to soak for a few minutes (refer to detergent instructions).
- Switch back to a high-pressure nozzle and rinse the surface thoroughly.
Cleaning Techniques:
- General Cleaning: Use the adjustable nozzle for a wide fan spray. Keep the nozzle a safe distance from the surface to avoid damage.
- Stubborn Dirt: Use the red mouth lance (rotary nozzle) for concentrated cleaning on tough spots. Exercise caution as this nozzle provides very high impact.
- Surface Cleaner (if included): For large flat surfaces like patios or driveways, attach the surface cleaner accessory. This provides even cleaning and reduces splash-back.

Figure 4: Demonstrating the use of the pressure washer for vehicle cleaning. The adjustable nozzle allows for gentle yet effective removal of dirt from car surfaces.

Figure 5: A user operating the pressure washer with a surface cleaner attachment on a wooden deck. This accessory is ideal for cleaning large, flat areas efficiently and uniformly.
Stopping the Pressure Washer:
- Release the trigger on the high-pressure gun. The Total-Stop system will turn off the motor.
- Turn the ON/OFF switch to the "OFF" (O) position.
- Turn off the water supply at the tap.
- Squeeze the trigger on the high-pressure gun to release any remaining pressure in the system.
- Disconnect the high-pressure hose from the gun and the unit.
- Disconnect the garden hose from the water inlet.
- Unplug the power cord from the electrical outlet.
Maintenance
Regular maintenance ensures the longevity and optimal performance of your pressure washer.
- Clean Water Inlet Filter: Regularly check and clean the water inlet filter to prevent debris from entering the pump. Rinse it under running water.
- Nozzle Cleaning: If the nozzle becomes clogged, use the provided nozzle cleaning tool (if applicable) or a thin wire to clear any obstructions.
- Hose and Connections: Inspect the high-pressure hose and all connections for wear, kinks, or leaks before each use. Replace damaged parts immediately.
- Storage: Store the pressure washer in a dry, frost-free environment. If storing for extended periods, especially in cold climates, ensure all water is drained from the pump and hoses to prevent freezing damage. Consider using a pump protector solution.
- General Cleaning: Wipe down the exterior of the unit with a damp cloth. Do not use harsh chemicals.
Troubleshooting
This section addresses common issues you might encounter and their potential solutions.
| Problem | Possible Cause | Solution |
|---|---|---|
| Motor does not start. | No power supply; ON/OFF switch in OFF position; Thermal overload activated. | Check power connection and outlet; Turn switch to ON (I); Allow motor to cool down (approx. 30 minutes). |
| No water or low pressure. | Water supply off or restricted; Water inlet filter clogged; Nozzle clogged; Air in pump. | Turn on water supply fully; Clean water inlet filter; Clean nozzle; Purge air from system (see Setup). |
| Motor runs continuously when trigger is released. | Air in pump; Leak in high-pressure system; Bypass valve stuck. | Purge air from system; Check all connections for leaks; Contact customer service if issue persists. |
| Detergent not dispensing. | Detergent tank empty; Wrong nozzle attached (high pressure); Detergent hose clogged. | Refill tank; Use low-pressure/detergent nozzle; Clean detergent hose. |
If the problem persists after attempting these solutions, please contact customer service.
Specifications
| Feature | Value |
|---|---|
| Model Number | SXFPW25E |
| Power Consumption | 2500 W |
| Max. Pressure | 150 bar |
| Max. Flow Rate | 450 L/H |
| Max. Water Inlet Temperature | 50 °C |
| Hose Length | 10 Metres |
| Product Dimensions (L x W x H) | 54 x 30 x 35 cm |
| Item Weight | 16.1 kg |
| Power Source | Corded Electric |
Warranty and Support
The Stanley FatMax SXFPW25E High Pressure Washer comes with a 2-year warranty from the date of purchase. This warranty covers manufacturing defects and material faults under normal use conditions.
For warranty claims, technical support, or to locate an authorized service center, please refer to the contact information provided in the original packaging or visit the official Stanley website. The included user manual (physical copy) contains a list of customer service stations.
Please retain your proof of purchase for warranty validation.


