
1. Important Safety Information
Please read all instructions carefully before operating the appliance. Failure to follow these instructions may result in property damage, personal injury, or death.
- Ventilation: Ensure adequate ventilation when operating the refrigerator, especially when using propane gas. Carbon monoxide poisoning is a serious risk.
- Power Source Selection: Never attempt to operate the refrigerator on both propane gas and electric power (110V AC or 12V DC) simultaneously. This can create a hazardous situation. Always ensure only one power source is selected and active at any given time.
- Gas Leaks: Before each use with propane, check all gas connections for leaks using a soapy water solution. Do not use an open flame to check for leaks. If you smell gas, immediately turn off the gas supply, ventilate the area, and do not operate the appliance.
- Gas Ignition: If the gas burner does not ignite after 4-5 attempts, turn off the gas tap, wait 5 minutes, and then try to re-light. If it still fails to light, contact an authorized service provider.
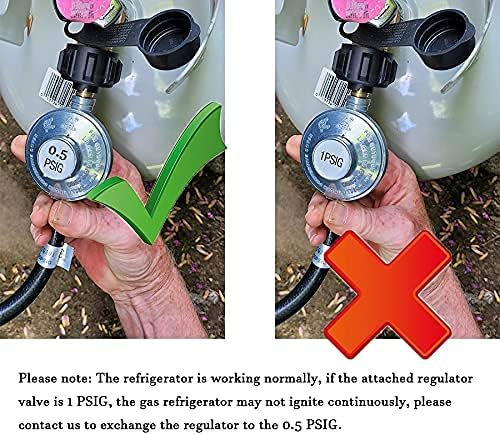
- Regulator Valve: Ensure the correct gas regulator valve (0.5 PSIG) is used for continuous ignition. If your current regulator is 1 PSIG and ignition is inconsistent, contact the manufacturer for a replacement.
- Electrical Connections: Ensure all electrical connections are secure and meet local electrical codes.
- Children and Pets: Keep children and pets away from the appliance during operation, especially when using gas.
2. Product Overview
The SMETA SC-60 is a compact 3-way absorption refrigerator designed for versatility, offering operation on Propane (LPG), 110V AC, or 12V DC power. It is suitable for RVs, campers, trucks, and off-grid applications.

3. Installation and Setup
3.1 Placement and Clearance
Position the refrigerator on a stable, level surface. Ensure adequate clearance around the unit for proper ventilation and heat dissipation, especially at the rear where the cooling unit is located.
- Minimum 10 cm (4 inches) clearance from the rear to the wall.
- Minimum 30 cm (12 inches) clearance from the top to any overhead obstruction.

3.2 Propane Gas Connection
To connect the refrigerator to a propane gas supply:
- Ensure the gas supply valve on the propane tank is closed.
- Connect the provided gas hose and regulator to the propane tank. Ensure a secure, leak-free connection.
- Connect the other end of the gas hose to the designated gas inlet on the rear of the refrigerator. Tighten firmly.
- Open the gas supply valve on the propane tank slowly and check for any gas leaks using a soapy water solution.

3.3 Exhaust System (for Indoor Use)
If using the refrigerator indoors with propane, an exhaust system is required to vent combustion byproducts safely outside. This typically involves installing an exhaust pipe through a wall.
- Create an appropriate-sized hole in the wall for the exhaust pipe.
- Insert the exhaust pipe through the wall, connecting one end to the refrigerator's exhaust outlet.
- Attach the external cover to the pipe on the outside of the wall to prevent rainwater entry.
4. Operation
4.1 Control Panel Overview
The refrigerator features a control panel for selecting the power source and adjusting temperature. Note that control panel designs may vary slightly between models (e.g., battery ignition vs. piezo igniter).

4.2 Power Source Selection
Use the main selector knob on the control panel to choose your desired power source:
- OFF: Turns the refrigerator off.
- DC12: For 12V DC operation (e.g., from a vehicle battery).
- AC: For 110V AC operation (e.g., from a standard wall outlet).
- GAS: For Propane (LPG) operation.
WARNING: Do not attempt to use more than one power source simultaneously. Ensure the selector is set to only one active source.
4.3 Gas Ignition Procedure
Once the gas supply is connected and the selector knob is set to 'GAS':
For Battery Ignition:
- Depress the safety device control (C) and hold it down.
- While holding (C), depress the igniter switch (A).
- Check the flame indicator (B) to see if the flame is lit.
- Keep the safety device control (C) depressed for an additional 10-15 seconds.
- Release the safety device control (C) and re-check that the flame remains lit.
- If the burner does not light after 4-5 attempts, turn off the gas tap, wait 5 minutes, then try again. If ignition still fails, contact an authorized service provider.
- Note: If the battery ignition fails to spark, the battery may need replacement.
For Piezo Igniter:
- Push the ignition switch (E). You may hear a 'ka' sound as the igniter pin sparks.
- Once the flame indicator (B) needle moves into the green area, release the ignition button (E).
- Verify that the flame is lit by observing the indicator needle in the green area.
4.4 Thermostat Control
Adjust the thermostat knob (D) to your desired temperature setting. Allow 8 to 10 hours of operation to achieve the set temperature.

5. Maintenance
Regular maintenance ensures optimal performance and longevity of your refrigerator.
- Cleaning: Clean the interior and exterior of the refrigerator regularly with a mild detergent and warm water. Avoid abrasive cleaners.
- Defrosting: The refrigerator features an automatic defrost system. However, if excessive frost builds up, manually defrost the unit by turning it off and leaving the door ajar until all ice melts.
- Ventilation Grilles: Keep the rear ventilation grilles clear of obstructions to ensure proper airflow for the cooling unit.
- Gas Connections: Periodically inspect gas connections for wear or damage and re-check for leaks.
6. Troubleshooting
If you encounter issues with your refrigerator, refer to the following common troubleshooting steps:
| Problem | Possible Cause | Solution |
|---|---|---|
| Refrigerator not cooling | Incorrect power source selected or no power supply. | Verify power source selection (GAS, AC, DC12) and ensure power is available. Check fuses/breakers for electrical modes. |
| Gas burner not igniting | Gas supply off, regulator issue, or ignition fault. | Ensure gas tank valve is open. Check gas hose connections. Verify regulator is 0.5 PSIG. Follow gas ignition procedure carefully. Replace ignition battery if applicable. |
| Inconsistent cooling performance | Poor ventilation, ambient temperature too high, or overfilling. | Ensure adequate clearance around the unit. Avoid placing hot items inside. Do not overfill the refrigerator. Absorption refrigerators perform best in moderate ambient temperatures. |
| Red line on flame indicator not moving to green | Gas not igniting. | Repeat gas ignition steps. Ensure safety device control is held long enough. Check gas supply. |
7. Specifications
| Feature | Specification |
|---|---|
| Model Number | SC-60 |
| Product Dimensions (D x W x H) | 18.5" x 17.8" x 25.6" |
| Capacity | 2.1 Cubic Feet |
| Power Sources | LPG (Propane), 110V AC, 12V DC |
| Cooling Method | Absorption |
| Defrost System | Automatic |
| Number of Doors | 1 |
| Shelf Type | Wire |
| Item Weight | 48 Pounds |
| UPC | 710847593442 |

8. Warranty and Support
For warranty information, technical support, or service inquiries, please contact SMETA customer service. Keep your purchase receipt and model number (SC-60) handy for faster assistance.
You can typically find support contact information on the manufacturer's website or through your retailer.
