
Product Overview
The KLH Bassbite-V is a compact yet powerful subwoofer designed to enhance the low-frequency response of your audio system. It features a robust 40-watt amplifier and a wired connection for reliable performance. This manual provides detailed instructions for setup, operation, and maintenance to ensure optimal sound quality and longevity of your device.

Figure 1: Front view of the KLH Bassbite-V Subwoofer next to its packaging box.
Setup and Connections
Before connecting your subwoofer, ensure all audio equipment is powered off. Carefully unpack the subwoofer and place it in your desired location, typically near your main speakers or in a corner for enhanced bass.
Connecting to Your Audio System
The Bassbite-V offers both high-level (speaker wire) and low-level (RCA) input options.

Figure 2: Rear panel of the KLH Bassbite-V Subwoofer showing input terminals and controls.
- High-Level Input (Speaker Wire): Connect the speaker wires from your amplifier's speaker outputs to the "FROM AMPLIFIER" terminals on the subwoofer. Ensure correct polarity (+ to + and - to -). Then, connect speaker wires from the "TO SPEAKERS" terminals on the subwoofer to your main speakers. This method allows the subwoofer to receive the full audio signal and filter out low frequencies for your main speakers.
- Low-Level Input (RCA): If your receiver or amplifier has a dedicated subwoofer output (LFE or Sub Out), connect an RCA cable from that output to the "LOW LEVEL INPUT" (L/R or Mono) on the subwoofer. If your source has stereo RCA outputs, you can connect both L and R channels to the subwoofer's L and R low-level inputs.
- Power Connection: Once audio connections are made, plug the subwoofer's power cord into a standard 115V AC, 60Hz electrical outlet.
Caution: To reduce the risk of electric shock, do not remove the cover. Refer servicing to qualified service personnel. Not suitable for in-wall mounting.
Operating Instructions
After connecting the subwoofer, you can power it on and adjust its settings for optimal performance.
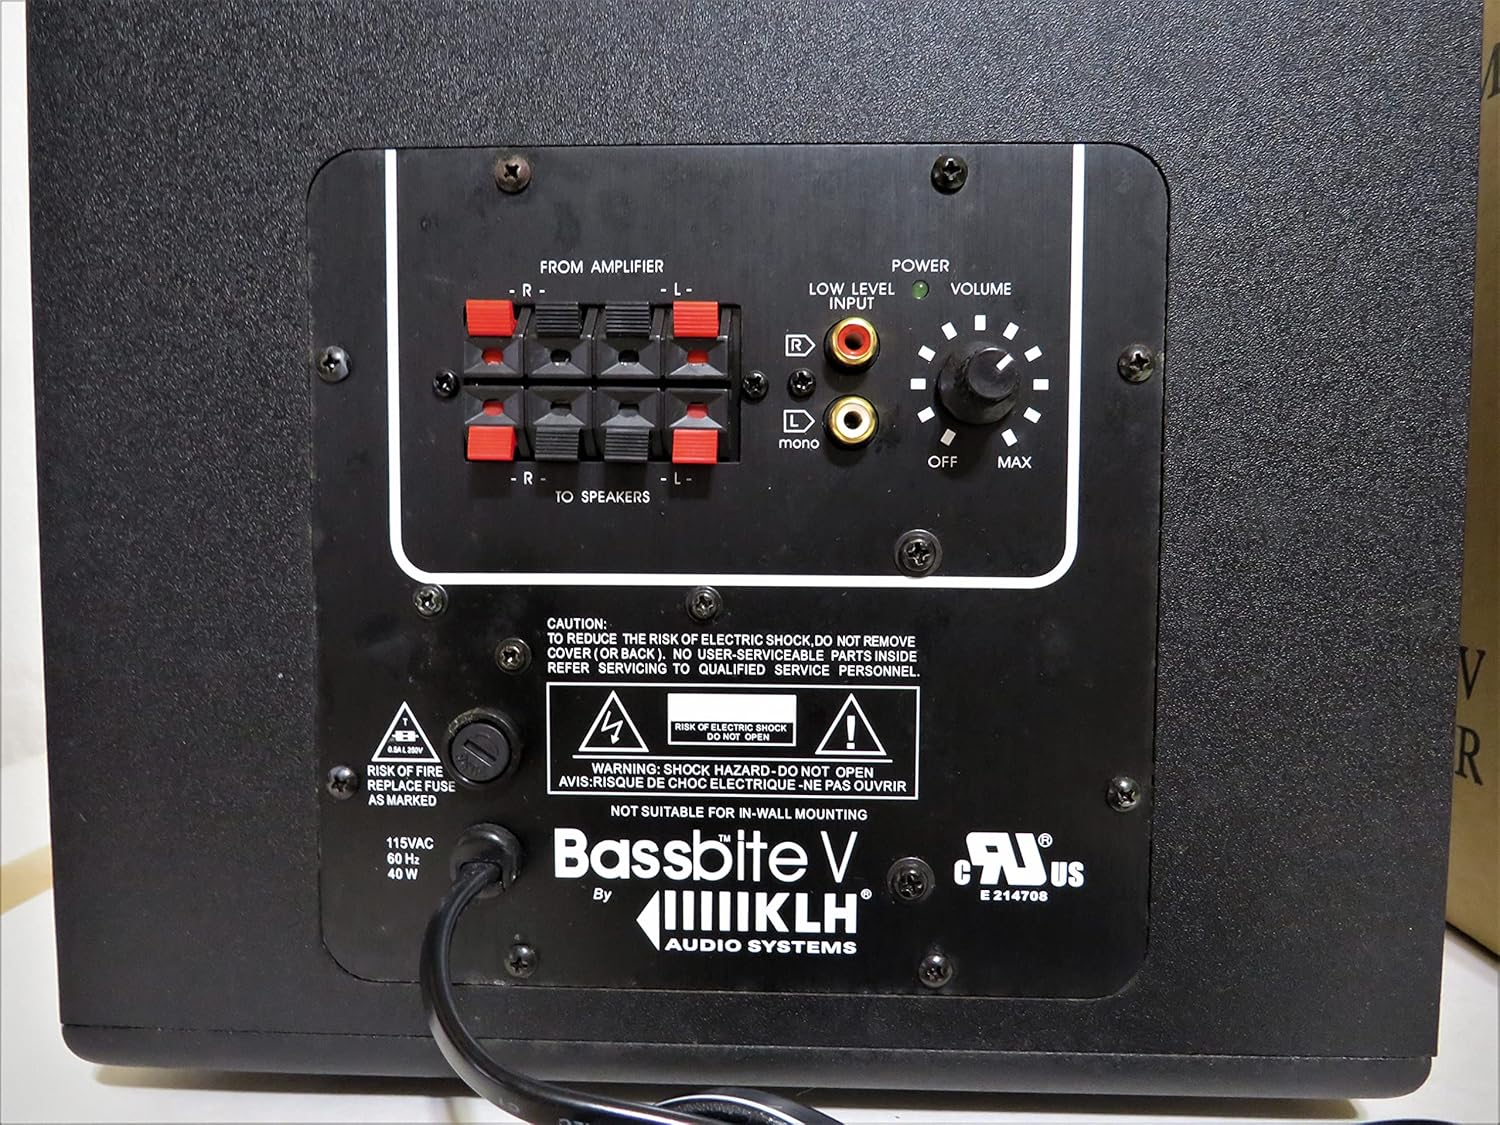
Figure 3: Detailed view of the Bassbite-V Subwoofer's control panel.
- Power Switch: Located on the rear panel, this switch turns the subwoofer on or off.
- Volume Control: Adjusts the overall output level of the subwoofer. Start with a low setting and gradually increase until the bass blends seamlessly with your main speakers.
- Low Level Input: RCA inputs for connecting to a receiver's LFE or subwoofer output.
Initial Setup Tips:
- Start with the volume control at its minimum setting.
- Play some music or a movie with good bass content.
- Slowly increase the subwoofer's volume until the bass output is balanced with your main speakers. The goal is to enhance the low end without making the subwoofer sound like a separate speaker.
Maintenance
Proper maintenance ensures the longevity and performance of your KLH Bassbite-V Subwoofer.
- Cleaning: Use a soft, dry cloth to wipe down the exterior of the subwoofer. Avoid using liquid cleaners, aerosols, or abrasive chemicals, as they may damage the finish or internal components.
- Placement: Keep the subwoofer away from direct sunlight, heat sources, and excessive moisture. Ensure adequate ventilation around the unit.
- Power: If the subwoofer will not be used for an extended period, it is advisable to unplug it from the power outlet.
Troubleshooting
If you encounter issues with your subwoofer, refer to the following common problems and solutions:
| Problem | Possible Cause | Solution |
|---|---|---|
| No sound from subwoofer |
|
|
| Distorted or unclear bass |
|
|
| Subwoofer hums or buzzes |
|
|
If the problem persists after trying these solutions, please contact KLH customer support for further assistance.
Specifications
| Model Name | KLH Bassbite-V |
| Speaker Type | Subwoofer |
| Recommended Uses | Home audio systems, Music systems, Gaming systems |
| Subwoofer Diameter | 31.8 Centimeters (approx. 12.5 inches) |
| Controller Type | Wired Electric |
| Color | Black |
| Product Weight | 7.26 kg (approx. 16 lbs) |
| Dimensions (L x W x H) | 31.75 x 26.67 x 26.67 cm (approx. 12.5 x 10.5 x 10.5 inches) |
| Max Speaker Output Power | 40 Watts |
| Connectivity Technology | Wired |
| Input Voltage | 115 Volts (AC) |
| Mounting Type | Tabletop Mount |
Warranty and Support
The KLH Bassbite-V Subwoofer comes with a limited warranty. For specific details regarding the warranty period and coverage, please refer to the documentation provided with your purchase or contact KLH customer support.
For technical assistance, troubleshooting beyond this manual, or warranty claims, please contact KLH customer service through their official website or contact information provided with your product.