
Introduction
This manual provides essential information for the safe and effective operation of your Ryobi 5133002778 1400W Circular Saw. Please read and understand all instructions before use to ensure personal safety and optimal performance of the tool. Keep this manual for future reference.
The Ryobi 5133002778 is a powerful 1400W circular saw designed for cutting wood and similar materials. It features a 190mm carbide blade, offering impressive cutting depths and a compact, lightweight design for comfortable handling.
Safety Information
WARNING: Always follow basic safety precautions when using electric tools to reduce the risk of fire, electric shock, and serious personal injury.
- Wear Eye Protection: Always wear safety goggles or safety glasses with side shields.
- Wear Hearing Protection: Use earplugs or earmuffs during operation.
- Keep Work Area Clean: Cluttered areas invite accidents.
- Secure Workpiece: Always clamp or otherwise secure the workpiece to prevent movement during cutting.
- Keep Hands Clear: Never place hands near the cutting blade.
- Disconnect Power: Always unplug the saw before making any adjustments, changing blades, or performing maintenance.
- Avoid Kickback: Ensure the blade is sharp and the workpiece is properly supported to prevent kickback.
- Use Correct Blade: Only use blades suitable for the material being cut and the saw's specifications.
- Maintain Proper Footing and Balance: Do not overreach.
Product Features
The Ryobi 5133002778 Circular Saw is equipped with several features designed for efficiency and user comfort:
- Powerful Motor: A 1400W motor delivers 5000 RPM for efficient cutting of wood and engineered wood products.
- High-Quality Blade: Includes a 190mm carbide-tipped saw blade with 20 teeth for precise and clean cuts.
- Adjustable Cutting Depth: Achieve cutting depths of up to 66mm at 90 degrees and 55mm at 45 degrees.
- Tool-Free Bevel Adjustment: The base plate can be adjusted for miter cuts up to 45 degrees without the need for additional tools.
- Compact and Lightweight Design: Up to 30% more compact and 20% lighter than previous models, enhancing maneuverability and reducing fatigue during extended use.
- Dust Extraction Port: Allows connection to a dust collection system to maintain a cleaner work environment.
- Gripzone+ Handle: Rubber anti-vibration grip provides enhanced comfort and control.

Image 1: Ryobi 1400W Circular Saw highlighting key features such as 190mm blade diameter, 5000 RPM speed, 66mm cutting depth, and compact/lightweight design benefits.
Components Overview
Familiarize yourself with the main components of your circular saw:
- Blade: The cutting element, typically carbide-tipped.
- Upper Blade Guard: Fixed guard covering the top part of the blade.
- Lower Blade Guard: Retractable guard that covers the bottom part of the blade and retracts during a cut.
- Handle (Gripzone+): Main handle for operating the saw.
- Trigger Switch: Activates the motor.
- Base Plate (Shoe): Supports the saw on the workpiece.
- Depth Adjustment Lever: Used to set the cutting depth.
- Bevel Adjustment Lever: Used to set the angle of the cut (0-45 degrees).
- Dust Port: Connection point for a dust extraction system.
- Parallel Guide: Accessory for making straight cuts parallel to an edge.
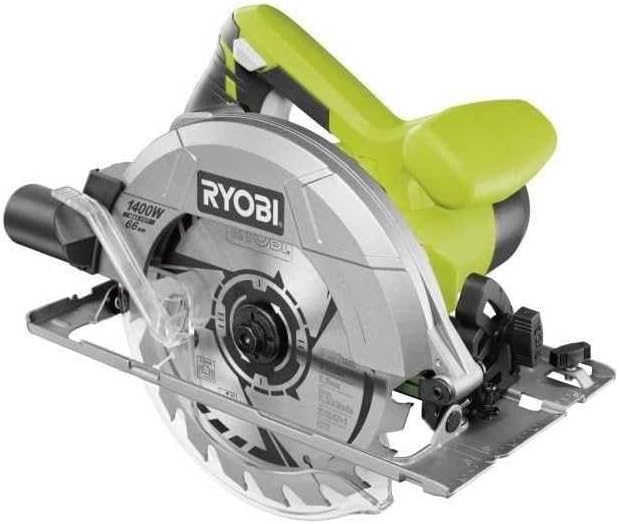
Image 2: Front-side view of the Ryobi 1400W Circular Saw, showing the blade, guards, handle, and base plate.
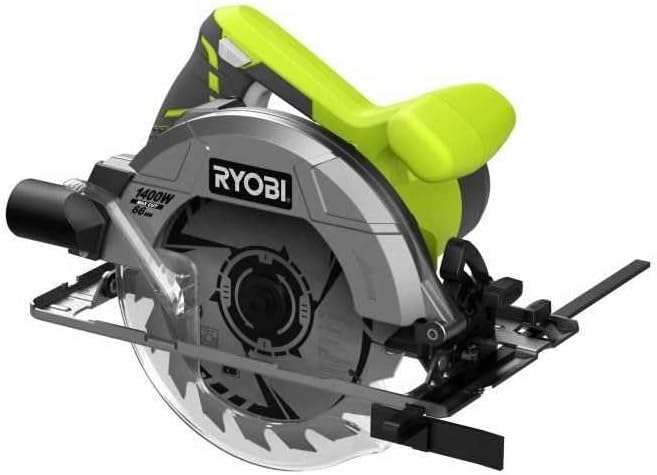
Image 3: Ryobi 1400W Circular Saw equipped with the parallel guide for accurate rip cuts.
Setup
1. Unpacking
Carefully remove the circular saw and all accessories from the packaging. Inspect the tool for any damage that may have occurred during shipping. Ensure all listed components are present: circular saw, 190mm carbide saw blade, Allen key, and parallel stop.
2. Blade Installation/Replacement
- Disconnect Power: Always unplug the saw from the power source before installing or changing the blade.
- Retract Lower Guard: Lift the lower blade guard lever to retract the guard.
- Loosen Arbor Nut: Use the provided Allen key to loosen the arbor nut that secures the blade. Note that the nut may have a left-hand thread.
- Remove Old Blade: Carefully remove the old blade, noting the direction of rotation.
- Install New Blade: Place the new 190mm carbide blade onto the arbor, ensuring the teeth are pointing in the direction of the arrow on the saw's upper guard.
- Secure Arbor Nut: Tighten the arbor nut firmly with the Allen key. Do not overtighten.
- Release Lower Guard: Allow the lower blade guard to return to its closed position.

Image 4: Close-up view of the 190mm carbide-tipped saw blade, showing tooth configuration and rotation direction markings.
3. Adjusting Cutting Depth
To adjust the cutting depth, loosen the depth adjustment lever, move the base plate up or down to the desired depth indicated on the scale, and then securely tighten the lever. For optimal safety and cut quality, set the blade depth so that the blade extends approximately 3-6mm (1/8-1/4 inch) below the workpiece.
4. Adjusting Bevel Angle
For angled cuts (bevel cuts), loosen the bevel adjustment lever, tilt the base plate to the desired angle (up to 45 degrees) indicated on the scale, and then tighten the lever firmly.
5. Connecting Dust Extraction
Attach a suitable dust extraction hose to the dust port on the saw to minimize sawdust and maintain a clear view of the cutting line.
Operating Instructions
1. Pre-Operation Checks
- Ensure the blade is sharp, clean, and correctly installed.
- Verify that all adjustments (depth, bevel) are securely tightened.
- Check that the lower blade guard operates freely.
- Inspect the power cord for damage.
- Clear the work area of obstructions and ensure adequate lighting.
- Wear appropriate personal protective equipment (PPE).
2. Making a Cut
- Mark the Cut Line: Clearly mark the desired cut line on your workpiece.
- Position Workpiece: Place the workpiece on a stable surface, ensuring it is securely clamped and the cut-off piece can fall freely without binding the blade.
- Position Saw: Rest the front of the saw's base plate on the workpiece, aligning the blade with the cut line. Ensure the blade is not touching the workpiece before starting.
- Start the Saw: Depress the trigger switch to start the motor. Allow the blade to reach full speed before beginning the cut.
- Begin Cut: Slowly and steadily push the saw forward along the cut line. Maintain firm pressure on the base plate against the workpiece. Do not force the saw.
- Complete Cut: Continue through the workpiece until the cut is complete. Release the trigger switch and allow the blade to stop completely before lifting the saw from the workpiece.

Image 5: A user demonstrating proper technique for operating the Ryobi Circular Saw on a workpiece, wearing safety glasses.
Maintenance
Regular maintenance ensures the longevity and safe operation of your circular saw.
- Cleaning: After each use, unplug the saw and use a brush or compressed air to remove sawdust and debris from the motor vents, blade guard, and base plate. Do not use solvents.
- Blade Inspection: Regularly inspect the saw blade for sharpness, cracks, or missing teeth. Replace dull or damaged blades immediately.
- Cord Inspection: Check the power cord for cuts, abrasions, or exposed wires. Replace damaged cords by a qualified technician.
- Guard Function: Ensure the lower blade guard moves freely and springs back to its closed position. Lubricate pivot points if necessary.
- Storage: Store the saw in a dry, secure location out of reach of children.
Troubleshooting
| Problem | Possible Cause | Solution |
|---|---|---|
| Saw does not start | No power supply; damaged cord; faulty switch. | Check power outlet and cord. If cord is damaged, have it replaced by a qualified technician. Contact service center if switch is faulty. |
| Poor cut quality (rough, splintering) | Dull or incorrect blade; incorrect cutting depth; forcing the saw. | Replace with a sharp, appropriate blade. Adjust cutting depth. Allow the saw to cut at its own pace. |
| Saw binds or kicks back | Workpiece not properly supported; dull blade; forcing the saw; blade pinched. | Ensure workpiece is securely clamped and supported. Replace dull blade. Do not force the saw. Check for blade pinching. |
| Excessive vibration | Damaged or unbalanced blade; loose components. | Inspect and replace blade if damaged. Check that all fasteners are tight. |
Specifications
| Feature | Detail |
|---|---|
| Brand | RYOBI |
| Model Number | 5133002778 |
| Power Source | Corded Electric |
| Wattage | 1400 watts |
| Speed | 5000 RPM |
| Blade Diameter | 190 mm |
| Blade Material | Carbide |
| Number of Teeth | 20 |
| Max Cutting Depth (90°) | 66 mm |
| Max Cutting Depth (45°) | 55 mm |
| Item Weight | 3.8 Kilograms (8.36 pounds) |
| Product Dimensions | 10.63 x 8.66 x 14.37 inches |
| Surface Recommendation | Wood |
| Special Features | Compact, Lightweight |
Warranty and Support
For warranty information, service, or technical support, please refer to the warranty card included with your product or visit the official Ryobi website. You can also contact Ryobi customer service directly for assistance with your Ryobi 5133002778 Circular Saw.
Manufacturer: Ryobi


