
Introduction
This instruction manual provides comprehensive guidance for the assembly, operation, maintenance, and troubleshooting of your Topskyfurniture Mesh Computer Office Chair. Please read this manual thoroughly before assembly and use to ensure proper function and safety. This chair is designed for ergonomic support and comfort in an office environment.
Safety Information
Adhere to the following safety guidelines to prevent injury or damage to the product:
- The maximum weight capacity for this chair is 220 pounds (approximately 100 kg). Do not exceed this limit.
- Exercise caution when tilting or reclining the chair to maintain balance.
- Ensure all bolts and fasteners are securely tightened before use and periodically check for looseness.
- Keep hands and fingers clear of moving parts during adjustment.
- Do not stand on the chair or use it as a ladder.
Setup and Assembly
Detailed assembly instructions are provided in the included Installation Manual (PDF) and User Guide (PDF). The following steps outline the general assembly process and key considerations.

Figure 1: Chair Dimensions. This image illustrates the various dimensions of the chair, including height, seat depth, and backrest width, providing a comprehensive size overview.
Unpacking and Part Identification
Carefully unpack all components and verify that all parts are present according to the packing list. The chair comes with various bolts and tools. Identify the bolts by size and type before starting assembly. Supplied tools typically include Allen/hex wrenches (4mm, 5mm, 6mm) and a #2 Philips screwdriver.
Assembly Steps
- Base Assembly:
- Invert the chair base and insert the wheels into the holes at the end of each leg. Apply firm pressure until they click into place.
- Revert the base and insert the larger end of the seat gas spring into the center hole of the legs.
- Install the plastic hub cover over the gas spring and hub, snapping it around each leg.
- Armrest Attachment:
- Attach each armrest pad to its respective arm using two short (12mm) thinner black Philips bolts.
- Invert the seat. Attach each arm to the base of the seat using three middle-length (25mm) thinner hex bolts. Ensure the arms angle towards the front of the seat. Torque snugly.
- Mechanism and Backrest Attachment:
- Attach the reclining mechanism to the seat using four washers and four shorter-length (20mm) thinner hex bolts. Ensure the front of the mechanism aligns with the front of the seat. Torque snugly.
- Attach the seat back to the reclining mechanism using three shorter-length (20mm) thicker hex bolts. The seat back tongue slots between the seat and the recline mechanism. Torque snugly.
- Final Assembly:
- Revert the seat assembly to an upright position and place it onto the base assembly, ensuring the thin end of the gas spring mates with the hole in the reclining mechanism.
- Clip the headrest mount to the center top of the seat back and secure it with the longest-length (30mm) thinner flat hex screw. Torque snugly.
- Insert the headrest pivot into the headrest mount and align the holes. Insert the axle and secure it at each end with two short (15mm) thinner black hex bolts. Torque snugly.
Operating Instructions
Your Topskyfurniture office chair features multiple adjustment points to customize your seating experience for optimal comfort and ergonomic support.
Chair Height Adjustment
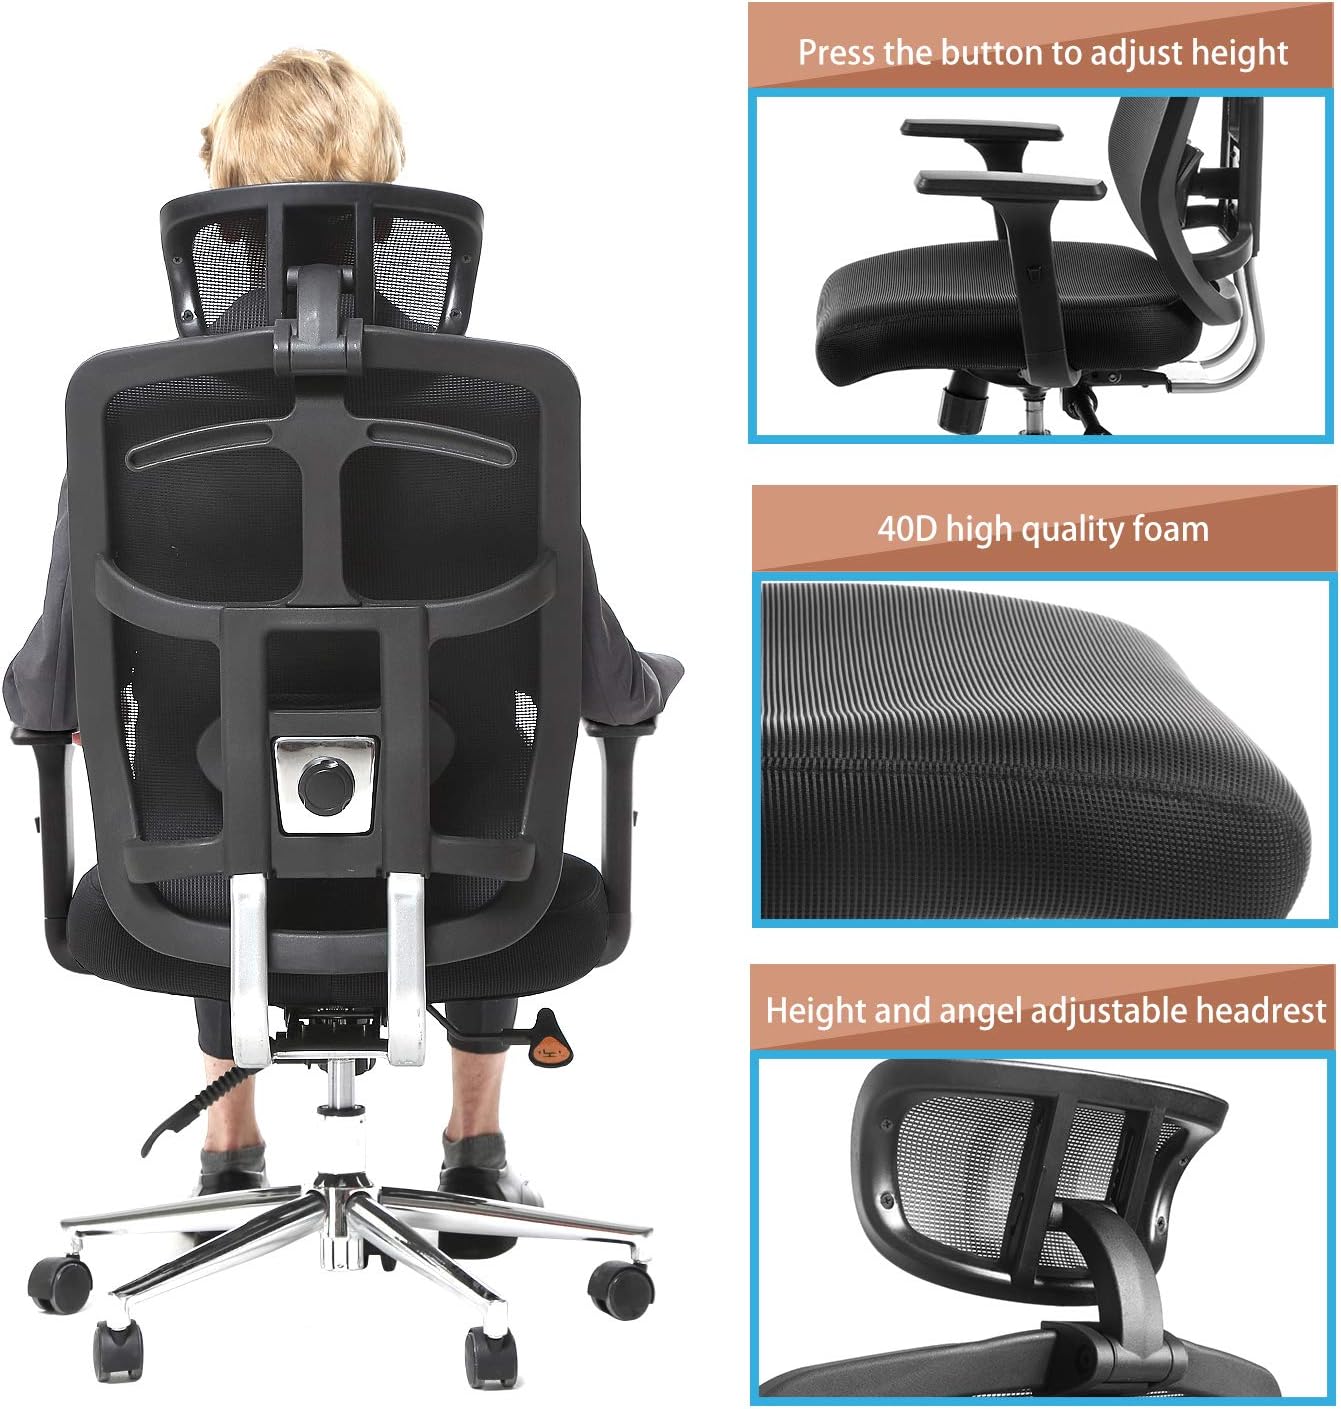
Figure 2: Height and Headrest Adjustment. This image highlights the lever for adjusting the chair's height and the mechanism for adjusting the headrest's angle and position.
To adjust the chair's height, locate the lever on the right side, beneath the seat. While seated, pull the lever upwards to lower the chair. To raise the chair, stand up slightly to relieve weight from the seat, then pull the lever upwards. Release the lever to lock the height.
Armrest Adjustment

Figure 3: Smart Adjustable Armrests. This image demonstrates the three adjustment capabilities of the armrests: vertical height adjustment, horizontal forward/backward movement, and pivot/twist function.
The armrests offer multiple adjustments:
- Height Adjustment: Press the button on the side of each armrest and slide it up or down to your desired height. Release the button to lock.
- Forward and Backward: Slide the armrest pad forward or backward to adjust its depth.
- Pivot/Twist Function: Rotate the armrest pads inward or outward to find a comfortable angle.
Headrest Adjustment
The headrest can be adjusted for height and angle. Refer to Figure 2 for visual reference.
- Height Adjustment: Slide the headrest up or down along its support to position it comfortably for your neck and head. It may click into set positions.
- Angle Adjustment: The headrest can be rotated forward and backward to adjust its angle, providing optimal support whether upright or reclined.
Lumbar Support Adjustment

Figure 4: Lumbar Support Adjustment. This image shows the knob located on the back of the chair, used to adjust the depth of the lumbar support for personalized comfort.
Adjust the lumbar support to provide optimal comfort for your lower back. Locate the circular knob on the back of the chair:
- Clockwise Rotation: Turning the knob clockwise will move the lumbar support outwards, providing more pressure to your lower back.
- Counter-clockwise Rotation: Turning the knob counter-clockwise will retract the lumbar support, reducing pressure.
Recline Mechanism

Figure 5: Recline Function. This image illustrates the chair's ability to recline, showcasing its ergonomic design for extended relaxation and support.
The chair features a synchronous recline mechanism, allowing both the seat and backrest to tilt at different rates for a comfortable recline. Locate the recline lock/tension lever on the left side, beneath the seat.
- Lock/Unlock Recline: Push the lever inwards to lock the recline position, and pull it outwards to unlock and allow reclining.
- Tension Adjustment: A knob beneath the seat (often at the front) controls the recline tension. Turn it to adjust the effort required to recline. Turn clockwise for more tension (harder to recline), counter-clockwise for less tension (easier to recline).
Integrated Hanger Function

Figure 6: Coat Hanger Function. This image displays the integrated hanger on the back of the chair, designed for conveniently hanging coats or jackets.
The chair is equipped with an integrated hanger on the backrest, suitable for hanging coats, jackets, or other light garments, keeping them off the floor and within reach.
Maintenance
Regular maintenance ensures the longevity and optimal performance of your office chair.
- Cleaning: For general cleaning, use a soft, damp cloth. For spills or stains, spot clean the affected area immediately. Avoid harsh chemicals or abrasive cleaners.
- Mesh Care: The mesh backrest and seat can accumulate dust, crumbs, and fluff. Periodically vacuum the mesh fabric using a brush attachment to keep it clean.
- Fastener Check: Periodically inspect all bolts and screws to ensure they are tight. Re-tighten any loose fasteners to maintain stability and safety.
- Caster Care: Keep the casters (wheels) free of hair, dust, and debris to ensure smooth movement. Clean them as needed.
Troubleshooting
This section addresses common issues you might encounter with your office chair.
| Problem | Possible Cause | Solution |
|---|---|---|
| Chair does not adjust height. | Gas lift malfunction or lever not engaged properly. | Ensure the height adjustment lever is fully engaged. If the issue persists, the gas lift may need replacement. Contact customer support. |
| Chair feels wobbly or unstable. | Loose assembly bolts. | Inspect all assembly bolts (especially those connecting the arms, mechanism, and backrest) and re-tighten them securely. |
| Recline mechanism is stiff or noisy. | Recline tension too high or lack of lubrication. | Adjust the recline tension knob counter-clockwise to loosen. Apply a small amount of silicone-based lubricant to moving parts if noise persists. |
| Casters (wheels) do not roll smoothly. | Debris caught in casters. | Invert the chair and remove any hair, dust, or debris from the caster wheels. |
| Headrest or armrest does not stay in position. | Friction mechanism worn or internal fastener loose. | Ensure adjustment mechanisms are fully engaged. If a specific part was noted as having a missing screw during assembly (as per some user experiences), this could be a cause. Contact customer support for replacement parts if necessary. |
Specifications
Key specifications for the Topskyfurniture Mesh Computer Office Chair:
- Brand: TOPSKY
- Model Name: Topskyfurniture ME7
- Item Model Number: C4C-2-Black
- UPC: 841247121529
- Color: Blue (also available in Black as per product title)
- Product Dimensions (D x W x H): 21" x 20" x 50"
- Seat Depth: 20.3 inches
- Back Style: Skeletal Back
- Special Feature: Ergonomic Design
- Maximum Weight Capacity: 220 pounds
- Product Care: Spot Clean
- Furniture Base Movement: Swivel
- Recommended Use: Office
- First Available Date: March 4, 2013
Customer Support
For further assistance, replacement parts, or warranty inquiries, please contact TOPSKY customer service. Refer to the official TOPSKY website or your purchase documentation for contact details.
Additional resources:

