Introduction
This manual provides detailed instructions for the safe and efficient operation, installation, and maintenance of your Avalon A5BOTTLELESS Self-Cleaning Bottleless Water Cooler Dispenser. Please read all instructions carefully before use and retain this manual for future reference.
The Avalon A5BOTTLELESS dispenser offers three temperature settings: hot, cold, and room temperature water, along with a dual filtration system and a self-cleaning feature.
Important Safety Information
- Always ensure the dispenser is properly grounded.
- Do not operate the dispenser with a damaged power cord or plug.
- Keep children away from the hot water spout. This product features a child safety lock on the hot water spout.
- Do not immerse the dispenser, cord, or plug in water or other liquids.
- Unplug the dispenser before cleaning or performing any maintenance.
- Ensure proper ventilation around the unit.
What's Included
Your Avalon A5BOTTLELESS water dispenser package includes the following components:
- Avalon A5BOTTLELESS Water Dispenser Unit
- Full Installation Kit:
- 20' of 1/4" tubing
- 3-way plastic 1/4" push connect adapter
- Under sink 3/8" adapter with shut-off valve
- Filter flushing adapter
- Detailed instructions with illustrations
- First Set of Dual Filtration Filters:
- Stage 1: Multi-Layer Sediment Filter (Avalon A5FILTER)
- Stage 2: Activated Carbon Block Filter (Avalon A4FILTER)

Image: The Avalon A5BOTTLELESS water dispenser shown alongside its included installation kit and the two filtration cartridges.
Setup and Installation
Follow these steps for proper setup and installation of your bottleless water cooler.
1. Unpacking and Placement
- Carefully remove the dispenser from its packaging.
- Place the dispenser on a flat, level surface in a location with adequate ventilation. Ensure there is at least 4 inches of clearance from the back and sides to a wall.
- Avoid direct sunlight or heat sources.
- Do not plug in the unit yet.

Image: Front view of the Avalon A5BOTTLELESS water dispenser in stainless steel finish.
2. Filter Installation
The dual filtration system includes a sediment filter and a carbon block filter. These filters should be installed before connecting to the water supply.
- Open the lower front door of the dispenser to access the filter compartment.
- Unwrap the sediment filter (Stage 1, typically blue) and the carbon block filter (Stage 2, typically black).
- Insert each filter into its designated housing, twisting clockwise until secure. Refer to the detailed instructions provided with the installation kit for specific guidance.

Image: Side view of the Avalon A5BOTTLELESS water dispenser with the lower door open, revealing the two water filters inside.
3. Water Line Connection
The dispenser connects directly to your cold water line using the provided installation kit.
- Turn off the cold water supply to your sink.
- Disconnect the cold water line from the faucet.
- Install the under-sink 3/8" adapter with the shut-off valve onto the cold water supply.
- Connect the 1/4" tubing from the dispenser to the adapter. Ensure all connections are tight to prevent leaks.
- Use the filter flushing adapter to flush the new filters before connecting them to the dispenser. This removes carbon fines.
- Once flushed, connect the tubing to the dispenser's water inlet.
- Slowly turn on the cold water supply and check for leaks.
Image: Close-up of the installation kit components, including tubing, adapters, and the filter flushing adapter.
4. Initial Fill and Power On
- Allow the dispenser to fill with water. This may take several minutes. Dispense a few cups of water from each spout (hot, cold, room temperature) to ensure air is purged from the system.
- Once water flows steadily from all spouts, plug the dispenser into a grounded electrical outlet.
- Turn on the hot and cold water switches located on the back of the unit. Allow approximately 15-30 minutes for the water to reach desired temperatures.
Operating Instructions
Dispensing Water
The Avalon A5BOTTLELESS offers three temperature options:
- Hot Water: Press and hold the child safety lock button (red) above the hot water spout, then press the hot water lever. Release the lever to stop dispensing.
- Cold Water: Press the cold water lever (blue) to dispense chilled water. Release the lever to stop dispensing.
- Room Temperature Water: Press the room temperature water lever (green/white) to dispense unchilled water. Release the lever to stop dispensing.

Image: Close-up view of the dispenser's top panel, showing the hot water safety button and the cool and cold water dispense buttons.
Self-Cleaning Feature
The dispenser includes a self-cleaning feature that sanitizes and purifies the internal water tanks. This feature operates automatically or can be initiated manually. Refer to the full instruction manual for specific details on activating and monitoring the self-cleaning cycle.
The self-cleaning UV LED system boasts a 99.99% sterilization rate and lasts over 10,000 hours, using food-grade materials.
Maintenance
Filter Replacement
The dual filters (Sediment and Carbon Block) should be replaced every 6 months or after 1500 gallons of use, whichever comes first. A "Replace Filter" indicator light will illuminate when replacement is due.
- Unplug the dispenser and turn off the water supply.
- Open the lower front door.
- Twist the old filters counter-clockwise to remove them.
- Insert new filters, twisting clockwise until secure.
- Flush the new filters using the filter flushing adapter before reconnecting the water line to the dispenser.
- Turn on the water supply and check for leaks.
- Plug in the dispenser.
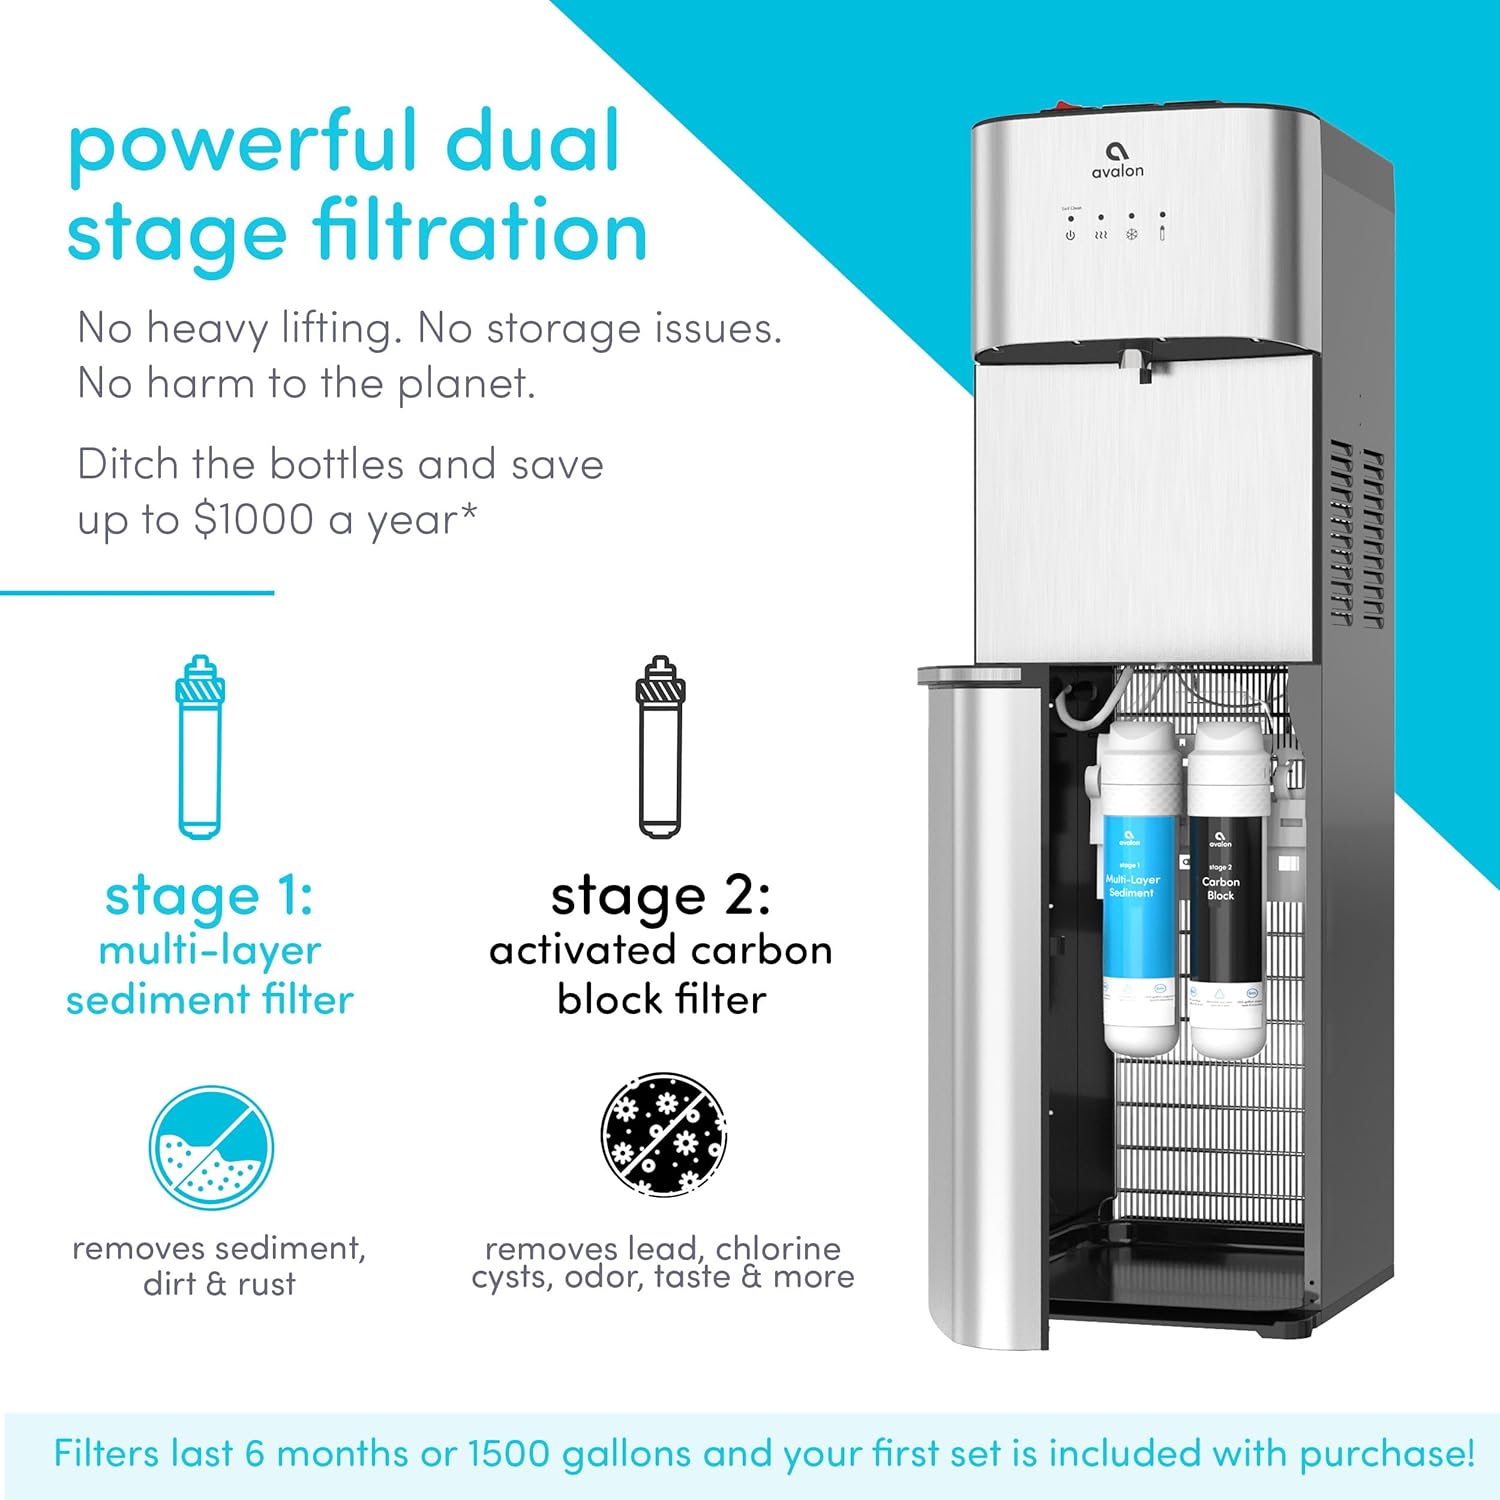
Image: The Avalon A5BOTTLELESS water dispenser with its lower compartment open, showing the two filtration cartridges (sediment and carbon block) in place.
Exterior Cleaning
Wipe the exterior surfaces with a soft, damp cloth. Do not use abrasive cleaners or solvents.
Drip Tray Cleaning
The drip tray should be emptied and cleaned regularly to prevent overflow and maintain hygiene.
Troubleshooting
| Problem | Possible Cause | Solution |
|---|---|---|
| No water dispensing | Water supply off; clogged filters; airlock in system. | Check water supply valve; replace filters; dispense water from all spouts to clear air. |
| Water not hot/cold enough | Hot/cold switch off; unit recently plugged in; thermostat issue. | Ensure hot/cold switches are on; allow 15-30 minutes for temperature stabilization; contact support if issue persists. |
| Leaking from unit | Loose connections; cracked tubing; damaged internal component. | Check all water line connections for tightness; inspect tubing for damage; contact support. |
| "Replace Filter" light on | Filters need replacement. | Replace both sediment and carbon block filters as per maintenance instructions. |
For issues not listed here or if troubleshooting steps do not resolve the problem, please contact Avalon customer support.
Specifications
| Model Number | A5BOTTLELESS |
| Brand | Avalon |
| Color | Stainless Steel |
| Material | Stainless Steel |
| Product Dimensions (D x W x H) | 14"D x 12"W x 41"H |
| Item Weight | 44 Pounds |
| Wattage | 420 watts |
| Installation Type | Freestanding |
| Number of Temperature Settings | 3 (Hot, Cold, Room) |
| Hot Water Temperature | Up to 185 Degrees Fahrenheit |
| Filter Capacity | 1500 Gallons or 6 Months |
| Power Source | Corded Electric |
| Certifications | NSF Certified Filter, UL Listed |

Image: The Avalon A5BOTTLELESS water dispenser with its dimensions (height 41", width 12", depth 13.5") clearly indicated.
Warranty and Support
Avalon provides a manufacturer's warranty for this product. Please refer to the warranty card included with your purchase for specific terms and conditions, including warranty duration and coverage details.
For technical assistance, troubleshooting, or to purchase replacement parts and filters, please visit the official Avalon website or contact their customer support directly. Contact information can typically be found on the product packaging or the Avalon website.
Online Resources: Visit the Avalon Store on Amazon
Helpful Videos
The following videos provide additional visual guidance for setup and operation.
No official seller videos are available for embedding at this time. Please refer to the written instructions and diagrams.


