
1. Introduction
This manual provides essential information for the safe and efficient use of your Bemonoc MY1016Z3 24 Volt 350 Watt Gear Reduction Electric Motor. Please read these instructions carefully before installation and operation to ensure proper function and longevity of the product. This motor is designed for various applications, including electric scooters and similar light electric vehicles, requiring a 24V DC power supply and a 350W output.
2. Product Overview
The Bemonoc MY1016Z3 is a robust 24V DC gear reduction electric motor, delivering 350 watts of power. It features a built-in gear reduction system to provide higher torque at lower RPMs, making it suitable for applications requiring strong pulling power. The motor comes equipped with a 9-tooth sprocket, compatible with standard chains for e-scooters and similar drive systems.

Figure 1: Front view of the Bemonoc MY1016Z3 electric motor, showing the main housing and output shaft with sprocket.
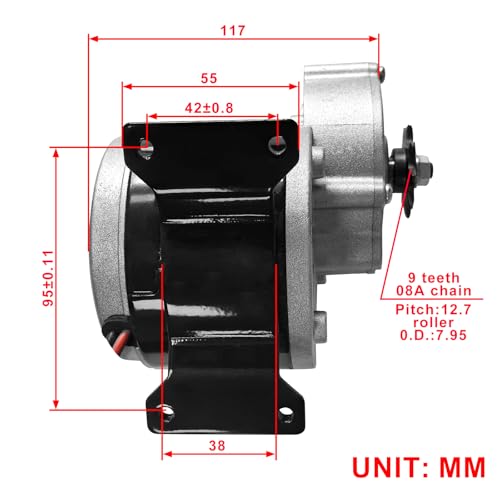
Figure 2: Side view of the motor, highlighting the gear reduction housing and the 9-tooth sprocket on the output shaft.
3. Specifications
| Feature | Specification |
|---|---|
| Model Number | MY1016Z3 (BBQ-106Z3) |
| Voltage | 24 Volts DC |
| Power Output | 350 Watts |
| Sprocket | 9 Tooth |
| Type | Gear Reduction Electric Motor |
| Weight | Approximately 2.86 kg |
| Manufacturer | OKEPS |
| UPC/GTIN | 714559152546 |
4. Safety Instructions
- Always disconnect power before performing any installation, maintenance, or troubleshooting.
- Ensure all electrical connections are secure and properly insulated to prevent short circuits and electrical hazards.
- Wear appropriate personal protective equipment (PPE), such as safety glasses and gloves, during installation and maintenance.
- Do not operate the motor if it is damaged or if any components are loose.
- Keep hands, hair, and loose clothing away from moving parts, especially the sprocket and chain, during operation.
- Ensure the motor is mounted securely to prevent vibration and potential detachment during use.
- Use only with a compatible 24V DC power source. Exceeding the rated voltage can damage the motor.
5. Setup and Installation
5.1 Mounting the Motor
- Identify a suitable mounting location on your e-scooter or application frame. The motor typically has a mounting base with bolt holes.
- Align the motor's mounting holes with the corresponding holes on your frame. If necessary, use a template to mark and drill new holes.
- Secure the motor using appropriate bolts, washers, and nuts. Ensure all fasteners are tightened to prevent movement or vibration during operation.
- Verify that the motor is stable and does not interfere with other components.
5.2 Electrical Connections
- Connect the motor's positive (+) wire (usually red) to the positive output of your 24V DC power source (e.g., battery or controller).
- Connect the motor's negative (-) wire (usually black) to the negative output of your 24V DC power source.
- Ensure all connections are firm and insulated with electrical tape or heat shrink tubing to prevent accidental contact.
- Note on Polarity: If the motor runs in reverse direction for your application, reverse the polarity of the connections (connect red to negative, black to positive).
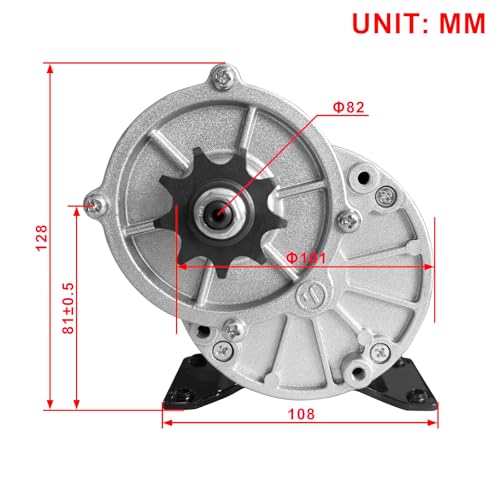
Figure 3: View of the motor's wiring terminals, typically red for positive and black for negative connections.
5.3 Sprocket and Chain Installation
- Ensure the 9-tooth sprocket is securely fastened to the motor's output shaft.
- Install the drive chain, ensuring proper tension. The chain should have a small amount of slack but not be excessively loose or tight.
- Verify that the chain is correctly aligned with the motor sprocket and the driven sprocket to prevent premature wear and chain derailment.
- Some applications may require modification of the existing sprocket or chain tensioner for optimal fit.
6. Operating Instructions
- After successful installation, ensure all safety checks are completed.
- Connect the 24V DC power source to the motor via a suitable controller or switch.
- Activate the power. The motor should begin to rotate, driving the connected system.
- Monitor the motor for any unusual noises, excessive heat, or vibrations during initial operation. If any issues are observed, immediately disconnect power and refer to the troubleshooting section.
- Operate the motor within its rated voltage and power limits to ensure optimal performance and lifespan.
7. Maintenance
- Regular Inspection: Periodically inspect the motor for any signs of wear, damage, or loose connections. Check the mounting bolts, electrical wiring, and sprocket for integrity.
- Cleaning: Keep the motor free from dirt, dust, and debris. Use a dry cloth or compressed air to clean the exterior. Avoid using liquids directly on the motor.
- Lubrication: The gear reduction mechanism is typically sealed and does not require user lubrication. If you notice unusual noise from the gears, consult a professional.
- Sprocket and Chain: Ensure the chain is properly tensioned and lubricated according to the chain manufacturer's recommendations. Inspect the sprocket for worn teeth.
- Storage: If the motor is not in use for an extended period, store it in a dry, clean environment away from direct sunlight and extreme temperatures.
8. Troubleshooting
| Problem | Possible Cause | Solution |
|---|---|---|
| Motor does not run | No power supply; loose electrical connections; faulty controller/switch; motor damage. | Check 24V power source; verify all wiring connections are secure; test controller/switch; inspect motor for visible damage. |
| Motor runs in reverse | Incorrect polarity of electrical connections. | Reverse the positive and negative electrical connections to the motor. |
| Motor makes unusual noise or vibrates excessively | Loose mounting; worn bearings; damaged gears; misaligned chain/sprocket. | Tighten mounting bolts; inspect for bearing play; check gear reduction housing for damage; verify chain/sprocket alignment. |
| Motor overheats | Overload; insufficient ventilation; prolonged operation at maximum load. | Reduce load on the motor; ensure adequate airflow around the motor; allow for cooling periods during heavy use. |
9. Warranty and Support
For warranty information, please refer to the terms provided by your original retailer or contact the manufacturer directly. Information regarding spare parts availability and software updates is not available in the product specifications.
If you encounter issues not covered in this manual or require further assistance, please contact the seller or manufacturer through their official support channels. When contacting support, please provide your product model number (MY1016Z3 or BBQ-106Z3) and a detailed description of the issue.