
1. Introduction
This manual provides essential information for the installation, operation, and maintenance of your Alpine i209-WRA 9-inch Restyle Dash System. Engineered specifically for 2011-2018 Jeep Wrangler JK models, this mech-less AM/FM/Bluetooth system features a 9-inch WVGA capacitive touchscreen and a custom dash bezel. The i209-WRA is designed with a weatherproof touch screen and bezel, rated at IP53, offering protection against dust and fresh water spray. It supports both Apple CarPlay and Android Auto for seamless smartphone integration.
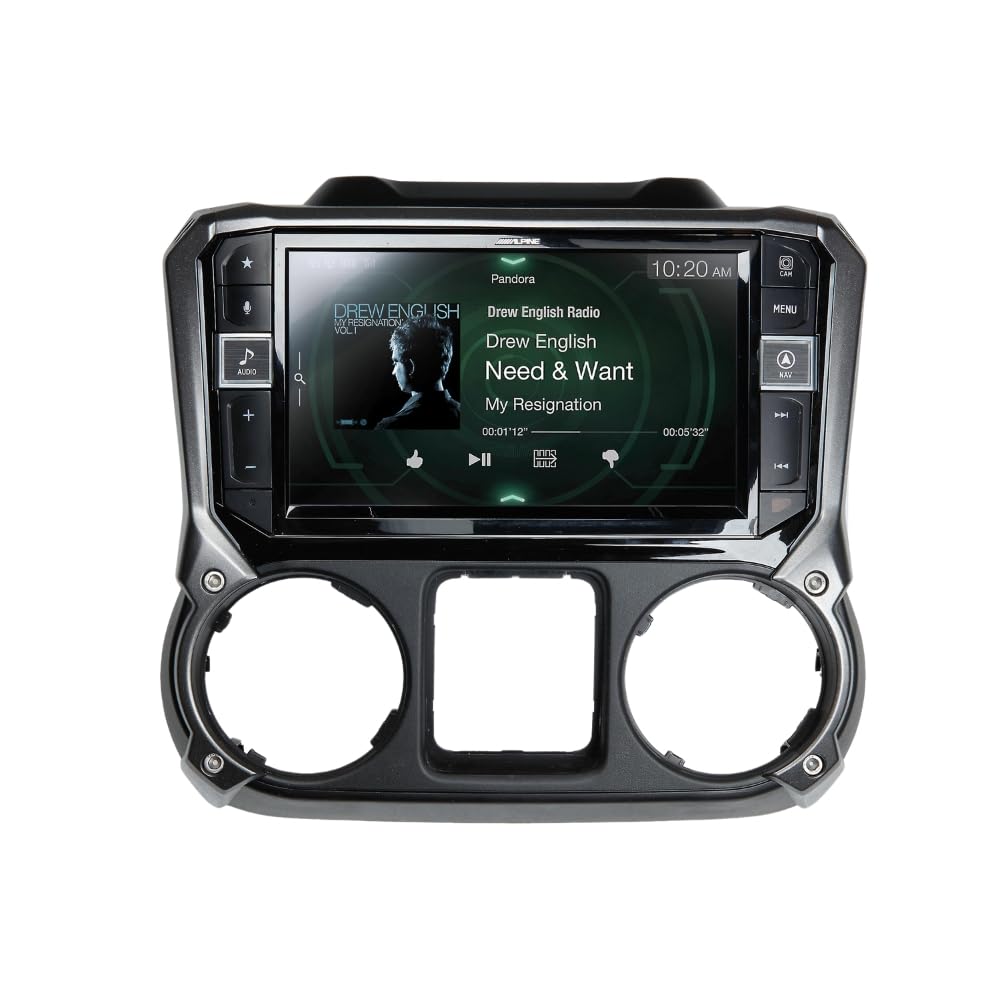
Image 1.1: The Alpine i209-WRA unit seamlessly integrated into a Jeep Wrangler JK dashboard, showcasing its large display and user interface.
2. Safety Information
Read all instructions carefully before installation and operation. Failure to follow these guidelines may result in personal injury or damage to the product or vehicle.
- Professional Installation Recommended: Due to the complexity of vehicle electronics and the need for dash modification, professional installation is highly recommended.
- Vehicle Compatibility: This unit is designed for 2011-2018 Jeep Wrangler JK models. Ensure compatibility before attempting installation.
- Power Connection: Connect the unit only to a 12V DC negative ground electrical system. Incorrect wiring can cause fire or malfunction.
- Driving Safety: Do not operate features that distract you from driving. Always keep your eyes on the road and obey all traffic laws.
- Weather Resistance: The unit is IP53 rated for dust and water spray. Avoid direct high-pressure water jets or submersion.
3. What's in the Box
Verify that all components listed below are present before beginning installation.
- i209 Display Unit
- i209 Source Unit
- USB Extension Cable
- AUX/Pre-out Harness
- GPS Antenna
- Direct Camera Adapter
- Display Cable
- Display Power Harness
- Anti-Vibration Foam
- Screws (12)
- Source Unit HDMI Bracket
- G-KTX-i209-WRA Installation Kit Parts (i209-WRA Radio Display Bezel)
- Key Harness
- Side Mounting Brackets
- Microphone
- GPS Antenna Bracket
- Display Mounting Brackets
- iDatalink Maestro Box Parts (Maestro Flashing Cable)
- Antenna Adapter
- iDatalink Maestro Module
- Main Harness
- Satellite Radio Antenna Adapter
- OEM USB Adapter

Image 3.1: All included wiring harnesses, adapters, and the iDatalink Maestro module for the Alpine i209-WRA system.
4. Setup and Installation
The installation of the Alpine i209-WRA system involves replacing the factory radio and dash components. This process requires careful attention to detail and may involve modifying the vehicle's dashboard. It is strongly recommended that installation be performed by a qualified professional.
4.1. Pre-Installation Steps
- Disconnect Battery: Always disconnect the vehicle's negative battery terminal before starting any electrical work.
- Remove Factory Components: Carefully remove the factory radio, dash bezel, and any associated wiring.
- Dash Modification: The installation may require cutting or modifying the factory dash structure to accommodate the larger 9-inch display and new bezel. Refer to the detailed installation guide provided with the product for specific instructions.

Image 4.1: The internal structure of the Alpine i209-WRA dash bezel, ready for display unit integration.
4.2. Wiring and Module Connection
- iDatalink Maestro Module: Connect the iDatalink Maestro module according to the provided instructions. This module retains factory features such as steering wheel controls and vehicle information display. Ensure the module is flashed with the correct firmware for your vehicle.
- Harness Connections: Connect the main harness, AUX/Pre-out harness, display power harness, and other specific adapters (GPS antenna, camera adapter, satellite radio adapter) to the i209 Source Unit and Display Unit.
- USB and HDMI: Route the USB extension cable and HDMI cable (if applicable) to desired locations for easy access.

Image 4.2: The Alpine i209-WRA dash bezel and mounting hardware.
4.3. Mounting the Unit
- Assemble Display and Bezel: Secure the i209 Display Unit into the custom dash bezel using the provided screws and mounting brackets.
- Install into Dash: Carefully install the assembled unit into the vehicle's dashboard, ensuring all connections are secure and no wires are pinched.
- Reconnect Battery: Once all components are securely installed and wired, reconnect the vehicle's negative battery terminal.
5. Operating Instructions
The Alpine i209-WRA offers a user-friendly interface with advanced features. Familiarize yourself with the main functions for optimal use.
5.1. Power On/Off and Basic Controls
- Power: The unit powers on automatically with the vehicle's ignition. To manually turn off or on, press and hold the power button (if available on the bezel).
- Volume: Adjust volume using the physical buttons on the bezel or the steering wheel controls (if retained via iDatalink Maestro).
- Home Screen: Press the 'Home' or 'Menu' button on the bezel to return to the main menu.
5.2. Apple CarPlay
Connect your iPhone (iPhone 5 or later) via an Apple Lightning cable to enable Apple CarPlay. CarPlay allows you to make calls, send messages, get directions, and play music using Siri voice control or the touchscreen.
- Connection: Plug your iPhone into the designated USB port. The CarPlay interface will automatically launch.
- Siri Voice Control: Press the 'Voice' button on the unit or steering wheel to activate Siri.
- Navigation: Use Apple Maps or other compatible navigation apps for directions.
5.3. Android Auto
Connect your Android phone (running Android 5.0 Lollipop or higher with the Android Auto app installed) via a USB cable and Bluetooth connection to use Android Auto. This feature provides a simplified interface for navigation, communication, and music.
- Connection: Connect your Android phone via USB and ensure Bluetooth is paired. The Android Auto interface will appear.
- Voice Commands: Use the 'Voice' button to activate Google Assistant for hands-free control.
- Navigation: Utilize Google Maps or Waze for turn-by-turn directions.
5.4. Bluetooth Audio and Hands-Free Calling
The i209-WRA includes built-in Bluetooth for wireless audio streaming and hands-free calling.
- Pairing: Go to the Bluetooth settings on the unit and your smartphone to pair devices.
- Audio Streaming: Stream music from your phone directly to the unit.
- Hands-Free Calling: Make and receive calls using the unit's microphone and speakers.
5.5. Radio (AM/FM/HD Radio/SiriusXM)
Access various radio sources through the unit's interface.
- AM/FM: Tune to your favorite local stations. The built-in HD Radio tuner provides enhanced sound quality where available.
- SiriusXM: The unit is SiriusXM compatible. A separate SiriusXM Connect Vehicle Tuner and subscription are required for satellite radio access.
5.6. Camera Integration
The unit supports direct camera input. Connect compatible cameras (e.g., rearview, front, side) to enhance visibility and safety.
6. Maintenance
Proper care ensures the longevity and optimal performance of your Alpine i209-WRA receiver.
- Screen Cleaning: Use a soft, lint-free cloth to gently wipe the touchscreen. For stubborn smudges, slightly dampen the cloth with water or a screen-safe cleaner. Avoid harsh chemicals or abrasive materials.
- Unit Cleaning: Wipe the unit and bezel with a soft, dry cloth. Do not use excessive moisture.
- Weather Protection: While the unit is IP53 rated, prolonged exposure to extreme weather conditions (e.g., heavy rain, direct sunlight) should be minimized when possible to prevent wear and tear.
- Software Updates: Periodically check the Alpine website for firmware updates to ensure your unit has the latest features and bug fixes.
7. Troubleshooting
If you encounter issues with your Alpine i209-WRA, refer to the following common problems and solutions.
- No Power:
- Check vehicle's battery connection.
- Verify all power harnesses are securely connected.
- Check vehicle fuses.
- No Sound:
- Ensure volume is not muted or set to minimum.
- Check speaker wire connections.
- Verify audio source selection.
- CarPlay/Android Auto Not Launching:
- Ensure your smartphone is compatible and has the latest OS updates.
- Use a high-quality USB cable.
- For Android Auto, confirm Bluetooth is paired and the Android Auto app is installed.
- Try restarting your phone and the unit.
- Touchscreen Unresponsive:
- Perform a soft reset (refer to the full product manual for instructions).
- Ensure the screen is clean and free of debris.
- Steering Wheel Controls Not Working:
- Verify the iDatalink Maestro module is correctly installed and flashed.
- Check connections to the iDatalink module.
For persistent issues, contact Alpine customer support or consult a professional installer.
8. Specifications
| Feature | Specification |
|---|---|
| Model Number | i209-WRA |
| Screen Size | 9 inches |
| Display Type | WVGA Capacitive Touchscreen |
| Compatibility | 2011-2018 Jeep Wrangler JK |
| Smartphone Integration | Apple CarPlay, Android Auto |
| Weather Resistance | IP53 Rated |
| Radio Tuner | AM/FM, Built-in HD Radio, SiriusXM Ready (tuner and subscription required) |
| Bluetooth | Built-in Bluetooth for hands-free calling and audio streaming |
| Connectivity | USB, HDMI, RCA |
| Dimensions (Product) | 3.63 x 8.44 x 5.25 inches |
| Weight | 11 pounds |
9. Warranty and Support
Alpine Electronics USA provides a limited warranty for this product. For specific warranty terms, registration, and support, please refer to the warranty card included with your product or visit the official Alpine website. For technical assistance or service inquiries, contact Alpine customer support directly.
Alpine Customer Support: Refer to your product documentation or the Alpine website for the most current contact information.


