
1. Introduction
This manual provides essential information for the safe and effective operation, maintenance, and troubleshooting of your Steinel HL 1820 S Multi-Purpose Heat Gun. Please read these instructions thoroughly before using the device to ensure proper function and to prevent injury or damage.
The Steinel HL 1820 S is a versatile 1400W heat gun designed for a variety of tasks, featuring variable temperature and airflow settings. Its robust ceramic heating element and ergonomic design contribute to its durability and ease of use.

Image 1: Front view of the Steinel HL 1820 S Multi-Purpose Heat Gun.
2. Safety Instructions
WARNING: Read all safety warnings and instructions. Failure to follow the warnings and instructions may result in electric shock, fire, and/or serious injury.
- Always wear appropriate personal protective equipment, including safety glasses, when operating the heat gun.
- Do not direct the hot air stream at people or animals.
- Ensure the work area is well-ventilated to prevent the accumulation of fumes, especially when working with plastics, paints, or adhesives.
- Do not use the heat gun near flammable materials or gases.
- Allow the heat gun to cool down completely before storing. Use the integrated kickstand for hands-free cooling.
- Do not block the air intake or output nozzles.
- Always unplug the heat gun from the power source before performing any maintenance or when not in use.
- Keep children and bystanders away while operating the heat gun.
3. Product Overview
The Steinel HL 1820 S heat gun is designed for durability and user comfort. Key features include:
- Powerful 1400W Motor: Provides efficient heating for various applications.
- Variable Temperature Settings: Three stages from 120°F to 1100°F (50°C to 593°C).
- Three-Stage Airflow: Adjustable airflow at 4, 7, and 13 CFM.
- Ergonomic Design: Balanced weight and pistol grip with soft inlay for comfortable, fatigue-free operation.
- Integrated Kickstand: Allows for stable, hands-free use.
- Overload Protection: Built-in thermal cut-out prevents overheating.
- Standard Nozzle Compatibility: Fits all 1.34-inch industry standard nozzles.
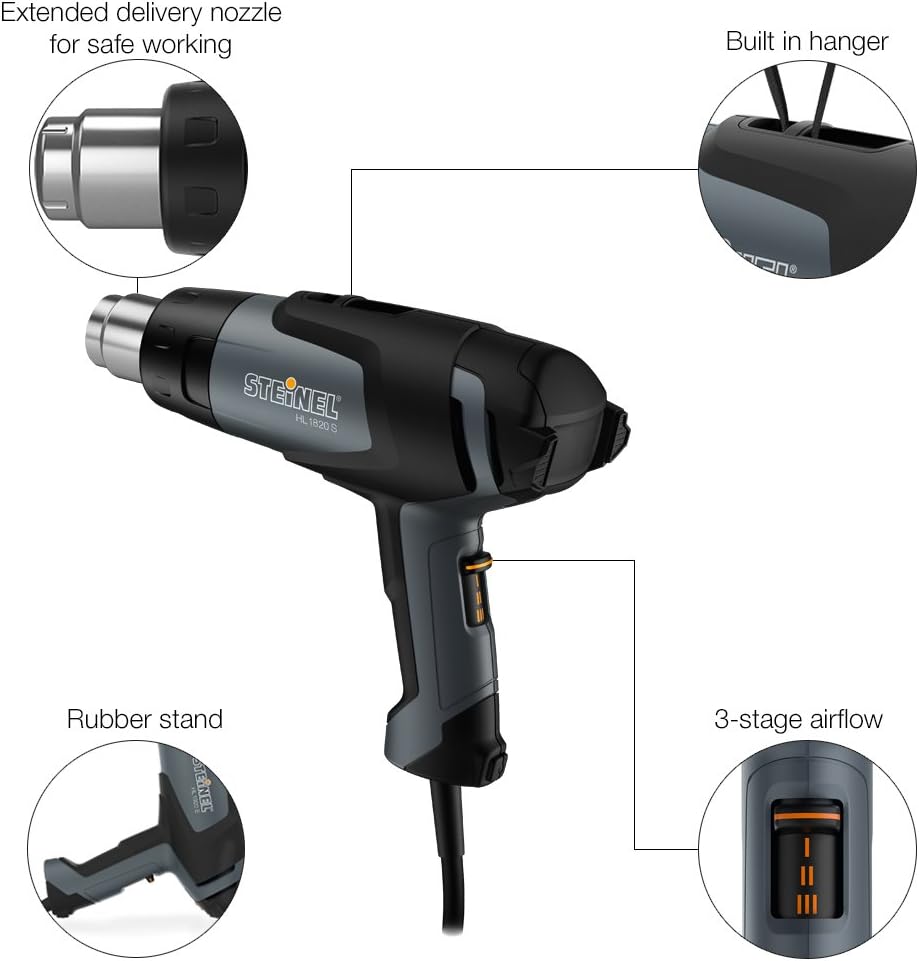
Image 2: Diagram highlighting key features such as the extended delivery nozzle, built-in hanger, rubber stand, and 3-stage airflow control.
4. Setup
- Unpacking: Carefully remove the heat gun from its packaging. Inspect for any signs of damage.
- Power Connection: Ensure the power cord is free from damage. Plug the heat gun into a standard electrical outlet (120V AC).
- Nozzle Attachment (Optional): If a specific nozzle is required for your application, ensure it is securely attached to the heat gun's output. The heat gun is compatible with 1.34-inch industry standard nozzles.
- Work Area Preparation: Set up your work area in a well-ventilated space, clear of flammable materials.
5. Operating Instructions
The HL 1820 S offers flexible control over temperature and airflow for various tasks.
5.1. Powering On and Off
To turn on the heat gun, slide the power switch to the desired setting. To turn off, slide the switch to the '0' position. Always allow the heat gun to cool down before storing.
5.2. Temperature and Airflow Settings
The heat gun features a three-stage switch for adjusting both temperature and airflow simultaneously:
- Stage 1: Approximately 120°F (50°C) with 4 CFM airflow. Suitable for gentle drying or cooling.
- Stage 2: Approximately 750°F (400°C) with 7 CFM airflow. Ideal for general-purpose heating, paint stripping, or bending plastics.
- Stage 3: Approximately 1100°F (593°C) with 13 CFM airflow. For high-heat applications such as shrink wrapping, soldering, or thawing pipes.
5.3. Common Applications
- Shrink Wrapping: Use a high heat setting (Stage 3) and move the heat gun evenly over the material to achieve uniform shrinkage.
- Soldering Sleeves: Apply heat to soldering sleeves on cables using a medium to high setting (Stage 2 or 3) until the solder melts and flows.
- Thawing Frozen Pipes: Use a medium heat setting (Stage 2) and continuously move the heat gun along the frozen section of the pipe to prevent overheating and damage.
- Stripping Paint: Apply heat to the painted surface using a medium to high setting (Stage 2 or 3) until the paint softens and bubbles, then scrape it off with a suitable tool.
- Drying: Use a low heat setting (Stage 1) for gentle drying of surfaces or materials.

Image 3: The Steinel HL 1820 S heat gun being used for diverse tasks such as shrink wrapping, soldering, and paint removal.

Image 4: The Steinel HL 1820 S heat gun applying heat to wiring during an installation or repair.
6. Maintenance
Regular maintenance ensures the longevity and optimal performance of your heat gun.
- Cleaning: After each use, ensure the heat gun is unplugged and cool. Wipe the exterior with a damp cloth. Do not use abrasive cleaners or solvents.
- Air Vents: Keep the air intake and output vents clear of dust and debris to maintain proper airflow and prevent overheating. Use a soft brush or compressed air if necessary.
- Cord Inspection: Regularly inspect the power cord for cuts, fraying, or damage. Do not use the heat gun if the cord is damaged.
- Storage: Store the heat gun in a dry, safe place, out of reach of children. Ensure it is completely cool before storage.
7. Troubleshooting
If you encounter issues with your Steinel HL 1820 S heat gun, refer to the following common problems and solutions:
| Problem | Possible Cause | Solution |
|---|---|---|
| Heat gun does not turn on. | No power supply; damaged cord; faulty switch. | Check power outlet and cord. If damaged, do not use. Contact customer support. |
| No hot air or insufficient heat. | Blocked air vents; faulty heating element; incorrect temperature setting. | Ensure vents are clear. Check temperature setting. If problem persists, contact customer support. |
| Heat gun overheats and shuts off. | Blocked air vents; prolonged use at high temperature without adequate cooling. | Clear air vents. Allow the unit to cool down. The built-in overload protection will reset once cooled. |
| Reduced airflow. | Blocked air intake or output. | Inspect and clear any obstructions from the air vents. |
For issues not listed above or if troubleshooting steps do not resolve the problem, please contact Steinel customer support.
8. Specifications
| Feature | Detail |
|---|---|
| Model | HL 1820 S |
| Part Number | 110025541 |
| Power Source | Corded Electric |
| Wattage | 1400 watts |
| Voltage | 120V AC (Standard US) |
| Temperature Settings | 120°F (Stage 1), 750°F (Stage 2), 1100°F (Stage 3) |
| Airflow Settings | 4 CFM (Stage 1), 7 CFM (Stage 2), 13 CFM (Stage 3) |
| Heating Element | Durable Ceramic |
| Nozzle Compatibility | 1.34 inch Industry Standard |
| Item Weight | 1.77 Pounds |
| Product Dimensions | 10 x 3.3 x 7.9 inches |
| Color | Grey/Black |
| Material | Copper (element), Plastic (housing) |
| Special Features | Overload Protection, Ergonomic Design, Integrated Kickstand |
9. Warranty and Support
Steinel products are manufactured to high-quality standards. For information regarding warranty coverage, please refer to the warranty card included with your product or visit the official Steinel website. If you require technical assistance or have questions about your HL 1820 S heat gun, please contact Steinel customer support directly.
Manufacturer: Steinel


