
1. Product Overview
The Suptig Hand Grip Waterproof Handle Monopod Floating Mount is designed to provide a secure and buoyant grip for your action camera, ensuring it remains afloat during water activities. Its compact and lightweight design allows for direct attachment to compatible cameras without the need for additional adapters. The handle also features a non-slip grip and a waterproof internal compartment for storing small valuables.

Figure 1.1: Suptig Floating Hand Grip with an attached action camera, demonstrating its primary use.
Key Features:
- Compatibility: Designed for GoPro Hero series (13, 12, 11, 10, 9, 8, 7, 6, 5, 4, 3+, 3, 2, 1, Session, Max, Fusion), DJI Osmo, Insta360 Ace Pro, Akaso (EK7000, Brave 4, Brave 7), Campark, and other action cameras.
- Floating Design: Ensures your camera floats on the water surface, preventing loss during aquatic activities.
- Non-Slip Grip: Provides a secure and comfortable hold, even when wet.
- Waterproof Storage: Features a hollow internal compartment with a waterproof seal for small items like money or keys.
- Adjustable Lanyard: Includes an adjustable wrist strap for added security.
- Tripod Mount: Integrated 1/4-inch screw hole at the base for attaching to tripods or other mounting accessories.
2. Package Contents
Verify that all items are present in the package:
- 1 x Suptig Floating Hand Grip
- 1 x Thumb Screw
- 1 x Adjustable Lanyard

Figure 2.1: Included components of the Suptig Floating Hand Grip.
3. Setup
3.1 Attaching Your Action Camera
- Align the mounting fingers of your action camera (or its waterproof housing) with the mounting prongs on the top of the Suptig Hand Grip.
- Insert the provided thumb screw through the aligned holes.
- Tighten the thumb screw securely to ensure the camera is firmly attached. Do not overtighten.
- Adjust the camera's angle as desired before fully tightening the screw.
Figure 3.1: Proper attachment of an action camera to the floating hand grip.
3.2 Using the Internal Storage Compartment
- Unscrew the orange cap at the bottom of the hand grip by turning it counter-clockwise.
- Place small, dry valuables such as money, keys, or a small memory card into the hollow compartment.
- Ensure the rubber O-ring on the cap is clean and properly seated.
- Screw the cap back on tightly by turning it clockwise until secure. This ensures the compartment remains waterproof.
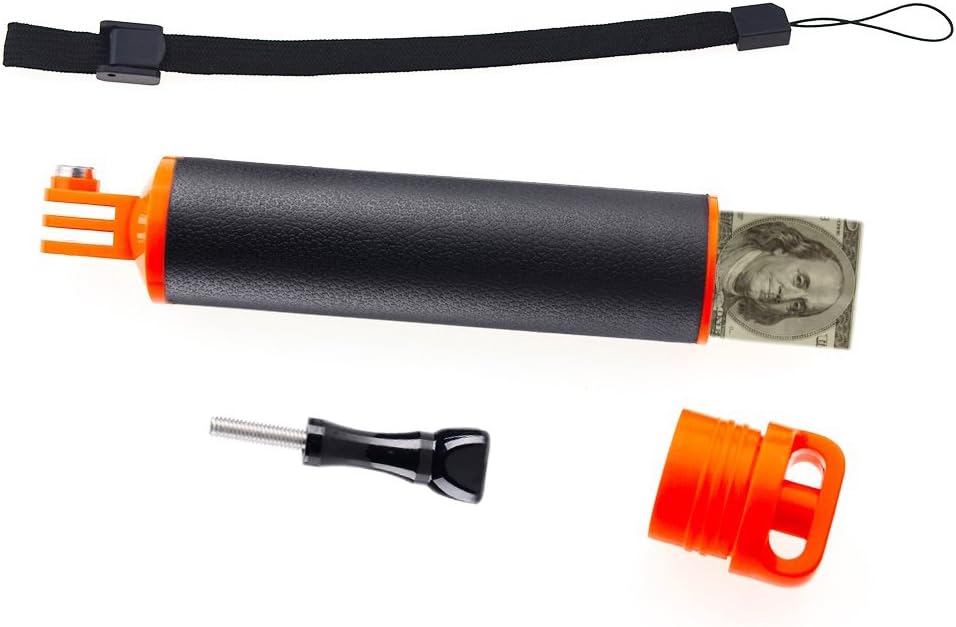
Figure 3.2: Accessing the waterproof storage compartment at the base of the grip.
3.3 Attaching the Lanyard
- Thread the loop end of the adjustable lanyard through the small hole on the orange cap at the bottom of the grip.
- Pass the larger end of the lanyard through the loop and pull to secure it.
- Adjust the lanyard around your wrist for a snug fit to prevent accidental drops.
Figure 3.3: The lanyard provides an extra layer of security during use.
4. Operating Instructions
4.1 Water Activities
The Suptig Floating Hand Grip is ideal for various water sports and activities, including deep sea diving, swimming, surfing, snorkeling, and scuba diving. Its buoyant design ensures that your action camera will float to the surface if accidentally released, making it easy to retrieve. The bright orange color of the top and bottom caps further enhances visibility in water.
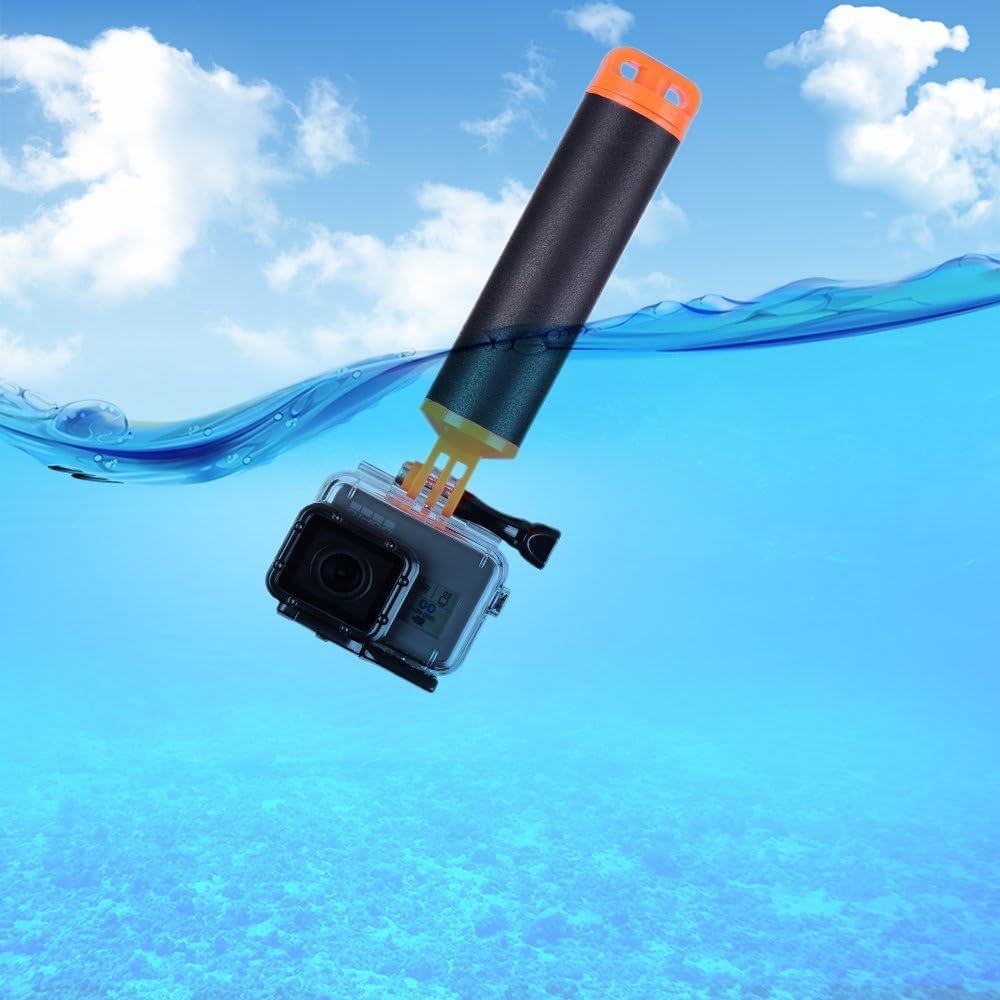
Figure 4.1: The grip's buoyancy keeps your camera visible and retrievable on the water surface.

Figure 4.2: The grip is suitable for underwater photography and videography.

Figure 4.3: Capturing moments while snorkeling with the floating hand grip.

Figure 4.4: The grip provides a stable platform for filming during swimming.
4.2 Using with a Tripod
The base of the Suptig Hand Grip features a standard 1/4-inch screw hole, allowing it to be mounted onto most tripods, monopods, or other compatible accessories for stable shots on land.
5. Maintenance
To ensure the longevity and optimal performance of your Suptig Floating Hand Grip, follow these maintenance guidelines:
- Rinse After Use: After each use, especially in saltwater, rinse the entire grip thoroughly with fresh water to remove salt, sand, and other debris.
- Dry Completely: Allow the grip to air dry completely before storing. Ensure the internal compartment is also dry if it was opened.
- Inspect O-Ring: Periodically inspect the rubber O-ring on the bottom cap for any signs of wear, cracks, or damage. A damaged O-ring can compromise the waterproof seal.
- Avoid Harsh Chemicals: Do not use abrasive cleaners or harsh chemicals, as these can damage the materials and seals.
- Storage: Store the grip in a cool, dry place away from direct sunlight and extreme temperatures.
6. Troubleshooting
6.1 Grip Does Not Float
- Check Camera Weight: Ensure the combined weight of your camera and any attached accessories (e.g., waterproof housing, additional lights) does not exceed the grip's maximum recommended floating weight (87 grams / 3.07 ounces).
- Empty Compartment: Verify that the internal storage compartment is empty or contains only very lightweight items, as heavy contents can reduce buoyancy.
6.2 Water Inside Storage Compartment
- Cap Tightness: Ensure the bottom cap was screwed on tightly and completely before submersion.
- O-Ring Integrity: Inspect the rubber O-ring on the cap for any dirt, sand, damage, or improper seating. Clean or replace the O-ring if necessary.
6.3 Difficulty Attaching Camera
- Alignment: Ensure the mounting fingers and prongs are perfectly aligned.
- Thumb Screw: Verify that the thumb screw is not cross-threaded and is inserted straight through the holes.
7. Specifications
| Feature | Detail |
|---|---|
| Brand | Suptig |
| Model Number | RSX-318 |
| Product Dimensions | 1.4"D x 1.4"W x 7"H (7 inches long, 1.4 inches diameter) |
| Item Weight | 3.07 ounces (87 Grams) |
| Maximum Weight Recommendation | 87 Grams |
| Color | BLACK AND ORANGE |
| Country of Origin | China |
| UPC | 889957667005 |
| Compatible Devices | GoPro Hero (13, 12, 11, 10, 9, 8, 7, 6, 5, 4, 3+, 3, 2, 1, Session, Max, Fusion), DJI Osmo, Insta360 Ace Pro, Akaso (EK7000, Brave 4, Brave 7), Campark, and other action cameras. |
8. Warranty and Support
Suptig products are manufactured with quality and durability in mind. For any questions regarding product functionality, troubleshooting, or warranty claims, please contact Suptig customer support through their official channels. You can find more information and contact details on the Suptig Brand Store on Amazon.