1. Introduction
This manual provides detailed instructions for the installation, operation, and maintenance of your Renogy 400W 12V Solar Panel Starter Kit. This kit is designed for efficient power generation in various off-grid applications, including RVs, campers, boats, and marine systems. It features high-efficiency monocrystalline solar panels and an MPPT charge controller for optimal performance.
2. Product Components
Your Renogy 400W 12V Solar Panel Starter Kit includes the following main components:
- 4 x 100W Monocrystalline Solar Panels: Designed for high efficiency and durability.
- MPPT 40A Charge Controller: Maximizes power harvest from solar panels and protects your battery.
- Adaptor Kit: Cables for connecting solar panels to the charge controller.
- Tray Cables: Cables for connecting the charge controller to the battery.
- Mounting Z-Brackets: For secure installation of solar panels.

Figure 2.1: Exploded view of a Renogy solar panel, highlighting its durable and reliable construction with an anti-corrosion frame, tempered glass, and high-efficiency cells.

Figure 2.2: The Renogy Rover 40A MPPT Charge Controller, showcasing its high tracking and conversion efficiency, and compatibility with various battery types.

Figure 2.3: Included cables for system connection, featuring UV protection, IP67 waterproofing, and fire rating for safety and durability.

Figure 2.4: Z-Bracket mounting system components, including four brackets and all necessary hardware for installation.
3. Setup and Installation
Proper installation is crucial for the safety and efficiency of your solar system. Please follow these steps carefully:
- Mount Solar Panels: Securely attach the solar panels using the provided Z-brackets to a stable surface, ensuring optimal sun exposure.
- Connect Charge Controller to Battery: Connect the tray cables (8AWG) from the charge controller's battery terminals to your 12V battery. Ensure correct polarity (positive to positive, negative to negative). The charge controller will power on once connected.
- Connect Solar Panels to Charge Controller: Connect the adaptor kit cables (10AWG) from the solar panels to the charge controller's PV terminals. Ensure correct polarity.
- Optional: Connect Inverter/Load: If using an inverter or direct DC loads, connect them to the appropriate terminals on the charge controller or battery, following the wiring diagram.

Figure 3.1: Comprehensive wiring diagram illustrating the connections for your Renogy solar panel system.
Video 3.1: An official Renogy video demonstrating the setup process for a solar starter kit, including connecting panels, charge controller, and battery.
4. Operating Instructions
Once installed, your Renogy solar system will automatically begin charging your battery when sunlight is available. The MPPT charge controller optimizes the power output from your solar panels to ensure efficient charging.
- Charge Controller Display: The charge controller features an LCD display that shows real-time system information, including battery voltage, charging current, and solar panel voltage.
- Battery Compatibility: The Renogy Rover MPPT charge controller supports various battery types, including lithium, lead-acid, and gel batteries. Ensure the correct battery type is selected in the controller settings for optimal charging.
- Daily Output: The system can provide approximately 1600Wh daily output, depending on 4 hours of peak sunlight availability.
5. Maintenance
Regular maintenance ensures the longevity and optimal performance of your solar system:
- Solar Panels: Periodically clean the surface of the solar panels to remove dust, dirt, and debris that can reduce efficiency. Inspect for any physical damage or loose connections.
- Charge Controller: Keep the charge controller in a dry, well-ventilated area. Check all wire connections for tightness and ensure there is no corrosion.
- Batteries: Follow the manufacturer's guidelines for your specific battery type regarding maintenance. For lead-acid batteries, check electrolyte levels if applicable.
- Wiring: Inspect all cables and connections for wear, fraying, or damage. Replace any damaged components immediately.
6. Troubleshooting
If you encounter issues with your solar system, consider the following common troubleshooting steps:
- No Power Output from Panels: Check for shading on the panels. Ensure all connections from the panels to the charge controller are secure and correctly polarized. Verify the solar panel voltage on the charge controller display.
- Battery Not Charging: Confirm the charge controller is correctly connected to the battery and the battery voltage is within the acceptable range. Check the charge controller display for any error codes. Ensure sufficient sunlight is reaching the panels.
- Low Power Output: Clean the solar panels to remove any obstructions. Check for partial shading throughout the day. Verify that the charge controller settings match your battery type.
- Controller Not Turning On: Ensure the battery is connected first and has sufficient voltage to power the controller. Check battery connections for tightness.
For more complex issues, consult the detailed manual provided with the charge controller or contact Renogy customer support.
7. Specifications
| Feature | Specification |
|---|---|
| Brand | Renogy |
| Material | Aluminum |
| Product Dimensions | 41.81"L x 20.87"W x 1.38"H (per panel) |
| Item Weight | 9.6 ounces (per panel) |
| Efficiency | High Efficiency (22% solar cell efficiency) |
| Included Components | Solar panels, MPPT charge controller, adaptor kit cables, tray cables, Z-brackets |
| AC Adapter Current | 40 Amps (Charge Controller) |
| Maximum Voltage | 32 Volts |
| Maximum Power | 400 Watts |
| Special Feature | Lightweight Design, Corrosion-resistant aluminum frame |
8. Warranty and Support
Renogy offers a comprehensive service plan for your peace of mind:
- Solar Panel Material & Workmanship: 10 years of coverage.
- Charge Controller: 2-year plan.
- Solar Panel Power Output: 25-year service plan.
For technical assistance or warranty claims, please visit the official Renogy website or contact their customer support. Renogy provides 24-hour prompt response and professional technical guidance.


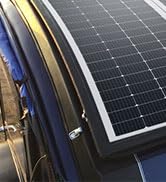
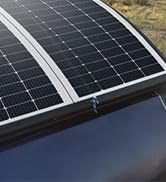
Figure 8.1: Renogy's commitment to customer support and service.


