
Introduction
This manual provides essential information for the safe and efficient use, installation, and maintenance of your N2 52cm Built-in Stainless Steel Kitchen Hood. Please read these instructions carefully before installation and operation, and retain them for future reference.
Safety Information
For your safety and to ensure proper operation, observe the following precautions:
- Ensure the electrical installation complies with local regulations.
- Do not operate the hood without the filters properly installed.
- Regularly clean the filters to prevent grease buildup, which can be a fire hazard.
- This appliance is not intended for use by persons (including children) with reduced physical, sensory or mental capabilities, or lack of experience and knowledge, unless they have been given supervision or instruction concerning use of the appliance by a person responsible for their safety.
- Children should be supervised to ensure that they do not play with the appliance.
- The hood is for domestic use only.
- Do not flambé under the range hood.
- Always ensure adequate ventilation in the room when the range hood is used simultaneously with appliances burning gas or other fuels.
- The air must not be discharged into a flue that is used for exhausting fumes from appliances burning gas or other fuels.
- Regarding the method of cleaning, please refer to the "Maintenance" section of this manual.
Product Overview
The N2 52cm Built-in Kitchen Hood is designed to efficiently remove smoke, steam, and odors from your cooking area. It features a stainless steel construction, LED lighting, and a 3-speed fan.
Components and Controls

Image 1: Top-down view of the N2 52cm Built-in Kitchen Hood. This image highlights the control panel with push buttons for fan speed and lighting, along with the two integrated LED lights and the aluminum grease filters.
The hood features a user-friendly control panel with push buttons for various functions:
- Power Button (0): Turns the hood On/Off.
- Fan Speed Buttons (1, 2, 3): Adjusts the extraction power to Low, Medium, or High.
- Light Button: Controls the integrated LED lighting.
Dimensions

Image 2: Dimensional drawing of the N2 52cm Built-in Kitchen Hood. The main body measures approximately 520mm in width, 280mm in depth, and 130mm in height. These measurements are crucial for proper cabinet integration.
Refer to Image 2 for detailed dimensions to ensure proper fitting within your kitchen cabinetry.
Setup & Installation
Installation should be performed by a qualified technician following all local building and electrical codes. Ensure the power supply is disconnected before beginning installation.
Mounting the Hood
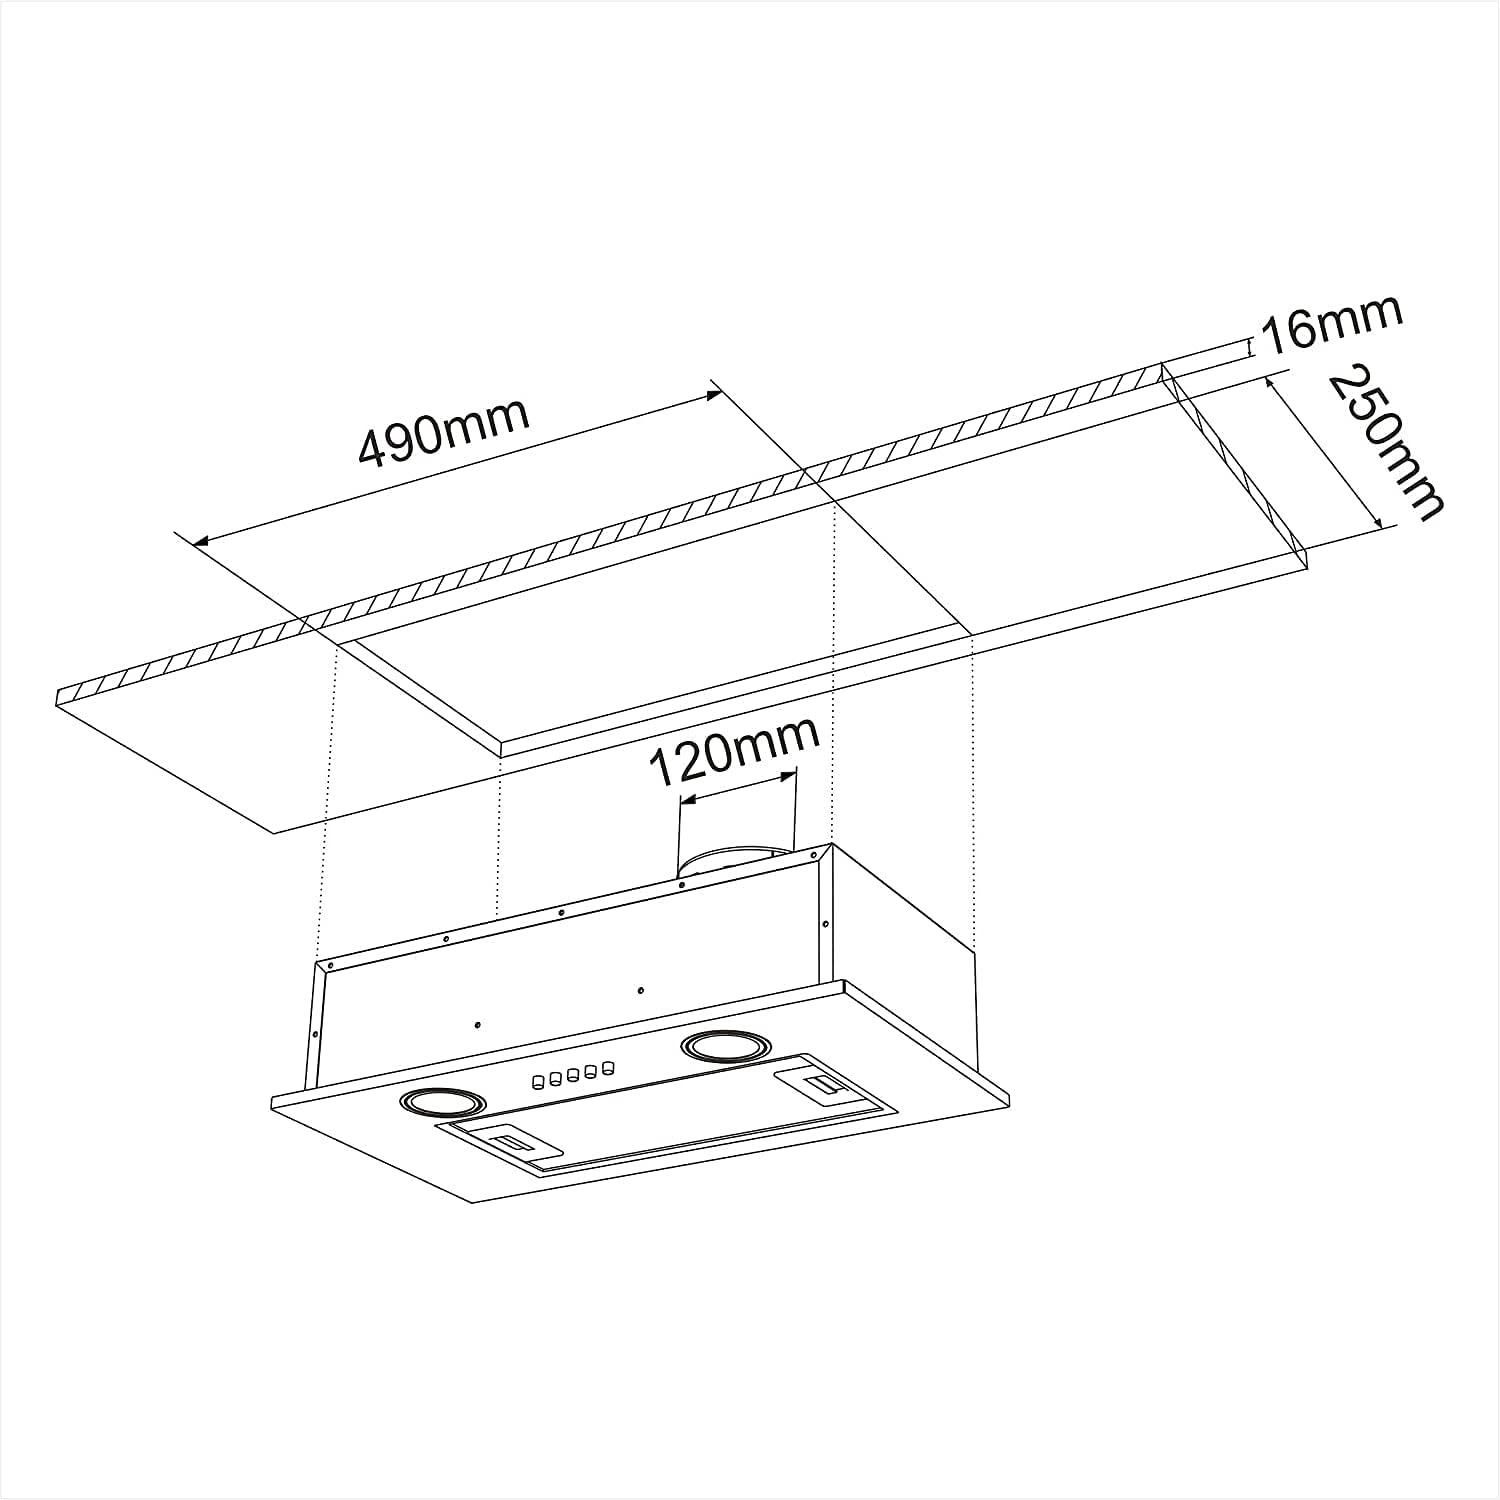
Image 3: Installation diagram illustrating how the N2 52cm Built-in Kitchen Hood is mounted into a kitchen cabinet. It shows recommended cutout dimensions for the cabinet (490mm x 250mm) and the position of the exhaust duct (120mm diameter).
The hood is designed for built-in installation within a kitchen cabinet.
- Prepare the cabinet opening according to the dimensions provided in Image 3. The recommended cutout for the hood is approximately 490mm in width and 250mm in depth.
- Ensure there is sufficient space for the exhaust duct, typically 120mm in diameter, as shown.
- Secure the hood within the cabinet using appropriate fasteners.
Ducting and Electrical Connection
- Connect the exhaust duct to the hood's outlet and route it to the outside or to a recirculation system. Ensure the ducting is as short and straight as possible for optimal performance.
- Connect the hood to a grounded electrical outlet. Refer to the specifications for voltage requirements.
Installation Video Reference
Video 1: This video demonstrates the features and installation process of a similar 52cm built-in hood, including its dimensions, control panel, and filter removal. It provides a visual guide to the product's design and functionality.
Operating Instructions
The N2 kitchen hood is operated via the push-button controls located on the front panel.
Fan Speed Control
- Press the "0" button to turn the hood ON or OFF.
- Press "1" for low speed, suitable for simmering or light cooking.
- Press "2" for medium speed, ideal for general cooking.
- Press "3" for high speed, recommended for frying or cooking with strong odors.
Lighting Control
- Press the Light button (often marked with a light bulb icon) to turn the LED lights ON or OFF. The lights provide illumination for your cooking surface.
Operation Video Reference
Video 2: This video demonstrates the operational features of a similar kitchen hood, including how to activate the fan at different speeds and turn on the LED lighting. It shows the hood effectively extracting steam during cooking.
Maintenance
Regular maintenance ensures the longevity and optimal performance of your kitchen hood.
Cleaning the Aluminum Grease Filters
The hood is equipped with 3-layer aluminum grease filters (e.g., CBCF005 type filter). These filters should be cleaned regularly, typically every 2-4 weeks depending on usage, to maintain extraction efficiency and prevent fire hazards.
- Ensure the hood is turned off and disconnected from the power supply.
- Locate the release latches on the filters and carefully remove them.
- Wash the filters by hand in hot water with a mild detergent, or in a dishwasher on a low-temperature cycle. Avoid using abrasive cleaners.
- Rinse thoroughly and allow the filters to dry completely before re-installing.
- Re-insert the dry filters, ensuring they click securely into place.
General Cleaning
- Clean the exterior surfaces of the hood with a soft cloth and a non-abrasive cleaner suitable for stainless steel.
- Do not use corrosive or abrasive products, or cloths that may scratch the surface.
- For LED lights, wipe gently with a dry, soft cloth. Do not attempt to replace LED bulbs yourself; contact qualified service personnel if replacement is needed.
Troubleshooting
Before contacting customer support, review the following common issues and solutions:
| Problem | Possible Cause | Solution |
|---|---|---|
| Hood does not operate. | No power supply; power cord disconnected; fuse blown. | Check power connection; check circuit breaker/fuse box. |
| Poor extraction performance. | Grease filters are dirty; ducting is blocked or too long/restrictive; fan motor issue. | Clean or replace grease filters; check ducting for obstructions; contact service if motor is faulty. |
| Lights not working. | LED bulb failure; electrical connection issue. | Ensure power is connected; contact service for LED replacement. |
| Excessive noise. | Loose components; improper installation; foreign object in fan. | Check for loose parts and tighten; ensure correct installation; inspect fan for obstructions. |
Specifications
| Feature | Detail |
|---|---|
| Brand | N2 |
| Model Number | 72b82952-5f9d-48a3-a46c-2441bfe21d74 |
| Type | Built-in Kitchen Hood |
| Dimensions (approx.) | 52 cm (Width) |
| Material | Stainless Steel (Lega di acciaio) |
| Color | Silver (Argento) |
| Extraction Capacity | 300 m³/h |
| Fan Speeds | 3 |
| Lighting Type | LED |
| Controls Type | Push Button (Pulsante) |
| Filter Type | Aluminum (CBCF005 compatible) |
| Energy Efficiency Class | C |
Warranty & Support
For warranty information and customer support, please refer to the documentation provided with your purchase or contact the manufacturer directly. Keep your proof of purchase for any warranty claims.