
Nikon VNA971E1
Nikon Coolpix A100 Digital Camera User Manual
Model: VNA971E1
1. Introduction
Thank you for purchasing the Nikon Coolpix A100 digital camera. This manual provides detailed instructions on how to use your camera, from basic setup to advanced features. Please read this manual thoroughly to ensure proper operation and to maximize your camera's potential.The Nikon Coolpix A100 is a compact 20.1-megapixel point-and-shoot digital camera featuring a 5x optical zoom lens (26-130mm equivalent), electronic image stabilization, and a 2.7-inch LCD screen. It is designed for ease of use, making it ideal for capturing everyday moments.
2. Safety Information
To prevent damage to your Nikon Coolpix A100 and to avoid injury to yourself or others, please observe the following safety precautions:
- Do not disassemble or modify the camera. Unauthorized repairs can cause electric shock or camera malfunction.
- Keep the camera dry. Exposure to water or high humidity can damage the camera.
- Avoid extreme temperatures. Do not expose the camera to direct sunlight for extended periods or to extremely cold environments.
- Use only specified batteries and accessories. Using incompatible items may cause fire, explosion, or injury.
- Keep out of reach of children. Small parts can be a choking hazard.
- Do not point the camera lens at the sun or other strong light sources. This can damage the image sensor.
3. Package Contents
Verify that all items listed below are included in your camera package. If any item is missing or damaged, please contact your retailer.
- Nikon Coolpix A100 Digital Camera
- EN-EL19 Rechargeable Li-ion Battery
- EH-72P Charging AC Adapter
- UC-E16 USB Cable
- Camera Strap

Figure 3.1: Included accessories for the Nikon Coolpix A100. This image shows the EN-EL19 battery, EH-72P charging AC adapter, UC-E16 USB cable, and a camera strap.
4. Camera Parts and Controls
Familiarize yourself with the various parts and controls of your Nikon Coolpix A100 camera.
4.1 Front View

Figure 4.1: Front view of the Nikon Coolpix A100. Key components visible are the NIKKOR 5x optical zoom lens, built-in flash, and the Nikon and COOLPIX branding.
- Lens: NIKKOR 5x optical zoom lens (4.6-23.0mm, f/3.2-6.5).
- Flash: Built-in flash for illuminating subjects in low light.
- Self-timer lamp/AF-assist illuminator: Indicates self-timer operation and assists autofocus in dim conditions.
- Microphone: Records audio during video capture.
4.2 Rear View
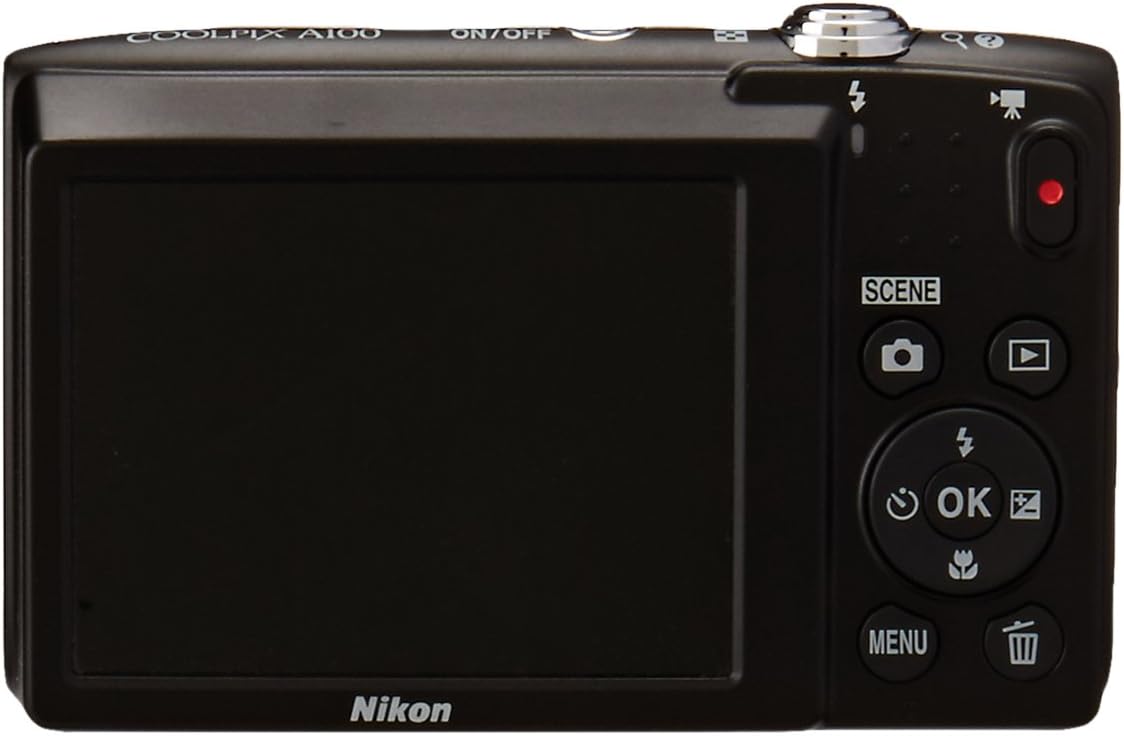
Figure 4.2: Rear view of the Nikon Coolpix A100. This image highlights the 2.7-inch LCD monitor and the various control buttons on the right side.
- LCD Monitor: 2.7-inch, 230k-dot display for framing shots and reviewing images.
- Zoom Control (W/T): Controls optical zoom (W for wide-angle, T for telephoto).
- Movie-record button: Starts and stops video recording.
- Playback button: Switches to playback mode to view photos and videos.
- Multi selector (directional pad): Navigates menus and selects options.
- OK button: Confirms selections.
- Menu button: Accesses camera settings and options.
- Delete button: Deletes selected images or videos.
- Scene button: Accesses various scene modes for optimized shooting.
4.3 Top View

Figure 4.3: Angled top-front view of the Nikon Coolpix A100. This view shows the power button and shutter release button.
- Power button: Turns the camera on or off.
- Shutter-release button: Press halfway to focus, press fully to take a picture.
5. Setup
5.1 Inserting the Battery
The Nikon Coolpix A100 uses an EN-EL19 rechargeable Li-ion battery.
- Open the battery-chamber cover on the bottom of the camera.
- Insert the battery with the terminals facing the correct direction, as indicated by the diagram inside the chamber.
- Gently push the battery until it clicks into place.
- Close the battery-chamber cover securely.
5.2 Inserting a Memory Card
The camera supports SD, SDHC, and SDXC memory cards (up to 64 GB).
- Open the battery-chamber cover. The memory card slot is usually next to the battery.
- Insert the memory card with the label facing the front of the camera, pushing it gently until it clicks.
- Close the battery-chamber cover securely.
Note: Ensure the camera is turned off before inserting or removing the battery or memory card to prevent data corruption.
5.3 Charging the Battery
Charge the EN-EL19 battery using the EH-72P Charging AC Adapter and UC-E16 USB Cable.
- Connect the UC-E16 USB cable to the camera's USB port.
- Connect the other end of the USB cable to the EH-72P Charging AC Adapter.
- Plug the AC adapter into a power outlet.
- The charge lamp on the camera will light up during charging and turn off when charging is complete. A full charge takes approximately 1 hour and 50 minutes.
5.4 Initial Setup (Date/Time)
The first time you turn on the camera, you will be prompted to set the date and time.
- Press the Power button to turn on the camera.
- Use the multi selector to navigate and adjust the year, month, day, hour, and minute.
- Press the OK button to confirm each setting.
- Select your time zone if prompted.
6. Operating the Camera
6.1 Turning On/Off
- To turn on the camera, press the Power button.
- To turn off the camera, press the Power button again.
6.2 Basic Photography (Point & Shoot)
The camera is designed for simple point-and-shoot operation in Auto mode.
- Turn on the camera. It will typically start in Auto mode.
- Frame your shot using the LCD monitor.
- Press the shutter-release button halfway down to focus. The focus area will turn green when focus is achieved.
- Press the shutter-release button fully down to take the picture.
6.3 Shooting Modes
The Coolpix A100 offers various shooting modes to optimize settings for different scenes.
- Auto Mode: The camera automatically optimizes settings for the scene.
- Scene Mode: Press the Scene button to select from various scene modes like Portrait, Landscape, Sports, Night Portrait, etc. The camera will apply optimal settings for the chosen scene.
- Smart Portrait Mode: Enhances portraits by detecting faces and applying effects like skin softening.
- Special Effects: Apply creative filters to your photos.
6.4 Zoom Operation
Use the zoom control to adjust the focal length.
- Push the zoom control towards T (Telephoto) to zoom in on your subject.
- Push the zoom control towards W (Wide-angle) to zoom out.
6.5 Flash Usage
The built-in flash can be used in low-light conditions.
- In Auto mode, the flash may fire automatically when needed.
- To manually control the flash, press the multi selector's up button (flash icon) to cycle through modes like Auto, Fill flash, Red-eye reduction, Slow sync, and Flash off.
6.6 Video Recording
The camera can record HD 720p videos.
- Press the dedicated Movie-record button to start recording.
- Press the Movie-record button again to stop recording.
6.7 Playback
View your captured photos and videos.
- Press the Playback button to enter playback mode.
- Use the multi selector to scroll through images.
- To play a video, select it and press the OK button.
- Press the Playback button again to return to shooting mode.
6.8 Deleting Images/Videos
Delete unwanted files from your memory card.
- In playback mode, select the image or video you wish to delete.
- Press the Delete button (trash can icon).
- Confirm your selection when prompted.
7. Connecting to a Computer
You can transfer photos and videos to a computer using the supplied USB cable.
- Ensure the camera is turned off.
- Connect the UC-E16 USB cable to the camera's USB port and to a USB port on your computer.
- Turn on the camera. Your computer should recognize the camera as a removable disk or prompt you to import images.
- Follow the on-screen instructions on your computer to transfer files.
8. Maintenance
8.1 Cleaning the Camera
- Camera Body: Use a soft, dry cloth to wipe away dust and smudges. For stubborn dirt, dampen the cloth slightly with water or a mild cleaning solution, then wipe dry.
- Lens: Use a lens brush to remove dust, then gently wipe with a lens cleaning cloth. Do not use abrasive cleaners or alcohol.
- LCD Monitor: Gently wipe with a soft, dry cloth. Avoid pressing hard on the screen.
8.2 Storage
- When not in use for extended periods, remove the battery from the camera.
- Store the camera in a cool, dry place, away from direct sunlight and high humidity.
- Use a desiccant (e.g., silica gel) in the storage area to absorb moisture.
9. Troubleshooting
If you encounter issues with your camera, refer to the following common problems and solutions.
| Problem | Possible Cause / Solution |
|---|---|
| Camera does not turn on. |
|
| Cannot take pictures. |
|
| Images are blurry. |
|
| Flash does not fire. |
|
| Cannot transfer files to computer. |
|
10. Specifications
| Model Name | VNA971E1 |
| Effective Pixels | 20.1 MP |
| Image Sensor | 1/2.3-inch CCD |
| Lens | NIKKOR lens with 5x optical zoom (26-130mm equivalent) |
| Digital Zoom | Up to 4x (approx. 20x combined with optical zoom) |
| Vibration Reduction | Electronic VR (for still images and movies) |
| Monitor | 2.7-inch (6.7 cm) diagonal TFT LCD with approx. 230k dots |
| Storage Media | SD, SDHC, SDXC memory cards (up to 64 GB) |
| File Formats | Still images: JPEG; Movies: AVI (Motion JPEG compliant) |
| ISO Sensitivity | ISO 80-1600 (Auto) |
| Shutter Speed | 1/2000 to 1 sec. (4 sec. when scene mode is Fireworks show) |
| Power Source | One EN-EL19 Rechargeable Li-ion Battery |
| Battery Life | Approx. 250 shots (CIPA standard) |
| Dimensions (W x H x D) | Approx. 94.2 x 58.2 x 19.8 mm (3.7 x 2.3 x 0.8 in.) excluding projections |
| Weight | Approx. 119 g (4.2 oz) including battery and memory card |
| Connectivity | USB (Micro-B connector) |
| Video Resolution | HD 720p (1280 x 720) at 30 fps |
11. Warranty and Support
Nikon provides a limited warranty for its products. Please refer to the warranty card included with your product for specific terms and conditions.
For technical support, service, or further inquiries, please visit the official Nikon support website or contact their customer service. Keep your proof of purchase for warranty claims.
Online Support: www.nikonusa.com/en/service-and-support/index.page
Ask a question about this manual
Ask about setup, troubleshooting, compatibility, parts, safety, or missing instructions. Manuals+ will review the question and use this page’s manual context to help answer it.