
Introduction
This manual provides essential instructions for the safe and efficient installation, operation, and maintenance of your Fasco A210 Specific Purpose Blower. Please read this manual thoroughly before attempting any installation or operation to ensure proper function and to prevent potential hazards.
Safety Information
- Always disconnect power before installing, servicing, or cleaning the blower.
- Installation and service should be performed by a qualified technician.
- Ensure all electrical connections comply with local codes and regulations.
- Do not operate the blower if any parts are damaged or missing.
- Keep hands and foreign objects away from moving parts.
Product Overview
The Fasco A210 is a specific purpose blower designed primarily for furnace flue exhaust applications. It features a shaded pole motor, offering reliable performance for moving air in HVAC systems. This unit is engineered for durability and efficiency.
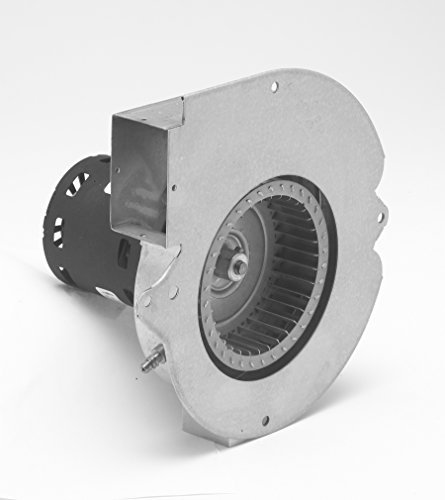
Figure 1: Fasco A210 Specific Purpose Blower. This image displays the blower unit, highlighting its metal housing, integrated motor, and the visible fan blades within the housing. It is designed for furnace flue exhaust systems.
Key features include:
- Shaded pole motor for consistent operation.
- Designed for furnace flue exhaust.
- Durable metal construction.
Setup and Installation
Proper installation is crucial for the safe and effective operation of the Fasco A210 blower. It is strongly recommended that installation be performed by a qualified HVAC technician.
- Power Disconnection: Before beginning, ensure that all power to the furnace or HVAC system is completely disconnected at the main breaker. Verify with a voltage tester.
- Mounting: Securely mount the blower to the designated location using appropriate fasteners. Ensure the mounting surface is stable and can support the weight of the blower. Refer to the existing mounting points for alignment.
- Ductwork Connection: Connect the blower to the flue exhaust ductwork. Ensure all connections are airtight to prevent exhaust leaks. Use appropriate sealing materials if necessary.
- Electrical Wiring: Connect the blower's electrical wiring to the furnace control board according to the furnace manufacturer's wiring diagram. Pay close attention to voltage and amperage requirements. This blower operates at 115 volts.
- Final Inspection: After installation, visually inspect all connections, mounting, and wiring to ensure everything is secure and correctly installed.
Note: A gasket is not included with this blower and may need to be purchased separately for proper sealing, depending on the application.
Operating Instructions
Once installed by a qualified technician, the Fasco A210 blower typically operates automatically as part of the furnace's combustion air or exhaust system. It is designed to activate and deactivate in conjunction with the furnace's operational cycle.
- System Activation: The blower will engage when the furnace calls for heat, assisting in the proper venting of combustion gases.
- Continuous Operation: The blower is designed for continuous operation during the furnace's heating cycle.
- Monitoring: Listen for unusual noises or vibrations during operation. Any abnormal sounds should be investigated by a qualified technician.
Maintenance
Regular maintenance helps ensure the longevity and efficient operation of your Fasco A210 blower. Always disconnect power before performing any maintenance.
- Annual Inspection: Have a qualified HVAC technician inspect the blower annually. This includes checking for wear on the motor, fan blades, and housing.
- Cleaning: Periodically inspect the fan blades and housing for accumulation of dust, debris, or soot. Clean gently with a soft brush or vacuum cleaner. Avoid using liquids directly on electrical components.
- Bearing Check: The blower features ball bearings. While generally maintenance-free, listen for any grinding or squealing noises, which may indicate bearing wear.
- Wiring Inspection: Check electrical connections for tightness and signs of corrosion or damage.
Troubleshooting
This section provides general guidance for common issues. For complex problems, consult a qualified HVAC technician.
| Problem | Possible Cause | Solution |
|---|---|---|
| Blower does not start | No power, faulty wiring, motor failure, control board issue. | Check power supply and circuit breaker. Verify wiring connections. Consult technician for motor or control board diagnosis. |
| Unusual noise or vibration | Loose mounting, debris in blower wheel, worn bearings, motor imbalance. | Check mounting bolts. Disconnect power and inspect for debris. Contact technician for bearing or motor issues. |
| Blower runs continuously | Faulty control board, stuck relay. | Consult a qualified technician to diagnose and repair the control system. |
Specifications
- Brand:
- Fasco
- Model:
- A210
- Speed:
- 3000 RPM
- Voltage:
- 115 Volts
- Material:
- Metal
- Motor Type:
- Shaded Pole Motor
- Bearings:
- Ball Bearings
- Amperage:
- 1.7 Amps
- Horsepower:
- 1/30 hp
- Rotation:
- CCWSE (Counter-Clockwise Shaft End)
- UPC:
- 735090842178
- Suggested Replacement For:
- Lennox 7021-11063, 7021-11848, 18M67011, Dayton 45KD01
Warranty Information
This Fasco A210 Specific Purpose Blower comes with a 1 Year Manufacturer Warranty. For specific terms, conditions, and to initiate a warranty claim, please refer to the warranty documentation provided with your purchase or contact Fasco customer support directly.
Please retain your proof of purchase for warranty purposes.
Support
If you encounter issues that cannot be resolved using the troubleshooting guide, or if you require technical assistance, please contact a qualified HVAC professional or the Fasco customer support team. When contacting support, please have your model number (A210) and any relevant purchase information ready.
For further information, you may visit the official Fasco website.