Introduction
This manual provides detailed instructions for the safe installation and operation of your Feit Electric Dimmer Switch, Model 689406. This dimmer switch is designed for use with both incandescent, halogen, and dimmable LED bulbs. Please read all instructions carefully before beginning installation.
Important Safety Information
WARNING: This product may present a possible shock or fire hazard if improperly installed or attached in any way. Product should be installed in accordance with the owner's manual, current electrical codes, and/or the current National Electric Code (NEC).
RISK OF ELECTRIC SHOCK! TURN OFF THE MAIN POWER AT THE CIRCUIT BREAKER BEFORE INSTALLATION.
RISK OF FIRE:
- DO NOT USE WITH CONTROL RECEPTACLE OUTLETS, FLUORESCENT LIGHTING FIXTURES, MOTOR-OPERATED APPLIANCES, OR TRANSFORMER-SUPPLIED APPLIANCES.
- DO NOT EXCEED ELECTRICAL RATINGS.
- USE ONLY COPPER WIRES WITH THIS DEVICE.
- USE INDOORS ONLY.
Parts Included
Verify that all components are present before beginning installation.
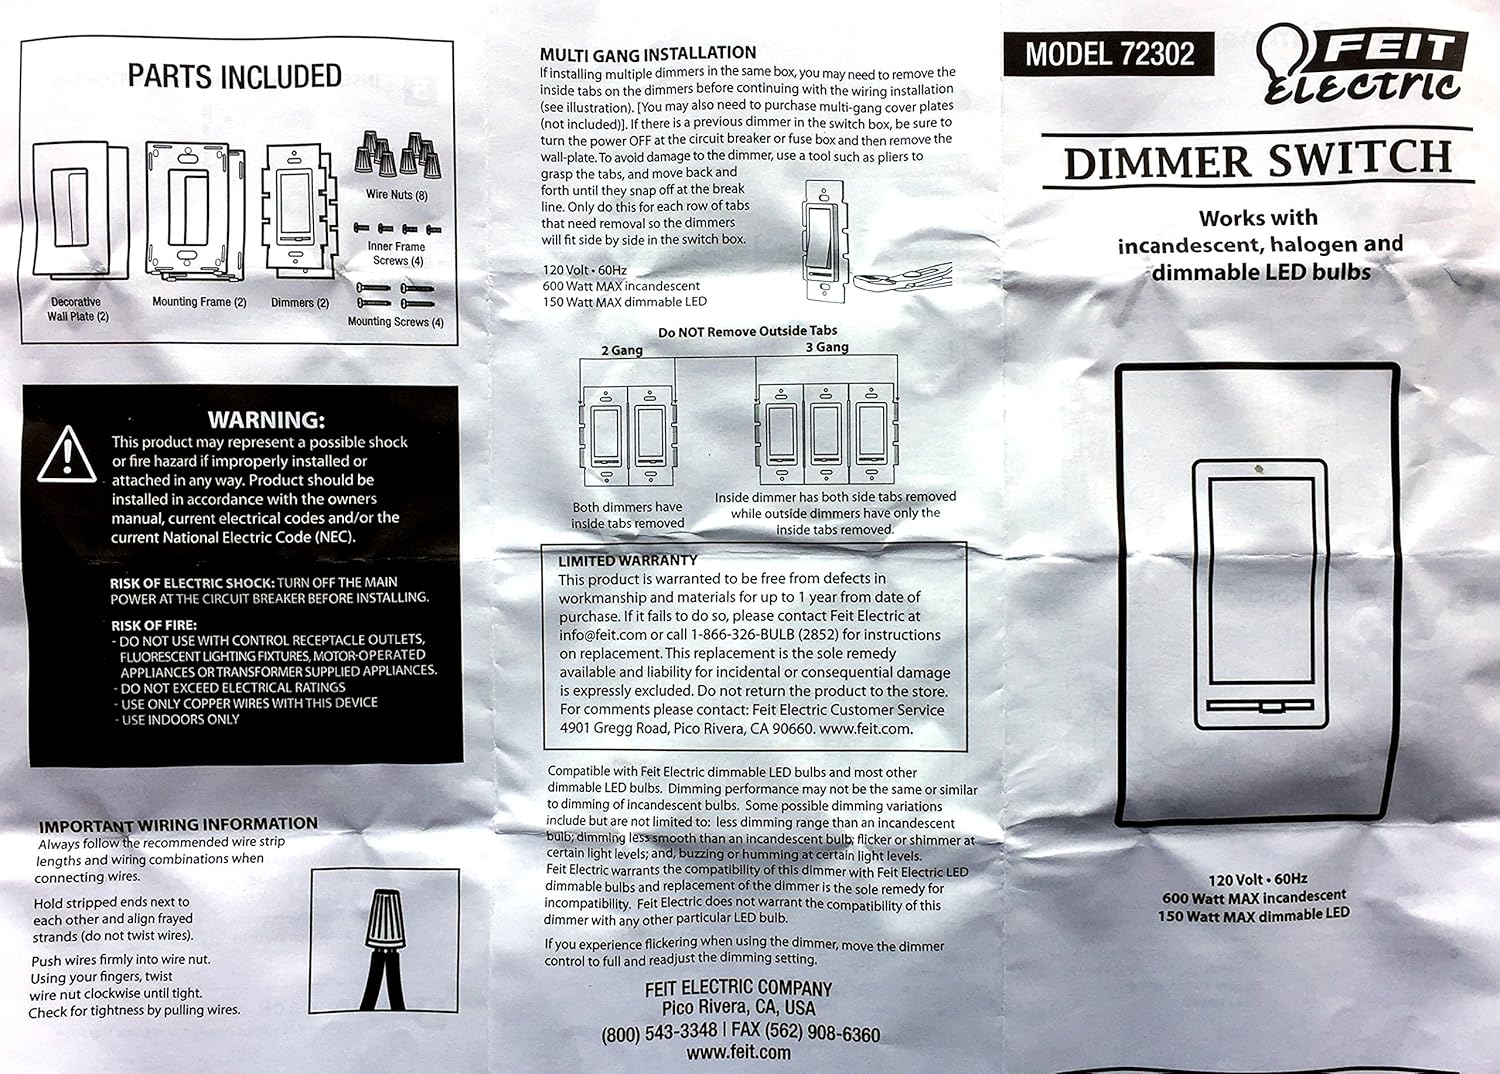
Image: Overview of included parts, including dimmers, wall plates, and wiring accessories.
- Decorative Wall Plate (2)
- Mounting Frame (2)
- Dimmers (2)
- Wire Nuts (8)
- Inner Screws (4)
- Mounting Screws (4)
Specifications
| Model Number | 689406 |
| Brand | Feit Electric |
| Operation Mode | Manual |
| Switch Type | Dimmer Switch |
| Circuit Type | 2-way |
| Voltage | 120 Volt - 60Hz |
| Max Incandescent/Halogen Wattage | 600 Watts |
| Max Dimmable LED Wattage | 150 Watts |
| Mounting Type | Wall Mount |
| Color | White |
| Material | Metal |
Setup and Installation
Follow these steps carefully to install your dimmer switch.

Image: Installation guide for single-pole and 3-way circuits.
- TURN POWER OFF: Turn power off at the circuit breaker or remove the fuse before proceeding. WARNING: SHOCK HAZARD. MAY RESULT IN SERIOUS INJURY OR DEATH.
- REMOVE EXISTING DIMMER OR SWITCH: Carefully remove the existing wall plate and switch by unscrewing them. Gently pull the switch out from the wall box, but do not disconnect any wires yet.
- IDENTIFY THE TYPE OF CIRCUIT:
- SINGLE-POLE: If the existing switch is wired with two insulated wires of the same color connected to two screws, proceed to Step 4a.
- 3-WAY: If the existing switch is wired with three insulated wires connected to three screws, and one of these wires is connected to a screw of a different color, or if one is labeled COMMON, mark or tag this wire to identify it when wiring. Proceed to Step 4b.
- WIRE YOUR NEW DIMMER:
- 4a Single Pole Circuit:
- Connect the green or bare copper ground wire from the dimmer to the green or bare copper ground wire in the wall box using a wire nut.
- Connect the black dimmer wire to the hot input wire removed from the old switch.
- Connect one of the red dimmer wires to the load wire removed from the old switch.
- Use a wire nut to cap the remaining red wire on the dimmer.
- 4b 3-Way Circuit:
IMPORTANT: In a 3-WAY circuit, only one dimmer can be used.- Connect the green or bare copper ground wire from the dimmer to the green or bare copper ground wire in the wall box using a wire nut.
- Connect the black dimmer wire to the tagged wire (COMMON) removed from the old switch.
- Connect the red dimmer wires to the remaining two wires removed from the old switch.
Important Wiring Information: Always follow recommended wire strip lengths and wiring combinations. Hold stripped ends next to each other and align frayed strands (do not twist ends). Push wires firmly into the wire nut. Using your fingers, twist the wire nut clockwise until tight. Check for tightness by gently pulling wires.
- 4a Single Pole Circuit:
- INSERT DIMMER INSIDE THE SWITCH BOX: Carefully position all wires inside the switch box, ensuring enough room for the dimmer housing. Use the provided mounting screws to secure the dimmer firmly inside the switch box.
- SEPARATE MOUNTING FRAME FROM WALL PLATE: Gently insert a screwdriver into the slots to separate the mounting frame from the decorative wall plate.
- INSTALL MOUNTING FRAME: Place the mounting frame over your installed dimmer and secure it using the provided screws.
- INSTALL WALL PLATE: Place the decorative wall plate over the installed mounting frame, aligning the top first then the bottom. Gently push the wall plate to ensure a flush fit.
- TURN POWER ON: Restore power at the circuit breaker or replace the fuse.
Operating Instructions
The Feit Electric Dimmer Switch features a rocker switch for ON/OFF control and a slide lever for dimming.

Image: Front view of the dimmer switch with rocker and slide controls.
- To turn the lights ON, press the upper part of the rocker switch.
- To turn the lights OFF, press the lower part of the rocker switch.
- To INCREASE BRIGHTNESS, slide the small lever upwards.
- To DECREASE BRIGHTNESS, slide the small lever downwards.
This dimmer is compatible with Feit Electric dimmable LED bulbs and most other dimmable LED bulbs. Note that dimming performance may vary and might not be identical to the dimming of incandescent bulbs. Feit Electric warrants compatibility with its own dimmable LED bulbs; replacement of the dimmer is the sole remedy for incompatibility with other specific LED bulbs.
Maintenance
The Feit Electric Dimmer Switch is designed for long-lasting performance with minimal maintenance. No user-serviceable parts are inside. To clean the surface, wipe with a soft, damp cloth. Do not use abrasive cleaners or solvents.
Troubleshooting
- Lights do not turn ON: Ensure power is restored at the circuit breaker. Verify all wiring connections are secure and correct according to the installation steps.
- Lights do not dim or flicker: Confirm that the bulbs being used are dimmable. Some LED bulbs may have specific dimming requirements or compatibility issues. Adjust the dimmer slide to a higher setting if lights do not turn on at the lowest dim setting.
- Dimmer feels loose in wall box: Ensure the mounting screws are tightened securely.
- Wall plate does not fit flush: Ensure the mounting frame is properly aligned and secured, and the wall plate is snapped into place correctly.
Warranty and Support
This product is warranted to be free from defects in workmanship and materials for up to 1 year from the date of purchase. If the product fails within this period, please contact Feit Electric for replacement instructions. Replacement is the sole remedy available, and liability for incidental or consequential damage is expressly excluded. Do not return the product to the store.
For customer service or comments, please contact:
Feit Electric Customer Service
4901 Gregg Road
Pico Rivera, CA 90660
Email: info@feit.com
Phone: 1-866-326-BULB (2852) or (800) 543-3348
Fax: (562) 908-8360
Website: www.feit.com


