
1. Introduction
This manual provides detailed instructions for the installation, operation, and maintenance of your Venstar T0130 Non-Programmable Digital Thermostat. Designed for simplicity and reliability, this thermostat offers precise temperature control for your heating and cooling systems. Please read this manual thoroughly before operating your device.
2. Product Overview
The Venstar T0130 is a user-friendly, non-programmable digital thermostat featuring a large, easy-to-read display and intuitive controls. It is compatible with 1-Heat/1-Cool systems, including gas/electrics, heat pumps, electric, and hydronic heat systems (2, 3, or 4-wire systems).
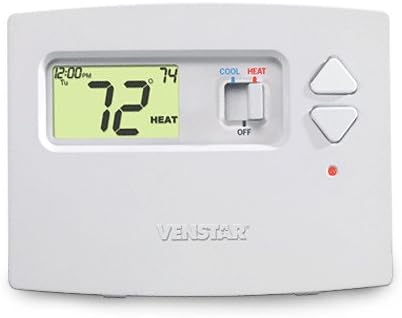
Figure 1: Front view of the Venstar T0130 Thermostat, showing the digital display, mode switch, and temperature adjustment buttons.
Key Components:
- Digital Display: Shows current time, current temperature, and set temperature.
- Mode Switch: Allows selection between COOL, HEAT, and OFF modes.
- Temperature Adjustment Buttons: Up (▲) and Down (▼) buttons to set the desired temperature.
- Battery Compartment: Located behind a cover on the front, for optional battery power.
- Fan Switch: (Located behind the front cover) Selects between AUTO and ON fan operation.
- Filter Reset Button: (Located behind the front cover) Used to reset the filter change reminder.
3. Setup and Installation
The Venstar T0130 thermostat can be powered by either batteries or your system's 24V AC power. For optimal performance and to ensure the display remains active during power outages, it is recommended to use both system power and batteries.
3.1. Power Source
- System Powered: Connects to your HVAC system's 24V AC power. This is the primary power source.
- Battery Powered: Requires two AA batteries (not included) for backup power and to maintain settings during power interruptions.
3.2. Battery Installation
- Gently open the front cover of the thermostat.
- Locate the battery compartment at the bottom.
- Insert two fresh AA alkaline batteries, ensuring correct polarity (+/-).
- Close the battery compartment cover securely.
3.3. Wiring and Mounting
Installation involves connecting the thermostat to your HVAC system's wiring. It is highly recommended that a qualified HVAC technician performs the installation to ensure proper wiring and system compatibility. Refer to the detailed wiring diagrams provided in the full installation guide that accompanies the product packaging.
4. Operating Instructions
4.1. Setting the Desired Temperature
- Ensure the thermostat is in either COOL or HEAT mode using the mode switch.
- Press the Up (▲) button to increase the set temperature.
- Press the Down (▼) button to decrease the set temperature.
- The display will show the current room temperature and the desired set temperature.
4.2. Selecting System Mode
Use the slide switch located on the front of the thermostat to select the desired operating mode:
- COOL: Activates the cooling system when the room temperature rises above the set temperature.
- HEAT: Activates the heating system when the room temperature falls below the set temperature.
- OFF: Turns off both heating and cooling systems.
4.3. Fan Operation
Open the front cover to access the fan switch. Select the desired fan operation mode:
- AUTO: The fan runs only when the heating or cooling system is actively operating.
- ON: The fan runs continuously, regardless of whether the heating or cooling system is active.
5. Maintenance
5.1. Cleaning the Thermostat
To clean the thermostat, gently wipe the exterior with a soft, damp cloth. Do not use abrasive cleaners or solvents, as these can damage the finish or internal components.
5.2. Battery Replacement
If using battery power, replace the AA batteries annually or when the low battery indicator appears on the display. Refer to Section 3.2 for battery installation instructions.
5.3. Resetting the Filter Reminder
If your thermostat has a filter change reminder feature, open the front cover and press the 'RESET FILTER' button to clear the reminder after changing your HVAC system's air filter.
6. Troubleshooting
If you encounter issues with your Venstar T0130 thermostat, try the following steps:
- No Display/No Power: Check if batteries are installed correctly and are fresh. Ensure the system power is on.
- Incorrect Temperature Reading: Ensure the thermostat is not exposed to direct sunlight, drafts, or heat sources that could affect its sensor.
- System Not Responding: Verify the mode switch is set to the desired mode (COOL or HEAT). Check your circuit breaker for the HVAC system.
- Fan Not Running: Check the fan switch setting (AUTO or ON).
For persistent issues, contact a qualified HVAC technician or Venstar customer support.
7. Specifications
| Feature | Specification |
|---|---|
| Brand | Venstar |
| Model Name | T0130 |
| Controller Type | Push Button |
| Special Feature | Auto Changeover |
| Color | White |
| Specific Uses For Product | Heating, Cooling |
| Temperature Control Type | Digital |
| Connectivity Technology | Wired |
| Included Components | Temperature Sensor |
| Power Source | Battery Powered, 24 Volts |
| Material | Acrylonitrile Butadiene Styrene (ABS), Plastic |
| Display Type | LED or LCD |
| Mounting Type | Wall Mount |
| Backlight | Yes |
8. Warranty and Support
For warranty information, please refer to the documentation included with your product or visit the official Venstar website. For technical support, troubleshooting assistance, or to inquire about replacement parts, please contact Venstar customer service directly.
Venstar Customer Support: Please refer to the contact information provided in your product packaging or on the official Venstar website.


