
1. Introduction
The Ibiza Sound SA500 is a robust 2x250W rack-mountable power amplifier designed for professional audio applications. It offers versatile input options including XLR, RCA, and 6.35mm Jack, making it compatible with a wide range of audio sources. This manual provides essential information for the safe and efficient setup, operation, and maintenance of your SA500 amplifier.
2. Safety Instructions
WARNING: TO REDUCE THE RISK OF FIRE OR ELECTRIC SHOCK, DO NOT EXPOSE THIS EQUIPMENT TO RAIN OR MOISTURE. DO NOT OPEN THE CASING. REFER SERVICING TO QUALIFIED PERSONNEL ONLY.
- Read all instructions carefully before operating the amplifier.
- Keep this manual for future reference.
- Always ensure the amplifier is connected to a grounded power outlet.
- Do not block ventilation openings. Ensure adequate airflow around the unit.
- Disconnect the power cord from the mains before making any connections or performing maintenance.
- Avoid placing the unit near heat sources or in direct sunlight.
- Do not use the amplifier if the power cord is damaged.
3. Product Features
- Power Output: 2 x 250W maximum.
- Rack Format: Standard 19-inch rack-mountable design.
- Input Connectivity: Stereo line-level inputs via XLR, RCA, and 6.35mm Jack connectors.
- Output Connectivity: Speakon and screw terminal outputs for speaker connections.
- Visual Monitoring: LED VU meter for signal level indication.
- Protection: Integrated thermal protection circuit with a front panel indicator.
- Control: Independent volume control for each channel.
- Power Switch: Convenient front panel power ON/OFF switch.
- Cooling: Efficient fan cooling system.
4. Controls and Connections
The rear panel of the Ibiza Sound SA500 amplifier provides all necessary connections for audio input, output, and power. Familiarize yourself with these connections before setup.
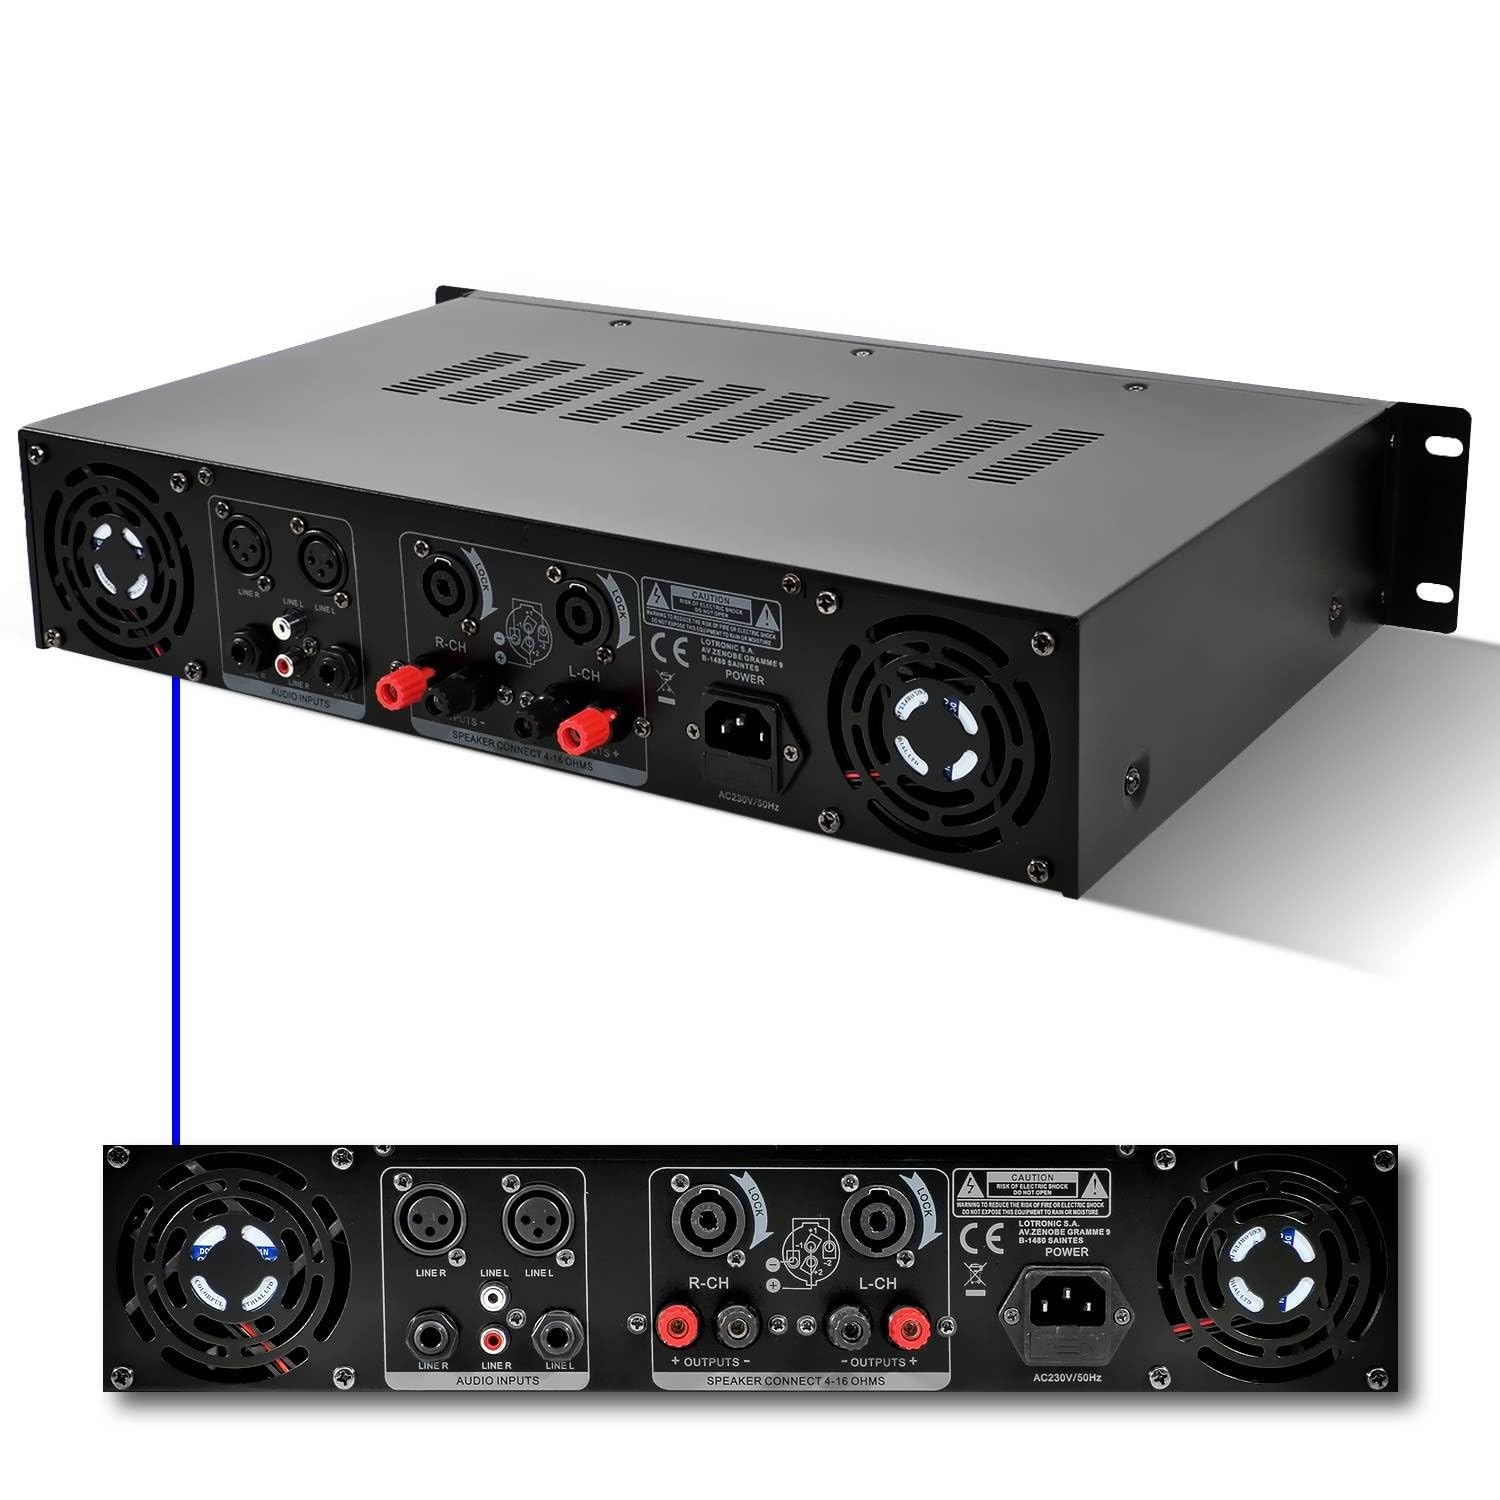
Figure 1: Rear panel of the Ibiza Sound SA500 amplifier.
- Audio Inputs (LINE R, LINE L): These are the stereo line-level inputs. You can connect your audio source (e.g., mixer, preamplifier) using XLR, RCA, or 6.35mm Jack cables. Ensure correct channel (Left/Right) assignment.
- Outputs (R-CH, L-CH): These are the speaker outputs for the Right and Left channels. Connect your passive speakers using Speakon connectors or the screw terminals. Ensure correct polarity (+/-) and that speaker impedance is between 4 and 16 ohms.
- AC230V/50Hz Power Input: Connect the supplied power cord here. Ensure the voltage matches your local power supply.
- Cooling Fans: Located on both sides of the rear panel, these fans provide essential cooling. Ensure they are not obstructed.
- CAUTION / CE Markings: Important safety and compliance information.
5. Setup
- Unpacking and Placement: Carefully remove the amplifier from its packaging. Place it in a well-ventilated area, preferably in a standard 19-inch equipment rack. Ensure there is sufficient space around the unit for airflow, especially around the cooling fans.
- Connecting Input Sources: Connect your audio source (e.g., mixer, CD player, audio interface) to the Audio Inputs on the rear panel. Use appropriate XLR, RCA, or 6.35mm Jack cables. Ensure the Left channel of your source connects to the L-CH input and the Right channel to the R-CH input.
- Connecting Speakers: Connect your passive speakers to the Outputs. You can use Speakon cables for secure connections or screw terminals for bare wire connections. Pay close attention to speaker impedance; it must be between 4 and 16 ohms. Ensure correct polarity (+ to + and - to -) for optimal sound quality and to prevent damage.
- Power Connection: With all audio connections made and the amplifier's front panel power switch in the OFF position, connect the supplied power cord to the AC230V/50Hz Power Input on the rear panel, then plug it into a grounded electrical outlet.
6. Operating Instructions
- Powering On: Ensure all volume controls on the amplifier are set to minimum. Turn on your audio source first, then press the power switch on the front panel of the SA500 amplifier to the ON position.
- Adjusting Volume: Slowly increase the volume controls for each channel (L-CH and R-CH) on the front panel to the desired listening level. Observe the LED VU meters to monitor signal levels and avoid clipping (distortion).
- Monitoring Signal: The LED VU meters provide a visual indication of the output signal level for each channel. Aim for levels that are strong but do not consistently peak into the red, which indicates clipping.
- Thermal Protection: If the amplifier overheats, the thermal protection circuit will activate, and an indicator light on the front panel will illuminate. The amplifier may temporarily shut down or reduce output. Allow the unit to cool down and ensure proper ventilation.
- Powering Off: Before powering off, reduce the volume controls to minimum. Turn off the amplifier first, then turn off your audio source.
7. Maintenance
- Cleaning: Disconnect the power before cleaning. Use a soft, dry cloth to wipe the exterior of the amplifier. Do not use liquid cleaners or solvents.
- Ventilation: Regularly check that the cooling fans and ventilation grilles are free from dust and debris. Use compressed air to gently clear any blockages.
- Storage: If storing the amplifier for an extended period, ensure it is in a dry, dust-free environment.
8. Troubleshooting
- No Power:
- Check if the power cord is securely connected to both the amplifier and the electrical outlet.
- Verify that the power outlet is functional.
- Ensure the front panel power switch is in the ON position.
- No Sound:
- Check all audio input and output cable connections.
- Ensure the volume controls on the amplifier and your audio source are not set to minimum.
- Verify that your audio source is functioning correctly.
- Check speaker connections and ensure speakers are functional.
- Distorted Sound:
- Reduce the input level from your audio source.
- Lower the amplifier's volume controls.
- Ensure speaker impedance matches the amplifier's requirements (4-16 ohms).
- Check for damaged cables.
- Amplifier Overheating / Protection Mode:
- Turn off the amplifier and allow it to cool down.
- Ensure adequate ventilation around the unit; clear any obstructions from the cooling fans.
- Verify that speaker impedance is within the specified range (4-16 ohms).
9. Specifications
- Model: SA500
- Max Power Output: 2 x 250W
- Frequency Response: 20Hz - 20kHz
- Signal-to-Noise Ratio (S/N): >76dB
- Input Connectors: XLR, RCA, 6.35mm Jack
- Output Connectors: Speakon, Screw Terminals
- Speaker Impedance: 4-16 Ohms
- Power Supply: AC230V / 50Hz
- Weight: 5.6 kg (12.35 lbs)
- Dimensions: 19-inch rack mountable
- Cooling: Fan cooled
10. Warranty and Support
This Ibiza Sound SA500 amplifier is covered by a 1-year warranty from the date of purchase. Please retain your proof of purchase for warranty claims. For technical support, service, or warranty inquiries, please contact your authorized retailer or the manufacturer's customer service department.


