
Introduction
The Sewell HD-Link HL14 is a 1x4 HDMI Splitter/Extender designed to distribute a single HDMI signal to up to four displays over long distances using Cat5e/6 cables. This system allows for signal transmission up to 200 feet, making it suitable for various applications such as retail displays, conference rooms, and home theater setups. It supports HDMI 1.4 and HDCP 1.4, with resolutions up to 1080p at 60Hz, and includes support for advanced audio formats like LPCM 7.1 Ch, Dolby True HD, and DTS-HD Master Audio.
Package Contents
Please verify that all items listed below are included in your package:
- 1x HD-Link HL14 Sender Unit
- 4x HD-Link HL14 Receiver Units
- 1x 12V DC Power Supply for Sender Unit
- 5x IR Blaster Cables (1 for Sender, 4 for Receivers)
- Mounting Brackets and Screws

Image: All components included in the HD-Link HL14 package, showing the sender unit, four receiver units, power supply, IR cables, and mounting hardware.
Product Overview
Sender Unit

Image: Top view of the HD-Link HL14 Sender unit, displaying the model name, 'Sender' label, power indicator, 'UPDATE' port, and EDID DIP switches.

Image: Rear view of the HD-Link HL14 Sender unit, showing the ON/OFF switch, DC 12V power input, IR OUT port, HDMI IN port, HDMI OUT (loop-through) port, and four RJ45 CAT outputs (1-4).
- Power Indicator: Illuminates when the unit is powered on.
- UPDATE: Mini-USB port for firmware updates.
- EDID DIP Switches: Used to configure EDID settings for display compatibility.
- ON/OFF Switch: Power toggle for the sender unit.
- DC 12V: Power input for the included power adapter.
- IR OUT: Connects to an IR blaster cable to control the source device.
- HDMI IN: Connects to the HDMI source device.
- HDMI OUT: Local HDMI loop-through output for a nearby display.
- CAT 1-4: RJ45 outputs for connecting to receiver units via Cat5e/6 cables.
Receiver Unit
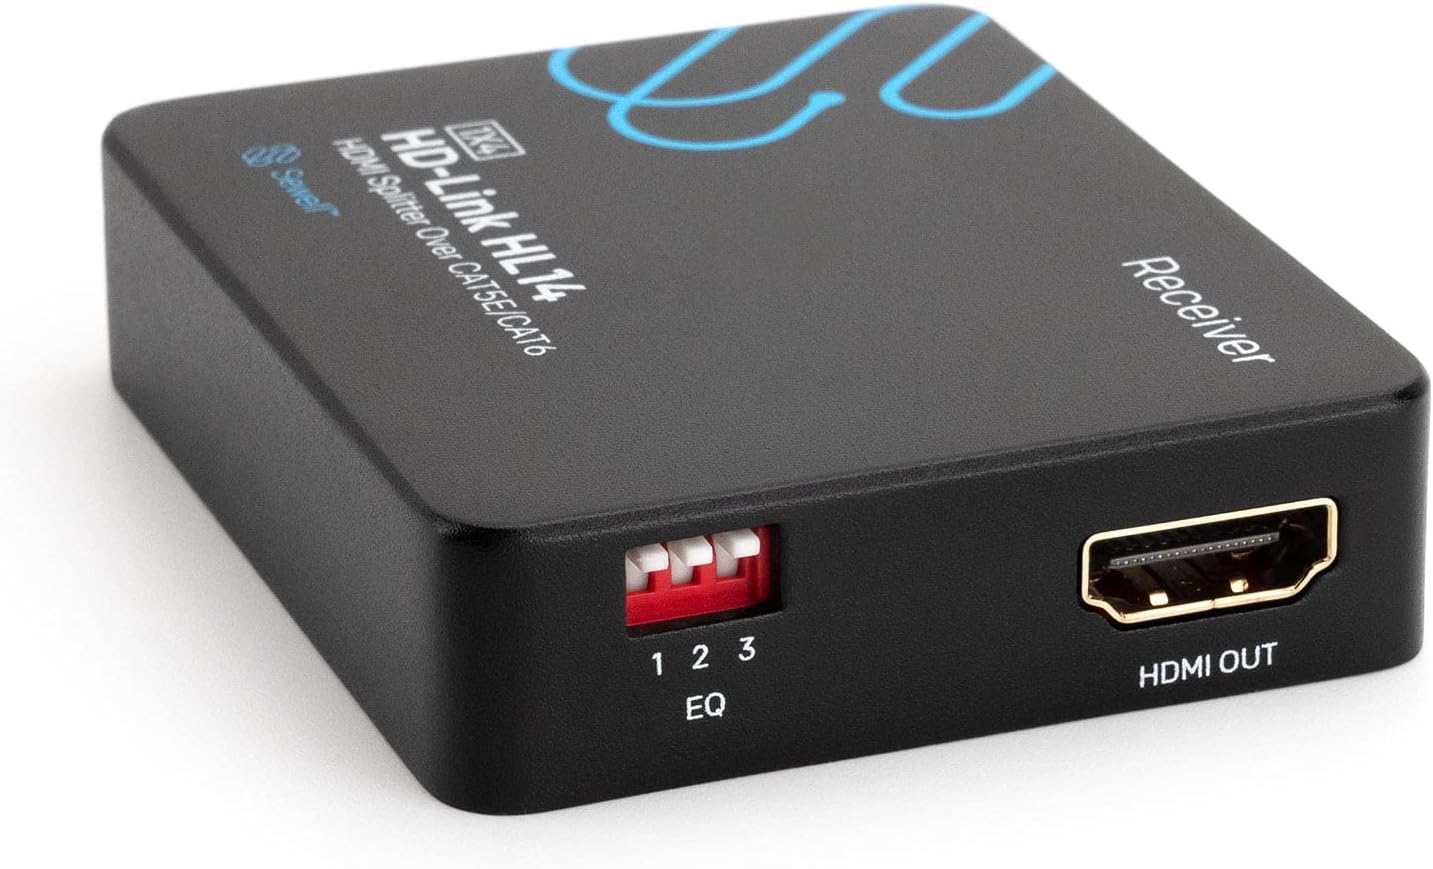
Image: Top view of the HD-Link HL14 Receiver unit, displaying the model name, 'Receiver' label, and EQ DIP switches.

Image: Side view of the HD-Link HL14 Receiver unit, showing the IR IN port, CAT RJ45 input, and power indicator.
- HDMI OUT: Connects to the display device.
- EQ DIP Switches: Used to adjust equalization for signal quality over long cable runs.
- IR IN: Connects to an IR receiver cable to receive signals from a remote control.
- CAT: RJ45 input for connecting to the sender unit via a Cat5e/6 cable.
- Power Indicator: Illuminates when the unit receives power (Power over Cable).
Setup Instructions
Follow these steps to set up your HD-Link HL14 system:
- Power Off Devices: Ensure all source devices and displays are powered off before making connections.
- Connect HDMI Source: Connect your HDMI source device (e.g., Blu-ray player, cable box) to the HDMI IN port on the HD-Link HL14 Sender unit using a high-quality HDMI cable.
- Connect Local Display (Optional): If you wish to have a local display near the sender, connect it to the HDMI OUT port on the Sender unit using an HDMI cable.
- Connect Cat5e/6 Cables: Run individual Cat5e or Cat6 cables from each of the CAT 1-4 ports on the Sender unit to the CAT port on each of the four Receiver units. Ensure cables are properly terminated with RJ45 connectors.
- Connect Displays: Connect each display (TV, monitor, projector) to the HDMI OUT port on its respective Receiver unit using an HDMI cable.
- Connect IR Cables (Optional):
- Connect an IR Blaster cable to the IR OUT port on the Sender unit and position the blaster eye near the IR receiver of your source device.
- Connect an IR Receiver cable to the IR IN port on each Receiver unit and position the receiver eye where it can pick up remote control signals.
- Apply Power: Connect the included 12V DC power adapter to the DC 12V input on the Sender unit and plug it into a power outlet. The Receiver units will receive power over the Cat5e/6 cables (Power over Cable).
- Power On Devices: Power on all displays and then your HDMI source device.
- Adjust EDID and EQ: If you experience display issues, adjust the EDID DIP switches on the Sender unit and EQ DIP switches on the Receiver units as needed. Refer to the 'Advanced Settings' section for guidance.

Image: Diagram illustrating the connection of the HD-Link HL14 Sender unit to an HDMI source and a local display, and its connection to four Receiver units via Cat5e/6 cables, which then connect to individual displays.
Cable Recommendations
The quality of your Cat5e/Cat6 cable significantly impacts performance. For optimal results, especially over distances exceeding 100 feet, Sewell recommends using pure copper Cat6 cables with extra shielding and robust conductors to prevent signal attenuation and ensure stable transmission.
Operating Instructions
Once properly set up, the HD-Link HL14 system operates automatically. The sender unit will split the incoming HDMI signal and transmit it to all connected receiver units. Each receiver unit then outputs the signal to its respective display.
- Power On/Off: Use the ON/OFF switch on the sender unit to power the entire system. Receiver units are powered via the Cat5e/6 cables.
- IR Control: If IR cables are connected, you can use your source device's remote control from any display location to control the source device.
Advanced Settings: EDID and EQ
The HD-Link HL14 features EDID (Extended Display Identification Data) and EQ (Equalization) settings to optimize compatibility and signal quality.
- EDID (Sender Unit): The EDID DIP switches on the sender unit allow you to manually configure the EDID information sent to the source device. This can resolve compatibility issues if your source device or displays are not negotiating the correct resolution or audio format. Consult the product documentation or manufacturer's website for specific EDID switch configurations.
- EQ (Receiver Unit): The EQ DIP switches on each receiver unit are used to compensate for signal degradation over long Cat5e/6 cable runs. Adjust these switches to improve picture quality if you experience flickering, snow, or no signal, especially at longer distances. Start with the lowest EQ setting and increase gradually until a stable picture is achieved.
Maintenance
To ensure the longevity and optimal performance of your HD-Link HL14 system, follow these maintenance guidelines:
- Cleaning: Use a soft, dry cloth to clean the units. Do not use liquid or aerosol cleaners.
- Ventilation: Ensure the units have adequate ventilation to prevent overheating. Do not block ventilation openings.
- Environment: Keep the units away from excessive heat, moisture, and direct sunlight.
- Cable Management: Ensure all cables are securely connected and not under strain. Avoid sharp bends in Cat5e/6 cables.
Troubleshooting
If you encounter issues with your HD-Link HL14, refer to the following common problems and solutions:
- No Picture/Signal:
- Verify all HDMI and Cat5e/6 cables are securely connected.
- Ensure the sender unit is powered on and its power indicator is lit.
- Check if the receiver unit's power indicator is lit (indicating Power over Cable is active).
- Try adjusting the EDID DIP switches on the sender unit to a different setting to ensure compatibility with your display.
- Test with shorter HDMI and Cat5e/6 cables to rule out cable issues.
- Ensure your displays are set to the correct HDMI input.
- Poor Picture Quality (Flickering, Snow, Distortion):
- Adjust the EQ DIP switches on the affected receiver unit. Increase the equalization setting gradually.
- Ensure you are using high-quality Cat5e/6 cables, preferably pure copper, especially for longer runs. Inferior cables can cause signal degradation.
- Reduce the cable length if possible.
- Check for sources of electromagnetic interference (EMI) near the Cat5e/6 cables.
- IR Control Not Working:
- Ensure IR blaster and receiver cables are correctly plugged into the IR OUT (sender) and IR IN (receiver) ports.
- Verify the IR blaster eye is directly aligned with the IR sensor on your source device.
- Ensure the IR receiver eye is positioned to receive signals from your remote control.
- Test the remote control directly with the source device to confirm it is functioning.
- Audio Issues (No Audio, Distorted Audio):
- Check HDMI cable connections.
- Verify the audio settings on your source device and display.
- Adjust EDID settings on the sender unit, as incorrect EDID can affect audio compatibility.
Specifications
| Model | SW-32949 |
| HDMI Version | HDMI 1.4 |
| HDCP Version | HDCP 1.4 |
| Supported Resolutions | Up to 1080p @60Hz |
| Audio Support | LPCM 7.1 Ch, Dolby True HD, DTS-HD Master Audio |
| Transmission Distance | Up to 200 ft (60 meters) over Cat5e/6 cable |
| Input Ports (Sender) | 1x HDMI IN, 1x DC 12V, 1x IR OUT |
| Output Ports (Sender) | 1x HDMI OUT (loop-through), 4x RJ45 CAT |
| Input Ports (Receiver) | 1x RJ45 CAT, 1x IR IN |
| Output Ports (Receiver) | 1x HDMI OUT |
| Power Supply | 12V DC (for Sender), Power over Cable (for Receivers) |
| Compatible Devices | TVs, monitors, projectors |
| Included Components | Sender, 4x Receivers, Power Supply, IR Cables |
| Item Weight | 0.97 Kilograms (total package) |
Warranty and Support
Sewell products are designed for reliability and performance. For warranty information or technical support, please refer to the official Sewell website or contact their customer service department. Keep your purchase receipt for warranty claims.

