
1. Introduction
Thank you for choosing the Comelit Classic Monitor, Model 6101N. This manual provides essential information for the correct installation, operation, and maintenance of your video intercom monitor. Please read these instructions carefully before using the device to ensure safe and efficient operation.
The Comelit Classic Monitor is designed to provide reliable video and audio communication for door entry systems, enhancing security and convenience for your home or office.
2. Safety Information
- Electrical Safety: Installation and maintenance should only be performed by qualified personnel. Disconnect power before performing any wiring or service.
- Environment: Do not expose the monitor to extreme temperatures, humidity, direct sunlight, or corrosive substances.
- Cleaning: Use a soft, dry cloth for cleaning. Do not use abrasive cleaners or solvents.
- Modifications: Do not attempt to modify or repair the device yourself. Unauthorized modifications may void the warranty and pose safety risks.
3. Package Contents
Please check that all components are present in the package:
- Comelit Classic Monitor (Model 6101N)
- Mounting bracket
- Mounting screws and wall plugs
- Instruction Manual (this document)
4. Product Overview
The Comelit Classic Monitor features a sleek design and intuitive controls for managing your door entry system. Below is an image of the monitor, highlighting its key features.
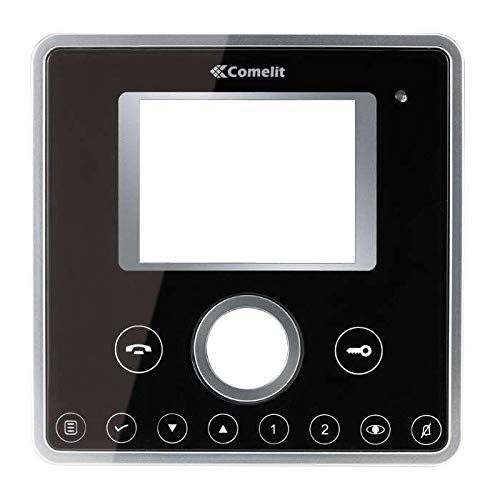
Figure 1: Front view of the Comelit Classic Monitor (Model 6101N). This image shows the monitor's display screen, handset, and control buttons. The monitor is black with a minimalist design.
Key components typically include:
- Display Screen: Shows video feed from the outdoor unit.
- Handset: For audio communication.
- Door Release Button: Activates the electric lock to open the door.
- Auxiliary Button: May control additional functions (e.g., secondary door, stair light).
- Volume Control: Adjusts ringtone and communication volume.
5. Setup and Installation
Installation of the Comelit Classic Monitor requires electrical wiring and should ideally be performed by a qualified technician. Incorrect installation can lead to device malfunction or safety hazards.
5.1 Mounting the Monitor
- Choose a suitable location on an interior wall, away from direct heat sources or moisture.
- Secure the mounting bracket to the wall using the provided screws and wall plugs. Ensure the bracket is level.
- Refer to the system wiring diagram (provided with your outdoor unit or system documentation) for correct cable connections.
- Connect the system cables to the monitor's terminals as indicated in the wiring diagram. Ensure all connections are secure.
- Carefully attach the monitor to the mounting bracket, ensuring it clicks securely into place.
5.2 Initial Power-Up
Once installed, restore power to the system. The monitor should power on and display a standby screen or indicator light. Perform a test call from the outdoor unit to verify proper operation.
6. Operating Instructions
6.1 Answering a Call
- When someone calls from the outdoor unit, the monitor will ring and display the video feed.
- Lift the handset to answer the call and begin two-way audio communication.
- To end the call, replace the handset.
6.2 Opening the Door
During a call, or when the monitor is active, press the Door Release Button (often marked with a key symbol) to activate the electric lock and open the door.
6.3 Adjusting Settings
- Volume: Use the volume control (usually a rotary dial or buttons on the side/bottom) to adjust the ringtone and communication volume.
- Brightness/Contrast: Some models may have controls for adjusting screen brightness or contrast. Refer to specific model features if available.
7. Maintenance
- Cleaning: Regularly wipe the monitor's surface and screen with a soft, dry, anti-static cloth. Do not use liquid cleaners directly on the screen or device.
- Inspection: Periodically check for any loose connections or visible damage. If any issues are found, contact a qualified technician.
- Software Updates: If your system supports firmware updates, follow the manufacturer's instructions for applying them to ensure optimal performance and security.
8. Troubleshooting
| Problem | Possible Cause | Solution |
|---|---|---|
| No video/audio from outdoor unit. | Loose wiring, power issue, outdoor unit malfunction. | Check all connections. Ensure system has power. Contact technician if problem persists. |
| Monitor does not power on. | No power supply, faulty wiring, monitor malfunction. | Verify power supply to the system. Check wiring. Contact technician. |
| Door release not working. | Wiring issue to electric lock, faulty lock, monitor button malfunction. | Check wiring to the lock. Test the lock independently if possible. Contact technician. |
| Poor video quality. | Dirty camera lens (outdoor unit), poor wiring, interference. | Clean outdoor camera lens. Check wiring for damage or interference. |
9. Specifications
Below are the technical specifications for the Comelit Classic Monitor, Model 6101N:
- Model Number: 6101N
- Manufacturer: Comelit
- Product Type: Video Intercom Monitor
- ASIN: B01MSE76EO
- Number of Products: 1
- First Available Date: 2 February 2017
- Note: Specific electrical and display specifications may vary by system configuration. Refer to your system's main documentation for full details.
10. Warranty and Support
Comelit products are covered by a manufacturer's warranty. For specific warranty terms and conditions, please refer to the warranty card included with your product or visit the official Comelit website. Keep your proof of purchase for warranty claims.
For technical support, service, or further assistance, please contact your authorized Comelit dealer or visit the official Comelit support page:
Official Comelit Website: www.comelitgroup.com
Please have your model number (6101N) and purchase details ready when contacting support.


