
OEMTOOLS 27178
OEMTOOLS 27178 Inner Tie Rod Removal Tool Set Instruction Manual
Model: 27178
Introduction
This instruction manual provides essential information for the safe and effective use of the OEMTOOLS 27178 Master Inner Tie Rod Tool Set. This tool set is designed for the removal and installation of inner tie rods on most cars, trucks, and SUVs without requiring the disassembly of the rack and pinion. Please read this manual thoroughly before operating the tool.
Safety Information
WARNING: Always wear appropriate personal protective equipment, including safety glasses, when using this tool. Automotive repair can be hazardous.
- Ensure the vehicle is properly supported on jack stands before beginning any work.
- Never use damaged or modified tools. Inspect all components before each use.
- Use the correct size crowfoot adapter for the tie rod nut to prevent slippage and damage.
- Apply steady, controlled force. Avoid sudden jerking motions.
- Keep hands and clothing clear of moving parts.
- Refer to the vehicle manufacturer's service manual for specific torque specifications and procedures.
Product Components
The OEMTOOLS 27178 Master Inner Tie Rod Tool Set includes the following components:
- Long Tube Handle (1/2" drive compatible)
- 12 Nickel-Plated Crowfoot Adapters (SAE and Metric sizes)
- Storage Case
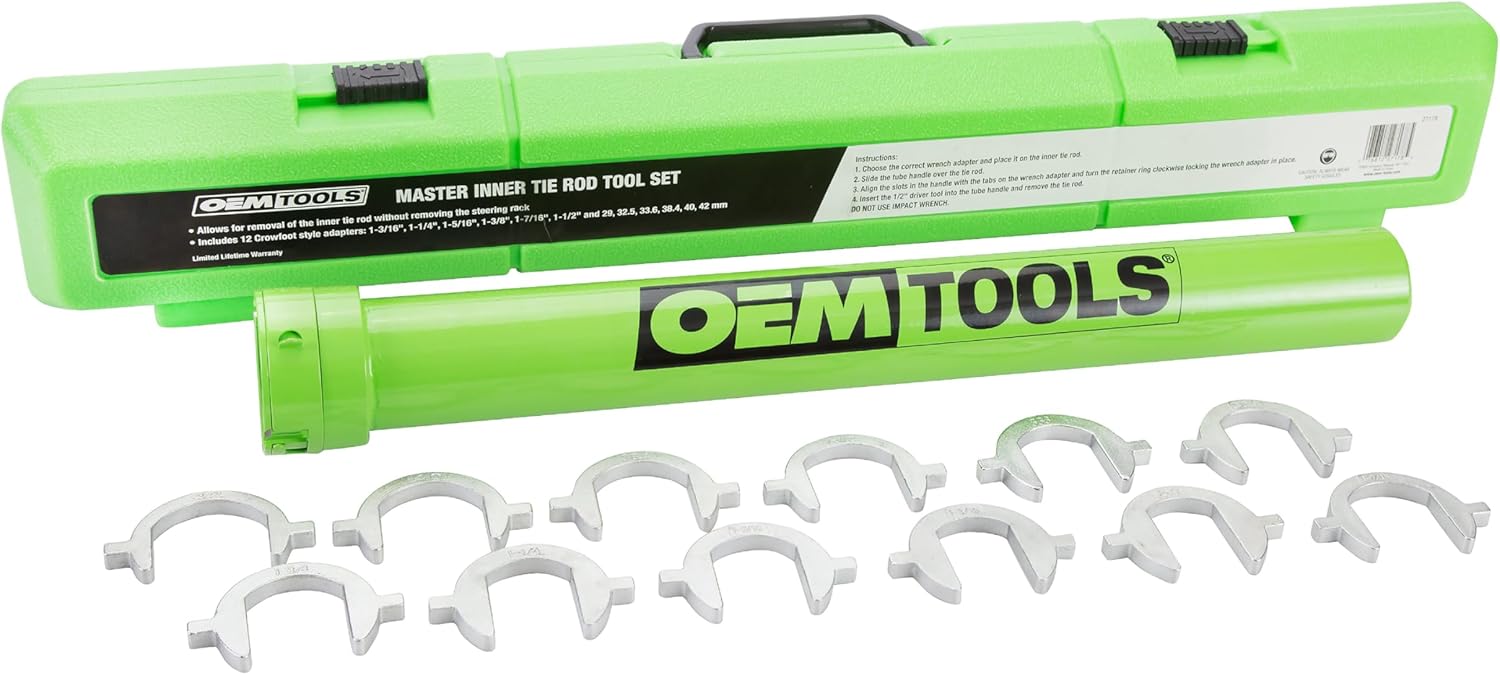
Figure 1: Complete OEMTOOLS 27178 Inner Tie Rod Removal Tool Set, including the green storage case, the long tube handle, and the twelve crowfoot adapters.

Figure 2: A selection of the crowfoot adapters, clearly labeled with their respective SAE and Metric sizes, ranging from 1-1/32" to 42 mm.

Figure 3: Close-up view of a single crowfoot adapter, highlighting its nickel-plated finish for enhanced durability and corrosion resistance.
Setup
- Prepare the Vehicle: Safely lift the vehicle and support it using appropriate jack stands. Remove the wheel and any components obstructing access to the inner tie rod.
- Identify Tie Rod Nut Size: Determine the size of the inner tie rod nut. This can often be found in the vehicle's service manual or by carefully measuring the nut.
- Select Correct Adapter: Choose the crowfoot adapter from the set that precisely matches the inner tie rod nut size. A snug fit is crucial to prevent rounding the nut.
- Attach Adapter to Handle: Insert the selected crowfoot adapter onto the square drive of the inner tie rod tool's tube handle. Ensure it is fully seated.

Figure 4: Illustration of how to connect a crowfoot adapter to the 1/2-inch drive end of the inner tie rod tool's tube handle, ensuring a secure fit for operation.
Operating Instructions
Inner Tie Rod Removal:
- Position the Tool: Slide the tube handle over the inner tie rod until the crowfoot adapter engages the inner tie rod nut.
- Secure the Adapter: Align the tabs on the tube with the notches on the crowfoot adapter and push the retainer ring forward to lock the adapter in place.
- Apply Torque: Attach a 1/2" drive ratchet or breaker bar to the square drive end of the tube handle. Rotate counter-clockwise to loosen and remove the inner tie rod. Maintain slight backward pressure on the tool to keep the adapter engaged.
- Remove Tie Rod: Once loosened, unscrew the inner tie rod completely by hand or with the tool.
Inner Tie Rod Installation:
- Prepare New Tie Rod: Apply thread locker to the threads of the new inner tie rod as recommended by the vehicle manufacturer.
- Hand-Tighten: Thread the new inner tie rod into the rack by hand until snug.
- Torque to Specification: Re-attach the appropriate crowfoot adapter to the tool handle and engage it with the new inner tie rod nut. Use a 1/2" drive torque wrench to tighten the inner tie rod to the vehicle manufacturer's specified torque.
- Final Steps: Reinstall any removed components, lower the vehicle, and perform a wheel alignment as necessary.

Figure 5: A mechanic demonstrating the use of the OEMTOOLS inner tie rod removal tool to access and work on an inner tie rod within a vehicle's wheel well.
Maintenance
- Cleaning: After each use, wipe down the tool handle and crowfoot adapters with a clean cloth to remove dirt, grease, and automotive fluids.
- Storage: Store all components in the provided storage case in a dry, clean environment to prevent corrosion and damage.
- Inspection: Periodically inspect crowfoot adapters for wear, cracks, or deformation. Replace any damaged components immediately.
Troubleshooting
| Problem | Possible Cause | Solution |
|---|---|---|
| Crowfoot adapter slips on tie rod nut. | Incorrect adapter size; nut is rounded; adapter not fully engaged. | Ensure correct adapter size is used. Verify adapter is fully seated and locked. If nut is rounded, alternative removal methods may be required. |
| Difficulty engaging adapter with nut. | Limited clearance; adapter misalignment. | Ensure clear access to the tie rod nut. Carefully align the adapter with the nut before sliding the tool over. |
| Tool feels unstable during use. | Adapter not locked; insufficient grip. | Confirm the retainer ring is pushed forward to lock the adapter. Maintain slight backward pressure on the tool to keep the adapter engaged. |
Specifications
- Model Number: 27178
- Drive Size: 1/2 inch
- Crowfoot Adapter Sizes: 1-1/32", 1-1/4", 1-5/16", 1-3/8", 1-7/16", 1-1/2", 29 mm, 32.5 mm, 33.6 mm, 38.4 mm, 40 mm, 42 mm (Total 12 adapters)
- Tube Handle Inner Diameter: 2.125 inches
- Material: Nickel-plated crowfoot adapters for corrosion resistance.
- Product Dimensions: Approximately 27.75 x 4.1 x 3 inches (Tool in case)
- Item Weight: Approximately 7.13 pounds

Figure 6: The tube handle's inner diameter of 2.125 inches, designed to accommodate various tie rod sizes for small cars, pickups, and large SUVs.
Warranty and Support
OEMTOOLS products are manufactured to high-quality standards. For warranty information, technical support, or to inquire about replacement parts, please refer to the official OEMTOOLS website or contact their customer service department. Keep your purchase receipt for warranty claims.
Ask a question about this manual
Ask about setup, troubleshooting, compatibility, parts, safety, or missing instructions. Manuals+ will review the question and use this page’s manual context to help answer it.