
1. Important Safety Instructions
Always read and understand all safety warnings, instructions, illustrations, and specifications provided with this power tool. Failure to follow all instructions listed below may result in electric shock, fire, and/or serious injury.
- Work Area Safety: Keep work area clean and well lit. Cluttered or dark areas invite accidents. Do not operate power tools in explosive atmospheres, such as in the presence of flammable liquids, gases, or dust. Power tools create sparks which may ignite the dust or fumes.
- Electrical Safety: Power tool plugs must match the outlet. Never modify the plug in any way. Do not use any adapter plugs with earthed (grounded) power tools. Unmodified plugs and matching outlets will reduce risk of electric shock.
- Personal Safety: Always wear eye protection. Use personal protective equipment such as dust mask, non-skid safety shoes, hard hat, or hearing protection for appropriate conditions. This will reduce personal injuries.
- Tool Use and Care: Do not force the power tool. Use the correct power tool for your application. The correct power tool will do the job better and safer at the rate for which it was designed.
- Circular Saw Specific Safety: Always keep hands away from the cutting area and the blade. Keep your second hand on the auxiliary handle, or motor housing. If both hands are holding the saw, they cannot be cut by the blade.
- Dust Extraction: Connect dust extraction facilities if provided. Use of dust collection can reduce dust-related hazards.
2. Product Overview
The Ferm CSM1038 Precision Circular Saw is designed for precise cutting in various materials. It features an ergonomic design with a soft grip for comfortable operation, and laser guidance for enhanced accuracy. A dust extraction hose connection ensures a cleaner working environment.
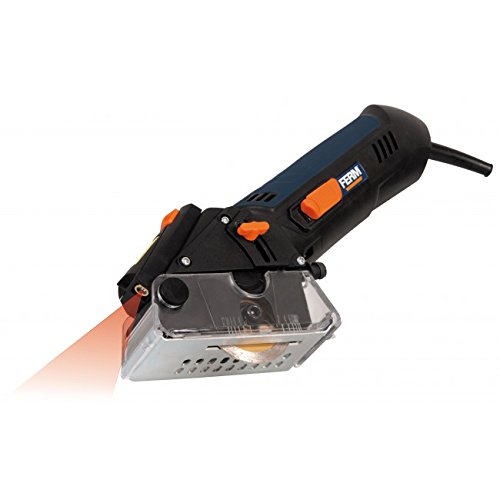
Figure 1: Overview of the Ferm CSM1038 Precision Circular Saw. This image shows the compact design and main body of the tool.
Components:
- Power Switch: For turning the tool ON/OFF.
- Soft Grip Handle: Provides comfortable and secure handling.
- Blade Guard: Protects the user from the rotating blade.
- Cutting Blade: For material removal.
- Laser Guide: Projects a line for accurate cutting.
- Dust Extraction Port: For connecting a dust hose.
- Depth Adjustment Lever: To set the desired cutting depth.
3. Setup
3.1 Blade Installation
- Ensure the tool is unplugged from the power source before any assembly or adjustment.
- Press the spindle lock button to secure the spindle.
- Use the provided wrench to loosen the blade retaining screw.
- Lift the lower blade guard and carefully remove the old blade (if applicable).
- Place the new blade onto the spindle, ensuring the rotation direction arrow on the blade matches the arrow on the saw's housing.
- Tighten the blade retaining screw firmly with the wrench while holding the spindle lock button.
- Release the spindle lock button and check that the blade rotates freely.
3.2 Power Connection
Connect the saw's power cord to a suitable 230V AC power outlet. Ensure the outlet is properly grounded and protected by a residual current device (RCD) for added safety.
3.3 Adjusting Cutting Depth
To adjust the cutting depth, loosen the depth adjustment lever. Move the base plate up or down to achieve the desired cutting depth. Ensure the blade extends slightly below the material being cut. Tighten the depth adjustment lever securely before operation.
4. Operating Instructions
4.1 Basic Operation
- Ensure the workpiece is securely clamped to prevent movement during cutting.
- Hold the saw firmly with both hands, ensuring a stable grip on the soft grip handle.
- Position the saw so the blade is clear of the workpiece.
- Press the power switch to start the saw. Allow the blade to reach full speed before engaging with the material.
- Slowly guide the saw into the workpiece along the desired cutting line. Maintain a steady, even pressure.
- Once the cut is complete, release the power switch and allow the blade to stop completely before lifting the saw from the workpiece.
4.2 Using the Laser Guide
The integrated laser guide projects a visible line onto the workpiece, indicating the cutting path. Align this laser line with your marked cutting line for improved accuracy. Ensure the laser lens is kept clean for optimal visibility.
4.3 Dust Extraction
For a cleaner and healthier working environment, connect a suitable dust extraction system to the dust extraction port on the saw. This will help collect sawdust and debris generated during cutting.
4.4 Cutting Various Materials
This precision circular saw is suitable for cutting wood, plastics, gypsum board, soft metal, and ceramics. Always use the appropriate blade type for the material being cut to ensure optimal performance and safety. Adjust cutting speed and pressure according to the material's hardness.
5. Maintenance
5.1 Cleaning
After each use, unplug the tool and clean the exterior with a soft, damp cloth. Remove any sawdust or debris from the blade guard, dust port, and ventilation openings. Do not use harsh chemicals or abrasive cleaners.
5.2 Blade Care and Replacement
Regularly inspect the cutting blade for sharpness, damage, or missing teeth. A dull or damaged blade can lead to poor cutting performance and increased risk of kickback. Replace worn blades promptly following the blade installation instructions in Section 3.1.
5.3 Storage
Store the circular saw in a clean, dry, and secure location, out of reach of children. Protect the power cord from damage and avoid storing the tool in direct sunlight or extreme temperatures.
6. Troubleshooting
| Problem | Possible Cause | Solution |
|---|---|---|
| Saw does not start | No power supply Faulty power switch | Check power cord and outlet Contact authorized service center |
| Poor cut quality / Blade binding | Dull or damaged blade Incorrect cutting depth Workpiece not secured | Replace blade Adjust cutting depth Secure workpiece firmly |
| Excessive vibration / Noise | Loose blade Damaged blade Internal fault | Check blade tightness Replace blade Contact authorized service center |
| Laser guide not visible | Dirty laser lens Laser malfunction | Clean laser lens Contact authorized service center |
7. Specifications
| Feature | Specification |
|---|---|
| Model Number | CSM1038 |
| Power Input | 400 W |
| Operating Voltage | 230 Volts |
| No Load Speed | 4200 RPM |
| Blade Material | Metal |
| Number of Teeth | 24 |
| Blade Shape | Round |
| Power Source | Corded Electric |
| Special Feature | Ergonomic |
| Surface Recommendation | Metal, Plastic |
8. Warranty and Support
Ferm products are manufactured to high-quality standards and are guaranteed against defects in materials and workmanship. For specific warranty terms and conditions, please refer to the warranty card included with your product or visit the official Ferm website. For technical support, spare parts, or service, please contact your local Ferm dealer or an authorized service center.


