
Soundstream AR4.1200
Soundstream AR4.1200 Arachnid Series Amplifier User Manual
Model: AR4.1200
Introduction
The Soundstream AR4.1200 Arachnid Series Amplifier is a high-performance 1200W Class A/B full-range amplifier designed for car audio systems. This amplifier incorporates military-grade PCB with PWM MOSFET power supply, ensuring reliable and efficient operation. It offers versatile connectivity options including high/speaker level and low level/RCA inputs, along with pre-amp low-level RCA outputs. Built with direct short, thermal, and overload circuit protection, the AR4.1200 provides robust performance and longevity.
This manual provides essential information for the proper installation, operation, and maintenance of your Soundstream AR4.1200 amplifier. Please read it thoroughly before attempting installation or use.
Features
- 2-Ohm Stereo & 4-Ohm Bridged Full Range Operation: Provides flexible impedance options for various speaker configurations.
- Military Grade PCB w/ PWM MOSFET Power Supply: Ensures stable and efficient power delivery.
- Direct Short, Thermal, & Overload Circuit Protection: Safeguards the amplifier from potential damage due to electrical issues or overheating.
- High/Speaker Level & Low Level/RCA Input: Allows connection to both factory and aftermarket head units.
- Pre-amp Low-Level RCA Outputs: Enables daisy-chaining to additional amplifiers.
- Total Power Output: 1,200 Watts: Delivers substantial power for clear and dynamic audio.
- LED Power (Green) and Protect (Red) Indicators: Provides visual status of the amplifier's operation and protection mode.
Product Overview

Figure 1: Top View of AR4.1200 Amplifier. This image displays the sleek black casing with the Soundstream logo prominently featured in the center, along with the "1200 Watts Max" and "AR4.1200" model designation.
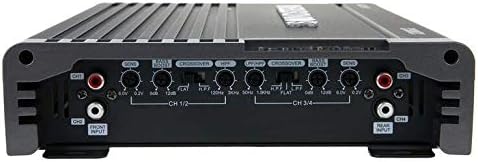
Figure 2: Control Panel of AR4.1200 Amplifier. This image highlights the input and control side of the amplifier, featuring RCA inputs, gain controls, crossover frequency adjustments (HPF and LPF), and bass boost knobs for channels 1/2 and 3/4.

Figure 3: Power and Speaker Terminal Side of AR4.1200 Amplifier. This image shows the connection terminals for power (GND, REMOTE, +12V), dual fuses, and the speaker output terminals for channels 1 through 4, along with bridging options.
Setup and Installation
Proper installation is crucial for optimal performance and safety. If you are unsure about any steps, consult a professional car audio installer.
1. Safety Precautions
- Disconnect the vehicle's negative battery terminal before starting any electrical work.
- Ensure all wiring is properly insulated to prevent short circuits.
- Mount the amplifier securely to prevent movement during vehicle operation.
- Avoid mounting the amplifier in areas exposed to direct sunlight, excessive heat, or moisture.
2. Mounting Location
Choose a mounting location that allows for adequate ventilation around the amplifier. Common locations include under seats, in the trunk, or behind rear seats. Ensure the surface is flat and sturdy.
3. Wiring Connections
Refer to Figure 3 for terminal locations.
- Power Connection (+12V): Connect a high-gauge power cable directly from the positive terminal of the vehicle's battery to the +12V terminal on the amplifier. Install an inline fuse (not supplied) within 18 inches of the battery.
- Ground Connection (GND): Connect a high-gauge ground cable from the GND terminal on the amplifier to a clean, unpainted metal surface on the vehicle's chassis. Ensure a solid, low-resistance connection.
- Remote Turn-On (REMOTE): Connect a remote turn-on wire from your head unit's remote output to the REMOTE terminal on the amplifier. This wire signals the amplifier to turn on when the head unit is active.
- Audio Input (RCA or Speaker Level):
- Low-Level Input (RCA): Connect RCA cables from your head unit's pre-amp outputs to the RCA input jacks on the amplifier (Figure 2).
- High-Level Input (Speaker Level): If your head unit does not have RCA outputs, use the speaker level inputs (if applicable, refer to amplifier's specific wiring diagram for details).
- Speaker Output: Connect your speakers to the speaker output terminals (Figure 3). Pay close attention to polarity (+ and -) for each speaker. For bridged operation, consult the amplifier's specific bridging instructions.
Operating the Amplifier
Once installed, adjust the amplifier settings for optimal sound performance.
1. Gain Control (SENS)
The gain control (labeled SENS in Figure 2) matches the amplifier's input sensitivity to the output level of your head unit. Start with the gain set to minimum. Play a familiar track at about 75% of your head unit's maximum volume. Slowly increase the amplifier's gain until you hear distortion, then back it off slightly. This ensures maximum clean output.
2. Crossover Settings (HPF/LPF)
The AR4.1200 features adjustable High-Pass Filter (HPF) and Low-Pass Filter (LPF) controls (Figure 2) for each channel pair (CH 1/2 and CH 3/4).
- HPF (High-Pass Filter): Allows frequencies above the set point to pass through. Use this for full-range speakers to prevent them from playing low bass notes they cannot reproduce, improving clarity and preventing damage. Typical settings range from 80Hz to 120Hz depending on speaker size.
- LPF (Low-Pass Filter): Allows frequencies below the set point to pass through. Use this for subwoofers to ensure they only reproduce bass frequencies. Typical settings range from 80Hz to 120Hz.
- FLAT: Bypasses the crossover, allowing the full frequency range to pass.
3. Bass Boost
The bass boost control (Figure 2) provides an adjustable boost at a specific low frequency. Use this sparingly, as excessive bass boost can lead to distortion and potential speaker damage. Start with the boost at minimum and increase only if desired, listening carefully for any signs of distortion.
Maintenance
The Soundstream AR4.1200 amplifier is designed for long-term reliability with minimal maintenance. Follow these guidelines to ensure its continued performance:
- Keep Clean: Periodically wipe the amplifier's exterior with a soft, dry cloth to remove dust and debris. Avoid using harsh chemicals or abrasive cleaners.
- Ensure Ventilation: Regularly check that the amplifier's cooling fins are not obstructed by dirt, carpet, or other objects. Proper airflow is essential to prevent overheating.
- Check Connections: Annually inspect all power, ground, remote, and speaker connections to ensure they are secure and free from corrosion. Loose connections can lead to poor performance or damage.
- Avoid Overloading: Do not operate the amplifier beyond its rated power or with speaker impedances lower than recommended. This can cause the amplifier to overheat and activate its protection circuits.
Troubleshooting
If you experience issues with your amplifier, consult the following table before seeking professional assistance.
| Problem | Possible Cause | Solution |
|---|---|---|
| No Power / Power LED Off | Blown fuse; loose power/ground connection; no remote turn-on signal. | Check and replace fuses; verify all power, ground, and remote wires are securely connected and receiving proper voltage. |
| Protection LED On (Red) | Overheating; short circuit in speaker wiring; speaker impedance too low; internal fault. | Allow amplifier to cool down; check speaker wires for shorts to chassis or between positive/negative; verify speaker impedance matches amplifier's rating; if problem persists, seek professional service. |
| No Sound Output | No input signal; gain set too low; speaker wires disconnected; head unit issues. | Check RCA or speaker level input connections; increase gain setting; verify speaker connections; ensure head unit is functioning correctly. |
| Distorted Sound | Gain set too high; improper crossover settings; damaged speakers; poor ground connection. | Reduce gain; adjust HPF/LPF settings; inspect speakers for damage; ensure ground connection is clean and secure. |
| Engine Noise / Whining | Poor ground connection; RCA cables routed too close to power wires; faulty RCA cables. | Improve ground connection; re-route RCA cables away from power wires; try different RCA cables. |
Specifications
| Feature | Detail |
|---|---|
| Model Number | AR4.1200 |
| Brand | Soundstream |
| Total Power Output | 1200 Watts (Max) |
| Amplifier Class | Class A/B |
| Number of Channels | 4 |
| Operating Impedance | 2-Ohm stereo & 4-Ohm bridged full range operation |
| Power Supply | PWM MOSFET |
| Input Type | High/Speaker Level & Low Level/RCA |
| Output Type | Pre-amp Low-Level RCA Outputs |
| Protection Features | Direct short, thermal, & overload circuit protection |
| Dimensions (L x W x H) | 18 x 4 x 11 inches |
| Item Weight | 3.9 pounds |
| Material | Metal |
| Minimum Supply Voltage | 9 Volts |
| Voltage | 6 Volts |
| Certifications | CE, FCC |
Warranty and Support
Soundstream products are manufactured to the highest quality standards. For specific warranty information, please refer to the warranty card included with your product or visit the official Soundstream website. Keep your purchase receipt as proof of purchase for warranty claims.
For technical support, troubleshooting assistance, or service inquiries, please contact Soundstream customer service. Contact information can typically be found on the manufacturer's website or in the product packaging.
Protection Plans: Extended protection plans may be available for purchase to cover your amplifier beyond the standard manufacturer's warranty. These plans offer additional coverage for repairs or replacement. Please check with your retailer or online marketplace for available options.
Related documentsAR4.1200


Ask a question about this manual
Ask about setup, troubleshooting, compatibility, parts, safety, or missing instructions. Manuals+ will review the question and use this page’s manual context to help answer it.