
1. Introduction
This manual provides detailed instructions for the installation, configuration, operation, and maintenance of the HP Aruba 7220 Wireless LAN Controller, model JW752A. The Aruba 7220 is designed to deliver high-performance network services and secure connectivity for enterprise wireless networks. Please read this manual thoroughly before operating the device to ensure proper functionality and safety.
2. Product Overview
The HP Aruba 7220 Wireless LAN Controller is a robust networking device offering advanced features for managing wireless access points and ensuring secure, reliable network access. It supports Gigabit Ethernet and is designed for rack-mountable, desktop, or wall-mountable installations.

Figure 2.1: Front view of the HP Aruba 7220 Wireless LAN Controller, showing various ports and indicators.
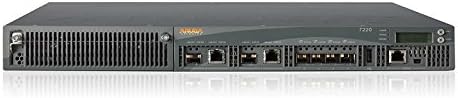
Figure 2.2: Angled front view of the HP Aruba 7220, highlighting the chassis design and port layout.
Key Features:
- High-performance wireless LAN management.
- Support for 802.11ac wireless type.
- Multiple installation options: rack-mountable, desktop, wall-mountable.
- Gigabit Ethernet connectivity.
- Integrated management port.
3. Setup and Installation
Follow these steps to properly set up your HP Aruba 7220 Wireless LAN Controller.
3.1. Unpacking and Inspection
- Carefully remove the controller from its packaging.
- Inspect the device for any signs of physical damage. If damage is found, contact your vendor immediately.
- Verify that all components listed in the packing slip are present.
3.2. Mounting the Controller
The Aruba 7220 can be installed in a standard 19-inch equipment rack, placed on a desktop, or mounted on a wall.
- Rack-Mounting: Secure the controller using the provided rack-mount kit. Ensure adequate ventilation space around the unit.
- Desktop Placement: Place the controller on a flat, stable surface, ensuring proper airflow.
- Wall-Mounting: Use appropriate wall-mounting hardware (sold separately) and follow local safety guidelines for secure installation.
3.3. Connecting Power
- Connect the power cord to the power input on the rear of the controller.
- Plug the other end of the power cord into a grounded electrical outlet.
- The power LED on the front panel should illuminate, indicating power is supplied.
3.4. Network Connections
- Connect Ethernet cables from your network infrastructure to the Gigabit Ethernet ports on the controller.
- For initial configuration, connect a management workstation to the dedicated management port (if available and required for initial setup).
- Ensure all network cables are securely seated.
4. Operating Instructions
Once the controller is physically installed and powered on, proceed with software configuration and operation.
4.1. Initial Configuration Access
Access the controller's management interface via a web browser or console port. Refer to the ArubaOS User Guide for detailed instructions on initial login credentials and network setup.
4.2. Network Configuration
- Configure IP addresses, subnet masks, and default gateways for the controller's interfaces.
- Set up VLANs and routing as required by your network topology.
- Integrate with existing network services such as DHCP and DNS.
4.3. Wireless Access Point Management
The controller automatically discovers and provisions Aruba access points. Configure wireless networks (SSIDs), security policies, and user access controls through the controller's interface.
- Create and manage virtual APs (VAPs).
- Implement authentication methods (e.g., WPA2/3, 802.1X).
- Monitor wireless client connectivity and performance.
5. Maintenance
Regular maintenance ensures optimal performance and longevity of your controller.
5.1. Firmware Updates
Periodically check the Aruba Networks support website for the latest firmware updates. Apply updates during scheduled maintenance windows to minimize service disruption.
5.2. Environmental Considerations
- Ensure the operating environment remains within specified temperature and humidity ranges.
- Keep ventilation openings clear of obstructions to prevent overheating.
- Regularly clean the exterior of the device with a soft, dry cloth. Do not use liquid cleaners.
5.3. Configuration Backup
Regularly back up your controller's configuration to an external storage device. This allows for quick recovery in case of system failure or misconfiguration.
6. Troubleshooting
This section provides solutions to common issues you might encounter.
6.1. Power Issues
- No Power: Ensure the power cord is securely connected to both the controller and a working power outlet. Check the power supply and circuit breaker.
- Intermittent Power: Verify stable power source. Replace power cord if damaged.
6.2. Network Connectivity Problems
- No Network Access: Check Ethernet cable connections. Verify port status LEDs. Ensure correct IP configuration.
- Wireless Clients Cannot Connect: Verify SSID broadcast, security settings, and controller configuration for access points. Check for IP address conflicts.
6.3. System Performance Issues
- Slow Performance: Check CPU and memory utilization through the management interface. Ensure adequate bandwidth for connected devices.
- Frequent Disconnections: Review wireless channel utilization and interference. Update firmware if necessary.
7. Specifications
Below are the technical specifications for the HP Aruba 7220 Wireless LAN Controller (Model JW752A).
| Feature | Specification |
|---|---|
| Product Name | 7220 ARUBA Controller |
| Manufacturer Part Number | JW752A |
| Product Type | Wireless LAN Controller |
| Ethernet Technology | Gigabit Ethernet |
| USB Ports | Yes |
| Number of Network (RJ-45) Ports | 2 |
| Product Family | 7200 |
| Form Factor | Rack-mountable, Desktop, Wall Mountable |
| Management Port | Yes |
| Country of Origin | China |
| Height | 1.8 inches |
| Width | 17.5 inches |
| Depth | 17.5 inches |
| Item Weight | 22 pounds |
| Wireless Type | 802.11ac |
8. Warranty and Support
For information regarding the product warranty, technical support, and service agreements, please refer to the official Hewlett Packard Enterprise (HPE) or Aruba Networks website.
- Official Support Portal: Visit Aruba Networks Support Services for documentation, downloads, and contact information.
- Warranty Information: Details on your product's warranty coverage can be found on the HPE website or by contacting your vendor.


