
Introduction
This manual provides essential instructions for the safe and effective use of your OM SYSTEM OLYMPUS FL-900R High-Intensity Flash. Please read this manual thoroughly before using the product and keep it in a safe place for future reference.
Safety Information
- Do not disassemble or modify the flash unit. This can cause electric shock or malfunction.
- Keep the flash unit dry. Exposure to water or moisture can cause electric shock or fire.
- Use only specified batteries. Incorrect battery types can lead to leakage, overheating, or explosion.
- Avoid direct eye exposure to the flash. The intense light can temporarily impair vision.
- Do not operate the flash in the presence of flammable gases or liquids.
Package Contents
Verify that all items listed below are included in your package:
- FL-900R flash unit
- Flash stand FLST-1
- Flash case
- Bounce Adapter
- IR filter
- Instruction Manual (this document)
- Warranty card
Product Overview
Familiarize yourself with the main components of the FL-900R flash unit.
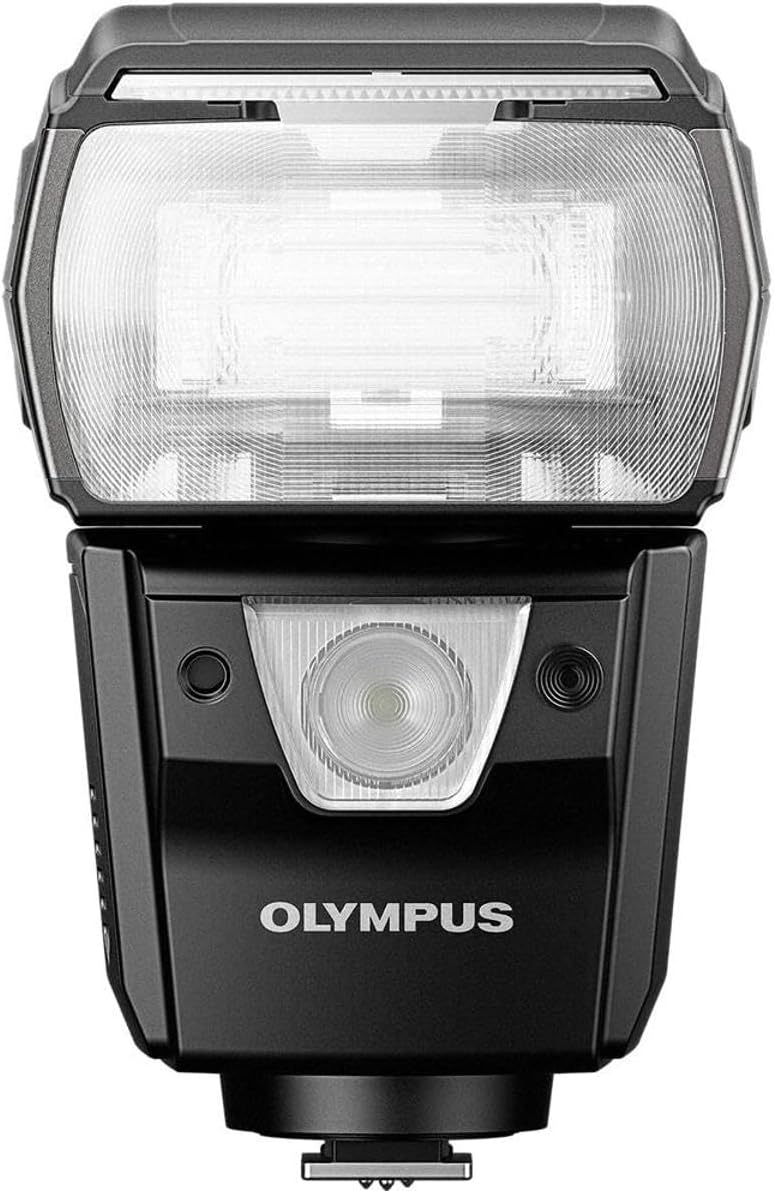
Figure 1: Front view of the FL-900R flash unit, showing the flash head and LED light.

Figure 2: Rear control panel of the FL-900R, displaying the LCD screen, mode buttons, and navigation controls.
- Flash Head: Emits the main flash. Can be rotated and tilted for bounce flash.
- LED Video Light: Provides continuous light for video recording or as a focus assist lamp.
- Control Panel: LCD screen and buttons for adjusting settings and modes.
- Hot Shoe Mount: Connects the flash to the camera.
- Battery Compartment: Holds four AA batteries.
Setup
1. Battery Installation
- Open the battery compartment cover located on the side of the flash unit.
- Insert four AA batteries, ensuring correct polarity (+/-) as indicated inside the compartment.
- Close the battery compartment cover securely.
2. Attaching to the Camera
- Slide the flash unit's hot shoe mount into the camera's hot shoe.
- Rotate the lock lever on the flash unit clockwise to secure it firmly to the camera.
- To remove, rotate the lock lever counter-clockwise and slide the flash off.

Figure 3: The FL-900R flash unit securely mounted on an OM SYSTEM camera, highlighting its compact integration and weather-sealed construction.
3. Initial Power-On
Press and hold the ON/OFF button until the LCD screen illuminates. The flash will perform a self-check and display the current settings.
Operating the Flash
Basic Flash Modes
Press the MODE button to cycle through available flash modes:
- TTL (Through-The-Lens): Automatic flash output based on camera metering.
- Manual: Allows manual adjustment of flash output power.
- RC (Remote Control): For wireless flash operation with compatible OM SYSTEM cameras.
Wireless Operation
The FL-900R supports wireless flash control using optical pulse technology. Set the flash to RC mode and configure your camera's flash settings for remote control. Ensure a clear line of sight between the camera's built-in flash (or a commander unit) and the FL-900R's sensor for reliable triggering.
LED Video Light
The built-in LED light can be used for continuous illumination during video recording or as a modeling light. Refer to your camera's manual for specific settings related to external video lights.
High-Speed Sequential Shooting
The FL-900R is designed to support high-speed sequential shooting with compatible OM SYSTEM cameras. This feature allows for rapid flash recycling to capture fast-moving subjects.
Dust and Splash Proof Design
The FL-900R features a dust and splash-proof construction, making it suitable for use in challenging outdoor conditions. While resistant to dust and splashes, it is not waterproof and should not be submerged in water.

Figure 4: The FL-900R flash unit on its stand, surrounded by water droplets, illustrating its dust and splash-proof capabilities.
Using the Bounce Adapter
Attach the included bounce adapter to the flash head to soften and diffuse the light, reducing harsh shadows and creating more natural-looking illumination.

Figure 5: The bounce adapter, designed to diffuse and soften the light output from the FL-900R flash.
Maintenance
- Cleaning: Use a soft, dry cloth to clean the flash unit. For stubborn dirt, lightly dampen the cloth with water. Do not use organic solvents.
- Storage: When not in use for extended periods, remove the batteries to prevent leakage. Store the flash in a cool, dry place, away from direct sunlight and extreme temperatures.
- Battery Care: Always use fresh, high-quality AA batteries. If using rechargeable batteries, ensure they are fully charged before use.
Troubleshooting
| Problem | Possible Cause | Solution |
|---|---|---|
| Flash does not power on. | Dead or incorrectly inserted batteries. | Replace batteries with fresh ones, ensuring correct polarity. |
| Flash does not fire. | Flash not securely mounted; camera settings incorrect; flash in sleep mode. | Ensure flash is locked onto hot shoe. Check camera flash settings. Press the shutter button halfway to wake the flash. |
| Flash output is too weak/strong. | Incorrect flash mode or power setting; subject too far/close. | Adjust flash compensation in TTL mode or manual power in Manual mode. Reposition subject. |
| Wireless flash not triggering. | No clear line of sight; incorrect RC settings on flash or camera. | Ensure flash sensor has clear view of camera's commander signal. Verify RC channel and group settings. |
Specifications
| Feature | Detail |
|---|---|
| Guide Number | 58m (at ISO 100) |
| Compatible Mountings | Olympus |
| Flash Sync Speed | 1/250 seconds |
| Connectivity Technology | Wireless (Optical Pulse) |
| Number of Batteries | 4 AA batteries (included) |
| Mount Type | Hot Shoe Mount |
| Item Dimensions (D x W x H) | 4.9"D x 4.8"W x 3.2"H |
| Color | Black |
| Exposure Control Type | Automatic, Manual |
| Water Resistance Level | Water Resistant (Dust and Splash Proof) |
| Compatible Devices | OM System/Olympus cameras |
| ISO Range | 200-25600 |
| Item Weight | 0.8 Pounds |
| Model Number | V326170BW000 |
| Manufacturer | Olympus |
Warranty Information
The OM SYSTEM OLYMPUS FL-900R High-Intensity Flash comes with a limited manufacturer's warranty. Please refer to the warranty card included in your package for specific terms, conditions, and duration of coverage. Keep your proof of purchase for warranty claims.
Customer Support
For technical assistance, troubleshooting beyond this manual, or service inquiries, please contact OM SYSTEM customer support.
- Online Support: Visit the official OM SYSTEM website for FAQs, software updates, and additional resources.
- Contact Information: Refer to the warranty card or the OM SYSTEM website for regional contact details.
