
1. Introduction
Thank you for purchasing the GPO Bermuda Classic Turntable. This manual provides essential information for the safe and efficient operation of your new turntable. Please read these instructions thoroughly before use and retain them for future reference.
2. Safety Information
- Power Supply: Use only the provided power adapter. Ensure the voltage matches your local power supply.
- Water and Moisture: Do not expose the unit to rain, moisture, or liquids. Do not place objects filled with liquids, such as vases, on the unit.
- Ventilation: Ensure adequate ventilation around the unit. Do not block ventilation openings.
- Heat Sources: Keep the unit away from heat sources such as radiators, heat registers, stoves, or other apparatus that produce heat.
- Cleaning: Unplug the unit from the power outlet before cleaning. Use a soft, dry cloth. Do not use liquid cleaners or aerosol cleaners.
- Stylus Care: The stylus (needle) is delicate. Handle with care to avoid bending or breaking. Keep out of reach of children.
- Servicing: Do not attempt to service this product yourself. Refer all servicing to qualified service personnel.
3. Package Contents
Please check that all items listed below are included in your package:
- GPO Bermuda Classic Turntable Unit
- Removable Legs (4 pieces)
- 45-rpm Adaptor
- USB Stick
- Power Adapter
- Instruction Manual
4. Product Overview
The GPO Bermuda Classic Turntable is a versatile record player featuring a classic design with modern functionalities. It includes built-in stereo speakers, USB recording capability, Bluetooth connectivity, and removable legs for flexible placement.

Figure 4.1: GPO Bermuda Classic Turntable with legs attached, highlighting key features and dimensions.

Figure 4.2: The GPO Bermuda Classic Turntable with its lid open, displaying the record platter and the removable legs.
Controls and Connections

Figure 4.3: Front control panel with USB port, Bluetooth indicator, and playback/recording buttons.
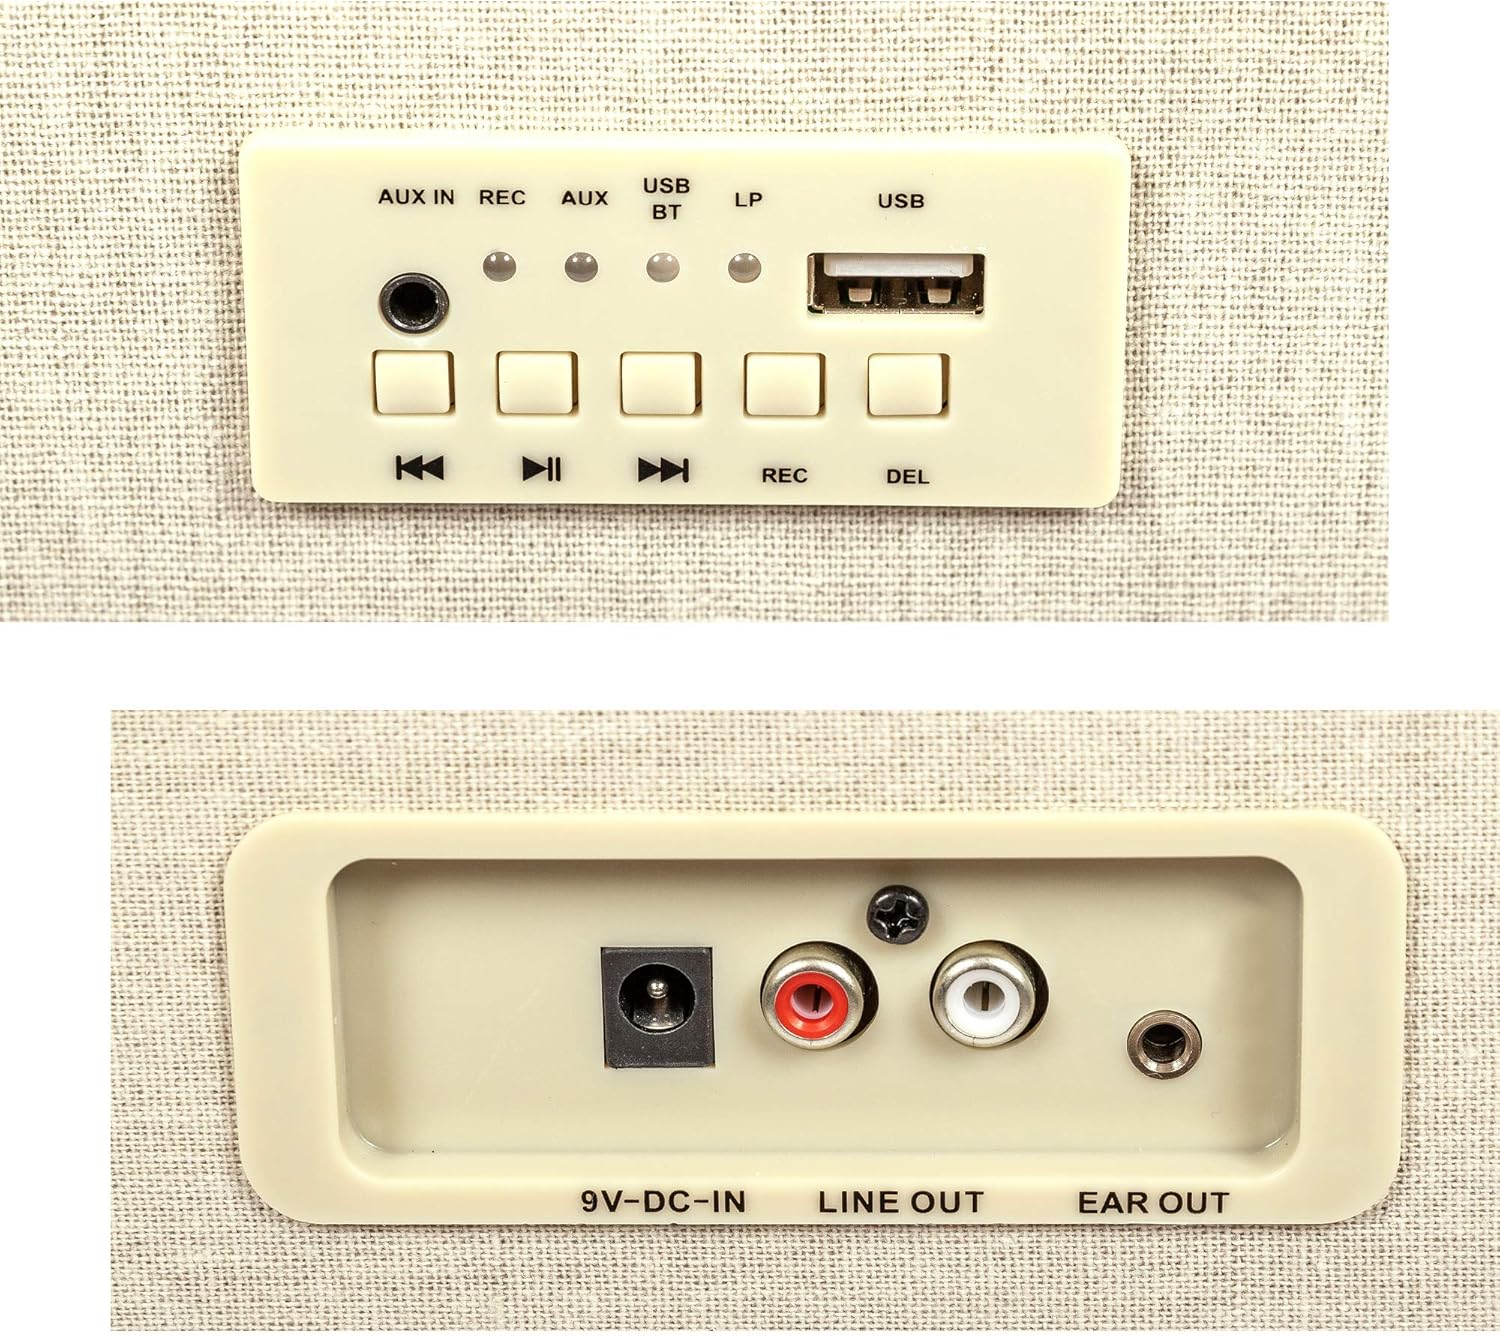
Figure 4.4: Rear panel connections including power input, line out, and ear out.
- Power/Volume Knob: Turns the unit on/off and adjusts the volume.
- Function Selector: Switches between Turntable, USB, Bluetooth, and AUX In modes.
- USB Port: For connecting a USB stick for recording or playback.
- AUX IN: 3.5mm jack for connecting external audio devices.
- REC Button: Initiates USB recording.
- DEL Button: Deletes recorded tracks from the USB stick.
- Playback Controls: Play/Pause, Skip Forward, Skip Backward for USB/Bluetooth.
- 9V DC-IN: Power input for the adapter.
- LINE OUT (RCA): For connecting to external amplifiers or powered speakers.
- EAR OUT: 3.5mm headphone jack.
5. Setup
5.1 Unpacking and Placement
- Carefully remove the turntable and all accessories from the packaging.
- Place the unit on a stable, level surface. Ensure there is enough space for the lid to open fully.
5.2 Attaching/Detaching Legs
The GPO Bermuda Classic Turntable comes with four removable legs, allowing it to be used as a standalone unit or placed on a table.
- To Attach: Align each leg with the screw holes on the bottom corners of the turntable. Gently twist each leg clockwise until securely fastened. Do not overtighten.
- To Detach: Twist each leg counter-clockwise until it can be removed. Store the legs safely when not in use.
5.3 Power Connection
Connect the provided power adapter to the 9V DC-IN port on the rear of the unit (Figure 4.4), then plug the adapter into a wall outlet.
6. Operating Instructions
6.1 Playing Records
- Open the lid of the turntable.
- Place a record on the platter. If playing a 45-rpm single, use the included 45-rpm adaptor.
- Select the correct speed (33, 45, or 78 RPM) using the speed selector switch located near the tone arm.
- Release the tone arm locking clip.
- Gently lift the tone arm using the tone arm lever.
- Position the stylus over the desired starting groove of the record.
- Lower the tone arm gently onto the record using the tone arm lever. The record will begin to play.
- Adjust the volume using the Power/Volume knob.
- At the end of the record, the auto-return arm will lift and return to its rest position.
- To stop playback manually, lift the tone arm, return it to its rest, and engage the locking clip.

Figure 6.1: Speed selector switch and tone arm controls.

Figure 6.2: Stylus and auto-return arm detail.
6.2 USB Recording
You can record your vinyl records directly to a USB stick.
- Insert the USB stick into the USB port on the front panel (Figure 4.3).
- Start playing your record as described in Section 6.1.
- Press the REC button to begin recording. The REC indicator light will illuminate.
- Press the REC button again to stop recording. The REC indicator light will turn off.
- To delete a recorded track, navigate to the track using the skip buttons and press the DEL button.
6.3 Bluetooth Connectivity
The turntable can receive audio wirelessly via Bluetooth from compatible devices.
- Turn on the turntable and select the Bluetooth (BT) function using the function selector. The BT indicator light will flash, indicating pairing mode.
- On your smartphone, tablet, or other Bluetooth device, enable Bluetooth and search for available devices.
- Select "GPO Bermuda" (or similar) from the list of devices.
- Once paired, the BT indicator light will stop flashing and remain solid. You can now play audio from your device through the turntable's speakers.
6.4 External Audio Connections
- AUX IN: Connect an external audio source (e.g., MP3 player, CD player) to the AUX IN jack (3.5mm) on the front panel (Figure 4.3). Select the AUX IN function on the turntable to play audio from the connected device.
- LINE OUT (RCA): Connect the LINE OUT RCA jacks (red and white) on the rear panel (Figure 4.4) to an external amplifier or powered speakers for enhanced sound output.
- EAR OUT: Connect headphones to the EAR OUT jack (3.5mm) on the rear panel (Figure 4.4) for private listening.
7. Maintenance
7.1 Cleaning the Unit
Wipe the exterior of the unit with a soft, dry cloth. Do not use abrasive cleaners, waxes, or solvents as they may damage the finish.
7.2 Stylus Care and Replacement
The stylus is a consumable part and will wear out over time. A worn stylus can damage records and degrade sound quality.
- Cleaning: Gently brush the stylus tip from back to front with a soft brush designed for stylus cleaning. Do not use your fingers.
- Replacement: Replace the stylus after approximately 300-500 hours of playback, or if you notice a decrease in sound quality or visible damage. Refer to the manufacturer's website or authorized dealers for replacement styli.
8. Troubleshooting
| Problem | Possible Cause | Solution |
|---|---|---|
| No power | Power adapter not connected or faulty. | Ensure power adapter is securely connected to the unit and a working wall outlet. |
| No sound from speakers | Volume too low; incorrect function selected; external speakers not connected/powered. | Increase volume. Select correct function (Turntable, AUX, BT). If using external speakers, ensure they are connected and powered on. |
| Record skipping | Record is dirty or scratched; turntable not level; stylus worn or dirty. | Clean record. Ensure turntable is on a stable, level surface. Clean or replace stylus. |
| Bluetooth not pairing | Turntable not in pairing mode; device too far; interference. | Ensure turntable is in BT pairing mode (flashing light). Move device closer. Avoid other wireless devices. |
| USB recording not working | USB stick full or incompatible; REC button not pressed. | Use a different USB stick. Ensure USB stick is formatted correctly (FAT32). Press REC button firmly. |
9. Specifications
- Model Name: Bermuda Classic
- Model Number: GPO BERMUDA GREY
- Brand: GPO
- Product Dimensions: 8.46 x 15.04 x 14.49 inches (21.5 x 38.2 x 36.8 cm)
- Item Weight: 15.27 pounds (6.94 Kilograms)
- Material: Plastic
- Color: Grey Cream
- Motor Type: AC Motor
- Playback Speeds: 33, 45, 78 RPM
- Special Features: Detachable Legs, USB Recording, Bluetooth Connectivity, Built-in Stereo Speakers, Auto-Return Arm
- Included Components: 45-rpm adaptor, USB stick
- Compatible Devices: Smartphone, Speaker, Tablet (for Bluetooth/AUX input)
10. Warranty and Support
GPO products are designed and manufactured to the highest quality standards. In the unlikely event of any issues, please refer to the warranty information provided with your purchase or contact GPO customer support for assistance.
For further support, please visit the official GPO website or contact your local dealer.