
1. Product Overview
The SCYAN X7 is a fingerprint keyless keypad door lock designed to provide secure and convenient access. It integrates multiple unlocking methods, including fingerprint recognition, user codes, and a traditional key override. This manual details the installation, programming, and operational procedures for the X7 lock.

Figure 1: SCYAN X7 Fingerprint Keyless Keypad Door Lock, front view.
2. Key Features
- Multiple Access Methods: Unlock using fingerprint, user code, or a physical key.
- High User Capacity: Supports up to 100 unique fingerprints and 100 user codes.
- Individual User Management: Allows for individual deletion of fingerprints and user codes.
- Touch Active Sensor: Built-in sensor for one-touch fingerprint unlocking.
- Self-Learning Fingerprint Technology: Fingerprint templates update after each successful entry, improving recognition accuracy over time.
- Dual System Login: Access the system for programming via a programming code or an administrator fingerprint.
- Passage Mode: Option to keep the door in an unlocked state for continuous access.
- Memory Function: Retains registered fingerprints and user codes even after power loss or system reset.
- Reversible Lever: Designed to fit both left-handed and right-handed doors.
- Key Override: Features a "Schlage C key" as an override, with an option to disable this feature.
- Emergency Power: A 9V battery can be attached as an additional power source if the main batteries are depleted.
- Durable Construction: Double-shell heavy-duty design for enhanced security.
- Low Power Alert: Notifies users when batteries are running low.
3. Setup and Installation
3.1 Package Contents
Before beginning installation, verify that all components are present. Refer to the exploded view diagram for identification.
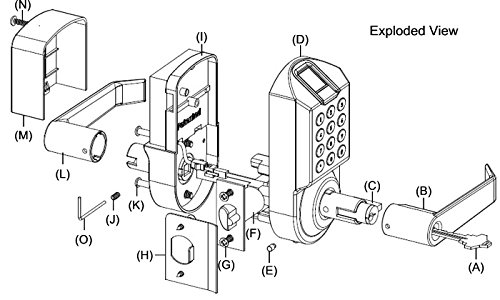
Figure 2: Exploded view of the SCYAN X7 lock components. This diagram shows all individual parts required for assembly and installation.
3.2 Door Preparation
The SCYAN X7 lock is designed for doors with a thickness between 1.25 inches (32mm) and 2.25 inches (57mm). For door thicknesses between 2.25 inches and 2.5 inches, specific screws may be required (not included). The lock fits a standard 2-1/8 inch (54mm) diameter hole. Two additional small holes will need to be drilled above the main bore hole for secure mounting.
- Ensure the door has a standard 2-1/8" (54mm) diameter hole.
- Adjustable backset: The tubular latch supports backsets of 2-3/8" (60mm) or 2-3/4" (70mm).
- Drill two small additional holes as indicated by the template for the lock's mounting posts.
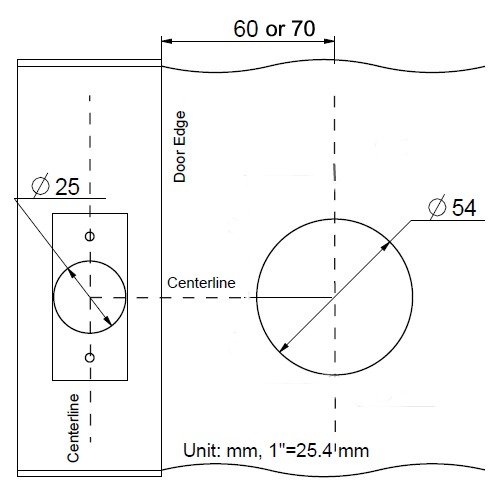
Figure 3: Door drilling template, side view, showing required hole diameters and backset options (60mm or 70mm).
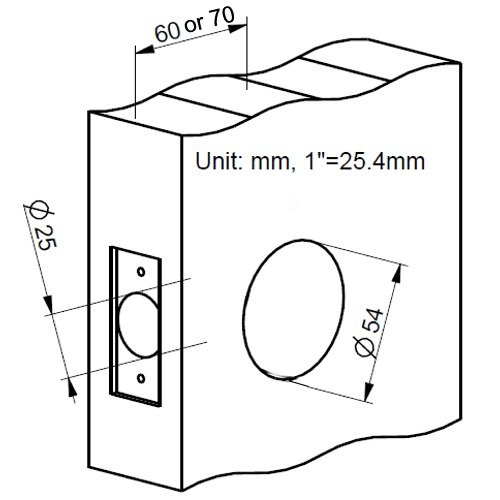
Figure 4: Door drilling template, perspective view, illustrating the main bore hole and additional mounting holes.
3.3 Battery Installation
The lock requires 4 AA alkaline batteries (not included). Install them into the battery compartment located on the interior side of the lock. Ensure correct polarity.
3.4 Reversible Lever Adjustment
The lever is reversible to accommodate both left-handed and right-handed doors. The reversing mechanism is controlled by the key. Consult the installation guide for specific steps on how to adjust the lever direction if needed.
4. Operating Instructions
4.1 Initial Setup and Administrator Programming
Upon initial power-up, the lock will be in a default state where any fingerprint can unlock it. It is crucial to program an administrator fingerprint or programming code immediately to secure the lock.
- Set Administrator: Follow the instructions in the detailed programming guide (usually included with the product) to set the first administrator fingerprint or programming code. This administrator will have full control over user management and lock settings.
- Add User Fingerprints: As an administrator, you can register up to 100 unique fingerprints. Place the finger on the sensor multiple times as prompted for accurate registration.
- Add User Codes: Program up to 100 user codes, each 4-12 digits long.
4.2 Unlocking the Door
- By Fingerprint: Place a registered finger on the fingerprint sensor. The lock will unlock if the fingerprint is recognized.
- By User Code: Enter a valid user code on the keypad, followed by the '#' key. The lock will unlock.
- By Key: Insert the physical key into the keyhole and turn to unlock.
4.3 Locking the Door
The lock typically auto-locks after a few seconds. Refer to the full programming guide for options to manually lock or adjust auto-lock settings.
4.4 Passage Mode
Passage mode allows the door to remain unlocked for continuous access without requiring a fingerprint or code. This mode can be activated and deactivated via the administrator settings.
4.5 Low Battery Alert and Emergency Power
The lock will provide an audible or visual alert when the batteries are low. Replace the 4 AA alkaline batteries promptly. In case of complete battery depletion, a 9V battery can be temporarily connected to the external terminals on the lock to provide emergency power for entry.
5. Maintenance
- Battery Replacement: Replace all 4 AA alkaline batteries when the low battery alert is activated. Do not mix old and new batteries or different battery types.
- Cleaning: Clean the keypad and fingerprint sensor with a soft, dry cloth. Avoid abrasive cleaners or solvents that could damage the finish or electronic components.
- Fingerprint Sensor Care: Keep the fingerprint sensor clean and dry for optimal performance. Ensure fingers are clean and dry when using the sensor.
- Mechanical Check: Periodically check that all screws are tight and the lock operates smoothly. Do not force the lever or key if resistance is met.
6. Troubleshooting
| Problem | Possible Cause | Solution |
|---|---|---|
| Lock does not respond or power on. | Dead batteries; incorrect battery installation. | Replace with new AA alkaline batteries, ensuring correct polarity. Use a 9V battery for emergency power if needed. |
| Fingerprint not recognized. | Finger is wet, dirty, or injured; fingerprint not properly registered; sensor is dirty. | Ensure finger and sensor are clean and dry. Try a different registered finger. Re-register the fingerprint if issues persist. |
| User code not working. | Incorrect code entered; code not properly programmed; lock in passage mode. | Verify the code. Re-program the user code. Check if passage mode is active. |
| Lock remains unlocked (does not auto-lock). | Passage mode is active; auto-lock feature disabled. | Deactivate passage mode. Ensure auto-lock is enabled in administrator settings. |
| Lock is loose or rattles. | Mounting screws are loose; improper installation. | Tighten all mounting screws. Review installation steps to ensure proper assembly. |
7. Specifications
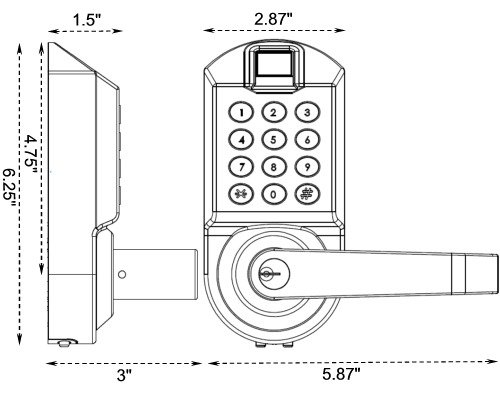
Figure 5: Dimensional drawing of the SCYAN X7 lock, showing key measurements.
- Model: SCYAN X7
- Lock Type: Keyless Fingerprint & Keypad Door Lock
- Material: Plastic, Zinc
- Dimensions (L x W x H): 6.5 x 5.5 x 6.75 inches (16.5 x 14 x 17.1 cm)
- Item Weight: 5.05 pounds (2.29 kg)
- Fingerprint Sensor: Optical sensor
- Keypad: Standard 12-key
- Backset: Adjustable 2-3/8" (60mm) or 2-3/4" (70mm)
- Door Thickness: 1-1/4" (32mm) to 2-1/4" (57mm) (Order specific screws for 2-1/4" to 2-1/2" doors)
- Operating Temperature: -4°F to 150°F (-20°C to 65°C)
- Power Source: 4 AA Alkaline batteries (NOT included)
- Emergency Power: 9V battery port
- Key Type: Schlage C key
- Application: Designed for INTERIOR doors ONLY.
- UPC: 701748846607
8. Warranty and Support
For warranty information, technical assistance, or customer support, please refer to the contact details provided with your purchase documentation or visit the official SCYAN website. Keep your purchase receipt as proof of purchase.


