Introduction
This manual provides essential instructions for the safe and efficient operation of your Denver MCR-50 Multi-Function Audio System. Please read this manual thoroughly before use and retain it for future reference.
Safety Information
- Ensure the unit is placed on a stable, level surface.
- Do not expose the unit to moisture, rain, or direct sunlight.
- Avoid placing the unit near heat sources or in areas with poor ventilation.
- Disconnect the power cord from the outlet during lightning storms or when unused for long periods.
- Do not open the casing; refer all servicing to qualified personnel.
Package Contents
- Denver MCR-50 Multi-Function Audio System
- Power Adapter
- User Manual (this document)
Setup
1. Unpacking and Placement
Carefully remove the unit from its packaging. Place the MCR-50 on a flat, stable surface away from direct sunlight, heat sources, and excessive dust or moisture. Ensure adequate ventilation around the unit.

Image: The Denver MCR-50 Multi-Function Audio System, showcasing its wooden cabinet, turntable, CD player, and control panel. The lid is open, revealing a vinyl record on the platter.
2. Power Connection
Connect the power adapter to the DC IN port on the rear of the unit, then plug the adapter into a standard wall outlet. Ensure the power switch on the back is in the OFF position before connecting.
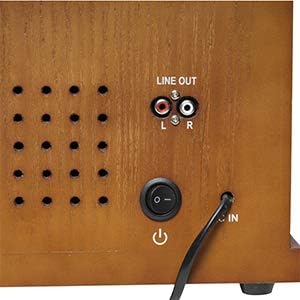
Image: A close-up of the rear panel of the Denver MCR-50, highlighting the "LINE OUT" RCA ports, the power switch, and the power input socket. A power cable is shown connected.
3. Antenna Connection (for Radio)
For optimal FM reception, extend the FM wire antenna fully. For AM reception, the unit has a built-in antenna.
Operating Instructions
1. Power On/Off and Volume Control
- To power on the unit, flip the main power switch on the rear to the ON position, then press the front panel power button.
- Adjust the volume using the "VOLUME" knob on the front panel.
2. Turntable Operation
- Open the dust cover.
- Place a vinyl record on the platter.
- Select the appropriate speed (33 1/3, 45, or 78 RPM) using the speed selector switch.
- Remove the stylus protector from the tone arm.
- Lift the tone arm using the cue lever and position it over the desired track on the record.
- Lower the tone arm gently onto the record. Playback will begin.
- At the end of the record, the auto-stop function will automatically stop the platter rotation. To enable/disable auto-stop, use the switch located on the side of the unit.

Image: A detailed view of the Denver MCR-50's turntable section, showing a vinyl record on the platter, the tone arm, and the speed selector switch. Part of the front control panel with the CD tray open is also visible.

Image: A close-up of the "AUTO STOP" switch located on the side of the Denver MCR-50 unit, used to activate or deactivate the automatic platter stop function for vinyl playback.
3. CD Player Operation
- Press the "CD" function button to select CD mode.
- Press the "OPEN/CLOSE" button to open the CD tray.
- Place a CD (label side up) into the tray and press "OPEN/CLOSE" again to close it.
- The CD will load, and playback should begin automatically. Use the "PLAY/PAUSE", "STOP", and "SKIP" buttons for control.
4. Cassette Player Operation
- Press the "TAPE" function button to select Cassette mode.
- Insert a cassette tape into the cassette deck.
- Use the control buttons (Play, Stop, Fast Forward, Rewind) for playback.
5. Radio Operation (AM/FM)
- Press the "RADIO" function button to select Radio mode.
- Select AM or FM band using the band selector.
- Rotate the "TUNING" knob to find your desired radio station.
6. USB Playback and Recording
- USB Playback: Insert a USB flash drive into the USB port. Press the "USB" function button. The unit will automatically detect and play MP3 files. Use the playback controls to navigate tracks.
- Recording to USB:
- Insert a USB flash drive.
- Select the source you wish to record from (Phono, CD, or Tape).
- Begin playback of the source material.
- Press the "RECORD" button on the unit. The recording indicator will light up.
- Press "RECORD" again to stop recording. The recorded audio will be saved as an MP3 file on the USB drive.
7. External Audio Input (AUX-IN)
Connect an external audio device (e.g., smartphone, MP3 player) to the AUX-IN port using a 3.5mm audio cable. Select "AUX" mode on the unit to play audio from the connected device.
8. Line Out Connection
Use the "LINE OUT" RCA ports on the rear of the unit to connect to an external amplifier or powered speakers for enhanced audio output.
Maintenance
1. Cleaning the Unit
Wipe the unit with a soft, dry cloth. Do not use abrasive cleaners, waxes, or solvents. Ensure the unit is unplugged before cleaning.
2. Stylus Care
The stylus (needle) is a delicate component. Clean it gently with a soft brush designed for stylus cleaning, moving from back to front. Replace the stylus if sound quality deteriorates or if it is visibly damaged.
3. Dust Cover
Keep the dust cover closed when the turntable is not in use to protect the platter and stylus from dust.
Troubleshooting
| Problem | Possible Cause | Solution |
|---|---|---|
| No power | Power cord not connected; Main power switch off; Front power button not pressed. | Check power connections; Ensure main power switch is ON; Press front power button. |
| No sound | Volume too low; Incorrect function mode selected; External speakers not connected/powered. | Increase volume; Select correct function (Phono, CD, Radio, Tape, USB, AUX); Check external speaker connections and power. |
| Turntable not spinning | Unit not powered; Auto-stop engaged and record finished; Drive belt dislodged. | Ensure power is on; Check auto-stop setting; Contact support if drive belt is suspected. |
| Poor radio reception | FM antenna not extended; Unit interference. | Extend FM wire antenna; Reposition unit away from other electronic devices. |
| USB recording not working | USB drive full or incompatible format; Source not playing. | Ensure USB drive has sufficient space and is formatted correctly (FAT32); Verify source playback. |
Specifications
| Feature | Detail |
|---|---|
| Model | MCR-50 |
| Brand | Denver |
| Power Input | AC 110-230V, 50-60Hz |
| Power Output | 5W (integrated speakers) |
| Turntable Speeds | 33 1/3, 45, 78 RPM |
| Functions | Turntable, CD Player, Cassette Player, FM/AM Radio, USB Playback/Recording, AUX-IN |
| Connections | USB 2.0, AUX-IN (3.5mm), Line Out (RCA) |
| Special Features | Integrated Speakers, Auto-Stop Turntable, MP3 Recording to USB |
| Material | Wood |
| Dimensions (approx.) | 51 x 34 x 21.5 cm |
| Weight (approx.) | 7 kg |
Warranty and Support
This product comes with a 2-year warranty on spare parts, as per manufacturer's terms. For technical support, warranty claims, or service inquiries, please contact your retailer or visit the official Denver website for contact information.
Please retain your proof of purchase for warranty purposes.


