
1. Introduction
The Motion Pro 08-0230 Master Link Clip Plier is a specialized tool designed for the efficient and safe installation and removal of clip-type master links on drive chains. This tool is essential for motorcycle, ATV, and other chain-driven vehicle maintenance, ensuring proper chain assembly and disassembly without damaging components.
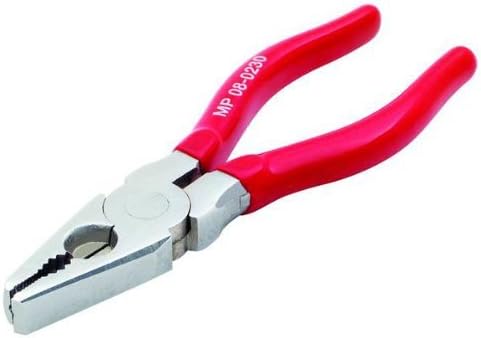
Image 1.1: The Motion Pro 08-0230 Master Link Clip Plier, featuring red ergonomic handles and durable metal jaws.
2. Safety Information
Always observe the following safety precautions when using the Master Link Clip Plier:
- Wear appropriate personal protective equipment (PPE), including safety glasses, to protect against flying debris.
- Ensure the workpiece is stable and secure before applying force with the pliers.
- Do not use the pliers for purposes other than their intended use (installation and removal of clip-type master links).
- Keep hands and fingers clear of the jaws when operating the tool to prevent pinching.
- Store the tool in a dry, safe place, out of reach of children.
- Inspect the tool for any damage or wear before each use. Do not use if damaged.
3. Setup
The Motion Pro Master Link Clip Plier requires minimal setup. Follow these steps before first use:
- Unpack: Carefully remove the pliers from their packaging.
- Inspect: Examine the pliers for any signs of shipping damage, such as bent jaws or loose handles. Ensure the pivot point moves smoothly.
- Clean: Wipe down the tool with a clean, dry cloth to remove any manufacturing residues or dust.
4. Operating Instructions
This tool is specifically designed to simplify the installation and removal of clip-type master links. Its unique design allows for easy compression of the master link side plates, making clip manipulation straightforward.
4.1. Removing a Master Link Clip
- Locate the Master Link: Identify the master link on the chain. It will have a removable clip securing the side plate.
- Position the Pliers: Place the jaws of the Motion Pro Master Link Clip Plier around the master link, ensuring the tips of the jaws are positioned to compress the side plate. The goal is to relieve tension on the clip.
- Compress and Remove: Gently squeeze the plier handles to compress the master link side plate. While compressed, use a small flat-head screwdriver or pick tool to carefully pry off the master link clip.
- Release and Disassemble: Once the clip is removed, release the plier handles. The side plate can now be easily removed, allowing for chain disassembly.
4.2. Installing a Master Link Clip
- Assemble Master Link: Place the master link pins through the chain ends and position the outer side plate onto the pins.
- Position the Pliers: Place the jaws of the Motion Pro Master Link Clip Plier around the master link, ensuring the tips of the jaws are positioned to compress the side plate onto the pins.
- Compress and Install: Gently squeeze the plier handles to compress the master link side plate, exposing the grooves on the pins. While compressed, slide the master link clip into the grooves on the pins until it snaps securely into place. Ensure the open end of the clip faces away from the direction of chain travel.
- Verify Installation: Release the plier handles. Wiggle the clip to ensure it is fully seated and secure. The master link should now be properly assembled.
5. Maintenance
Proper maintenance will extend the life of your Motion Pro Master Link Clip Plier:
- Cleaning: After each use, wipe down the pliers with a clean, dry cloth to remove any dirt, grease, or chain lubricant.
- Lubrication: Periodically apply a small amount of light machine oil to the pivot point to ensure smooth operation and prevent rust.
- Storage: Store the pliers in a dry environment to prevent corrosion. Avoid storing in damp or humid conditions.
- Inspection: Regularly inspect the jaws for wear or damage. If the jaws become misaligned or worn, the tool may not function effectively and should be replaced.
6. Troubleshooting
If you encounter issues while using your Master Link Clip Plier, consider the following:
| Problem | Possible Cause | Solution |
|---|---|---|
| Pliers not compressing master link effectively. | Incorrect positioning; worn jaws; incorrect tool for chain size. | Ensure jaws are correctly seated around the master link. Inspect jaws for wear. Verify tool is suitable for your chain's master link type and size. |
| Pliers feel stiff or difficult to open/close. | Lack of lubrication; dirt/debris in pivot. | Clean the pivot area thoroughly. Apply a few drops of light machine oil to the pivot point. |
| Master link clip is difficult to remove/install even with pliers. | Clip is rusted or damaged; insufficient compression. | Ensure maximum safe compression. If clip is severely rusted, apply penetrating oil or consider replacing the master link. |
7. Specifications
| Feature | Detail |
|---|---|
| Brand | Motion Pro |
| Model Number | 08-0230 (Manufacturer Part Number: 193324) |
| Material | Alloy Steel, Carbon Steel, Metal |
| Specific Uses | Installation and Removal of Clip-type Master Links |
| Grip Type | Ergonomic |
| UPC | 782645061850 |
| First Available | February 11, 2016 |
8. Warranty and Support
For warranty information or technical support regarding your Motion Pro 08-0230 Master Link Clip Plier, please refer to the official Motion Pro website or contact their customer service directly. Keep your purchase receipt as proof of purchase.
Motion Pro Contact Information:
Please visit www.motionpro.com for the most up-to-date contact details and support resources.