1. Introduction
This manual provides detailed instructions for the assembly, operation, and maintenance of your TOOLPORT 6x12m Storage Tent. This robust structure is designed to offer reliable protection and storage space for various applications. Please read these instructions carefully before beginning assembly or use to ensure safe and correct installation and operation.
2. Safety Instructions
Your safety is paramount. Adhere to all safety guidelines during assembly and use.
- Site Selection: Choose a level, stable surface for installation. Ensure adequate clearance from power lines, trees, and other structures.
- Weather Conditions: Do not attempt assembly in strong winds, heavy rain, or lightning. High winds can cause serious injury or damage.
- Assembly Personnel: Assembly requires at least two adults. Use appropriate safety gear, including gloves and eye protection.
- Secure Anchoring: Always ensure the tent is securely anchored to the ground using all provided anchoring points. The extra-large base plates with double anchoring are crucial for stability.
- Frame Connections: Verify that all frame components are securely bolted together. Double bolting on all support legs enhances stability.
- Tarp Tension: Maintain proper tension of the tarp to prevent flapping in the wind and water accumulation. The integrated tensioning system in the ground frame helps secure the tarp.
- Snow Load: In areas with heavy snowfall, regularly remove snow from the roof to prevent structural collapse. The tent is not designed for heavy snow loads without intervention.
- Tear Resistance: The PVC PRIMEtex 2300 N tarp has a tear resistance of 2300 N, determined by DIN EN ISO 13934-1 standards. This indicates the tear strength per 5 cm width of the tarp.
3. Components Overview
Familiarize yourself with the main components of your storage tent:
3.1 Tarp System
- Material: PVC PRIMEtex 2300 N, a tear-resistant grid fabric.
- Waterproofing: 100% waterproof due to heat-sealed seams.
- Construction: Roof tarp and side tarps are made from a single piece, ensuring frame stability.
- Tensioning: Integrated tensioning system ensures continuous tarp tightness and reduces wind susceptibility.
3.2 Frame Structure
- Tubes: Extra-strong, fully galvanized steel tubes.
- Vertical: Approximately Ø 50 mm, wall thickness approx. 1.6 mm.
- Horizontal: Approximately Ø 38 mm, wall thickness approx. 1.2 mm.
- Connectors: Extra-strong steel connectors.
- Vertical: Approximately Ø 54 mm, wall thickness approx. 1.7 mm.
- Horizontal: Approximately Ø 42 mm, wall thickness approx. 1.4 mm.
- Reinforcement Elements:
- Extra-large base plates with double anchoring for enhanced stability on any surface.
- Ground frame with integrated tensioning system to secure the tarp.
- Additional steel reinforcement elements in the roof.
- Diagonal braces at the corners to reinforce the side frame.
3.3 Entry Systems
- Main Entrance: Robust sliding door with anti-corrosion aluminum side guides and integrated crossbars for increased stability.
- Secondary Entrance: Zipper system with double stitching.
4. Setup Instructions
Follow these steps for proper assembly of your TOOLPORT storage tent.
4.1 Preparation
- Unpack all components and verify against the packing list.
- Lay out all frame parts and connectors.
- Ensure you have all necessary tools (e.g., wrenches for bolts).
4.2 Frame Assembly
Begin by assembling the base frame, then the vertical supports, and finally the roof structure.
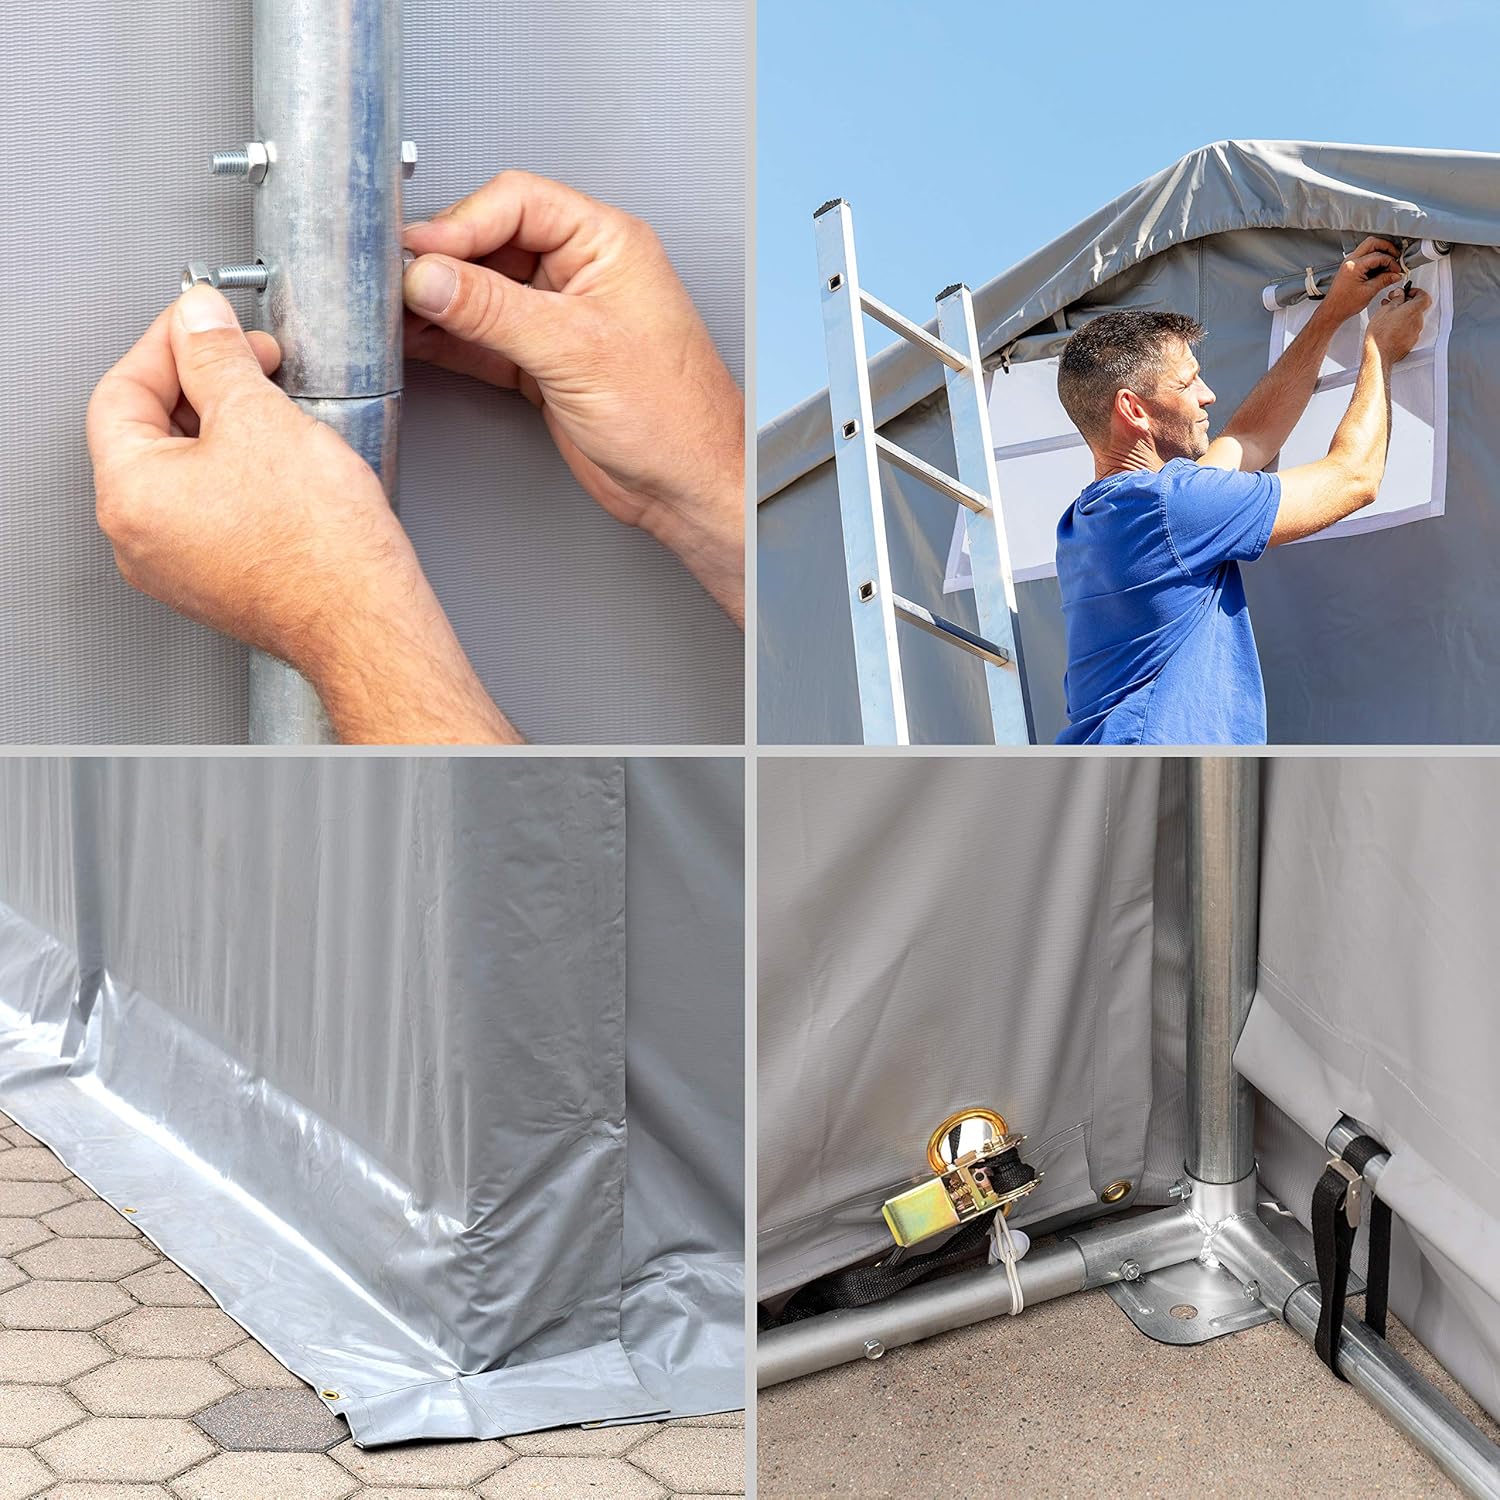
Image: Detailed assembly steps including bolting frame pipes and securing the tarp.
- Connect the horizontal base tubes using the appropriate connectors to form the rectangular ground frame.
- Attach the vertical support tubes to the base frame connectors. Ensure all bolts are tightened securely.
- Assemble the roof trusses on the ground, then lift and connect them to the vertical supports.
- Install all diagonal braces and additional roof reinforcements as per the detailed diagram in your included manual.
- Ensure all connections are fully bolted and secure. The double bolting on the support legs is critical.
4.3 Tarp Installation
Carefully unfold and position the tarp over the assembled frame.

Image: Internal roof structure with galvanized steel frame and tensioning.
- Drape the one-piece roof tarp over the frame, ensuring it is centered and evenly distributed.
- Attach the side tarps, ensuring they align with the frame and roof tarp.
- Secure the tarp to the ground frame using the integrated tensioning system. This involves attaching the tarp to the ground frame and tightening it to remove slack.
- Install the main sliding door and secondary zippered door panels.
4.4 Anchoring
Proper anchoring is essential for stability.
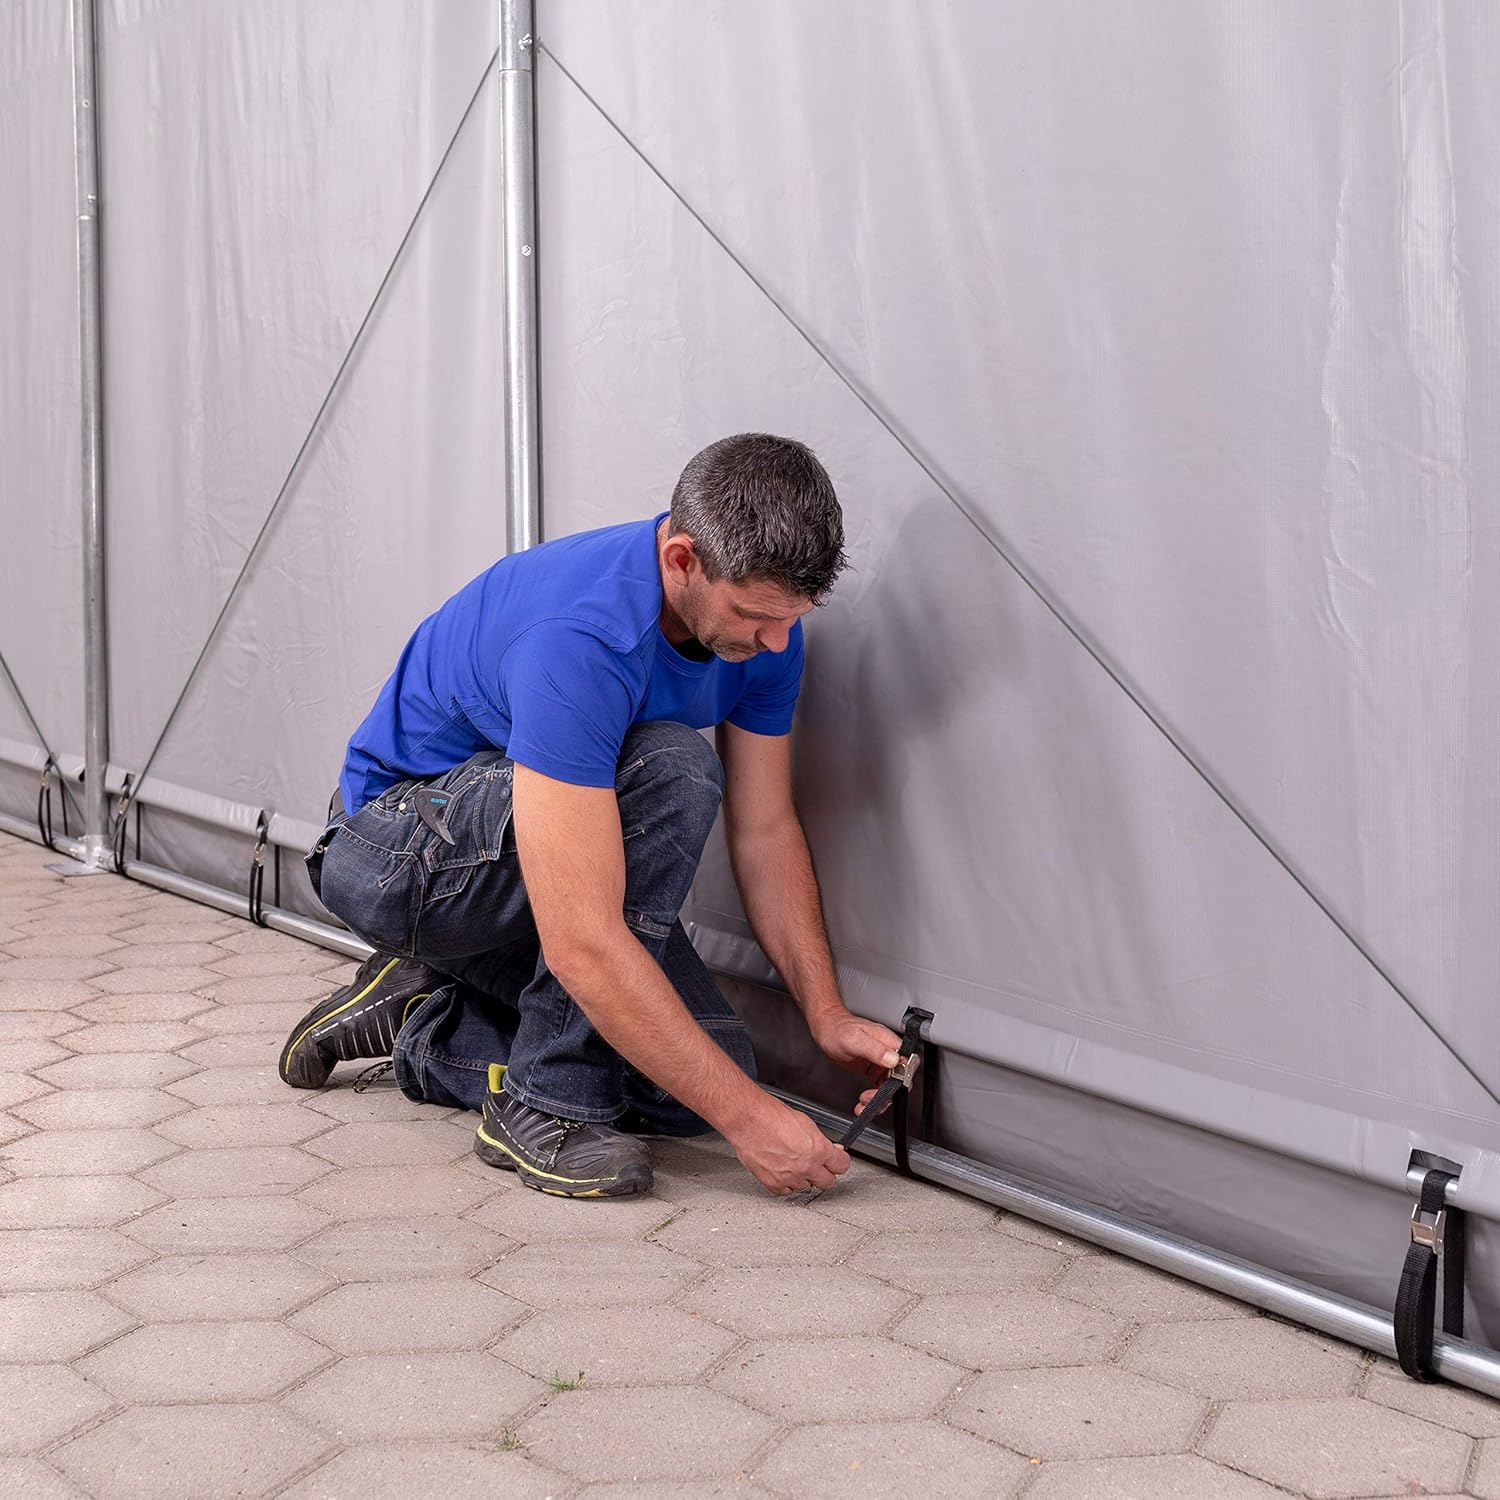
Image: Securing the tent tarp to the ground.
- Utilize the extra-large base plates with double anchoring points.
- Use appropriate ground anchors (not included, depending on ground type) to firmly secure each base plate.
- Ensure all tensioning straps are taut and evenly distributed.
5. Operating Instructions
Using your TOOLPORT storage tent is straightforward once assembled.
5.1 Main Sliding Door

Image: Operating the main sliding door.
- The main entrance features a robust sliding door designed for easy access, even for vehicles like forklifts.
- To open, gently slide the door along its anti-corrosion aluminum guides.
- To close, slide the door back into position and secure it if necessary (e.g., with latches or ties).
5.2 Secondary Zippered Door
- The secondary entrance is equipped with a zipper system for convenient pedestrian access.
- Operate the zippers smoothly to open and close the door. Avoid forcing the zippers.
- Ensure the zippers are fully closed to maintain weather protection.
5.3 Ventilation
While not explicitly detailed, some models may include small windows or vents. Ensure these are clear for air circulation if present.
6. Maintenance
Regular maintenance will extend the lifespan of your storage tent.
- Tarp Cleaning: Clean the PVC tarp periodically with mild soap and water. Avoid harsh chemicals or abrasive brushes that could damage the material. Rinse thoroughly.
- Frame Inspection: Annually inspect the galvanized steel frame for any signs of rust, damage, or loose connections. Tighten any loose bolts.
- Tensioning System: Regularly check the tarp tension. Re-tension as needed, especially after strong winds or significant temperature changes, to prevent sagging and water pooling.
- Anchoring Points: Verify that all ground anchors remain secure and that the base plates are firmly in place.
- Door Mechanisms: Keep the sliding door guides clean and free of debris. Lubricate moving parts if necessary to ensure smooth operation. Inspect zippers for damage.
7. Troubleshooting
Here are solutions to common issues you might encounter:
- Issue: Tarp is sagging or flapping in the wind.
Solution: Re-tension the tarp using the integrated tensioning system. Check all anchoring points for security. - Issue: Water pooling on the roof.
Solution: This indicates insufficient tarp tension. Adjust the tensioning system to ensure the roof tarp is taut and sheds water effectively. - Issue: Frame feels unstable.
Solution: Immediately check all bolted connections on the frame and connectors. Ensure all base plates are securely anchored to the ground. Verify diagonal braces are correctly installed. - Issue: Sliding door is stiff or difficult to move.
Solution: Clean the aluminum guides to remove any dirt or debris. Apply a silicone-based lubricant to the guides if needed. - Issue: Zipper on secondary door is stuck or damaged.
Solution: Try to gently free the zipper if stuck. If damaged, contact customer support for replacement parts. Avoid forcing a damaged zipper.
8. Specifications
Key technical details for the TOOLPORT 6x12m Storage Tent:
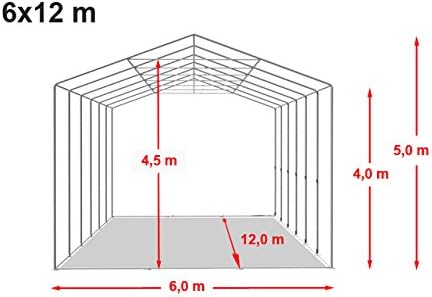
Image: Dimensional diagram of the 6x12m storage tent.
| Feature | Detail |
|---|---|
| Product Dimensions (L x W x H) | 1200 x 600 x 400 cm (4m side height) |
| Weight | 562 kg |
| Model Number | 5200050XN721230768PRO |
| Tarp Material | PVC PRIMEtex 2300 N |
| Tarp Properties | 100% Waterproof, Tear-resistant grid fabric |
| Tarp Tear Resistance | 2300 N (according to DIN EN ISO 13934-1) |
| Frame Material | Fully galvanized steel |
| Vertical Tube Diameter / Wall Thickness | Ø 50 mm / 1.6 mm |
| Horizontal Tube Diameter / Wall Thickness | Ø 38 mm / 1.2 mm |
| Vertical Connector Diameter / Wall Thickness | Ø 54 mm / 1.7 mm |
| Horizontal Connector Diameter / Wall Thickness | Ø 42 mm / 1.4 mm |
| Color | Grey |
9. Warranty Information
For specific warranty details regarding your TOOLPORT 6x12m Storage Tent, please refer to the documentation provided at the time of purchase or contact your retailer directly. Warranty terms and conditions may vary.
10. Support
Should you require further assistance, have questions about assembly, or need to order replacement parts, please contact TOOLPORT customer service or your authorized retailer. Contact information can typically be found on the TOOLPORT website or in your purchase documentation.


