
1. Product Overview
The EVISTR L53 is an 8GB digital voice recorder designed for clear audio capture. It features PCM linear recording technology, voice-activated recording, adjustable noise reduction, and stereo audio recording. The device has a durable metal body and includes functions such as A-B repeat, T-MARK for key points, and direct file deletion. It also supports MP3, APE, FLAC, WAV playback and offers automatic power-off with file saving.
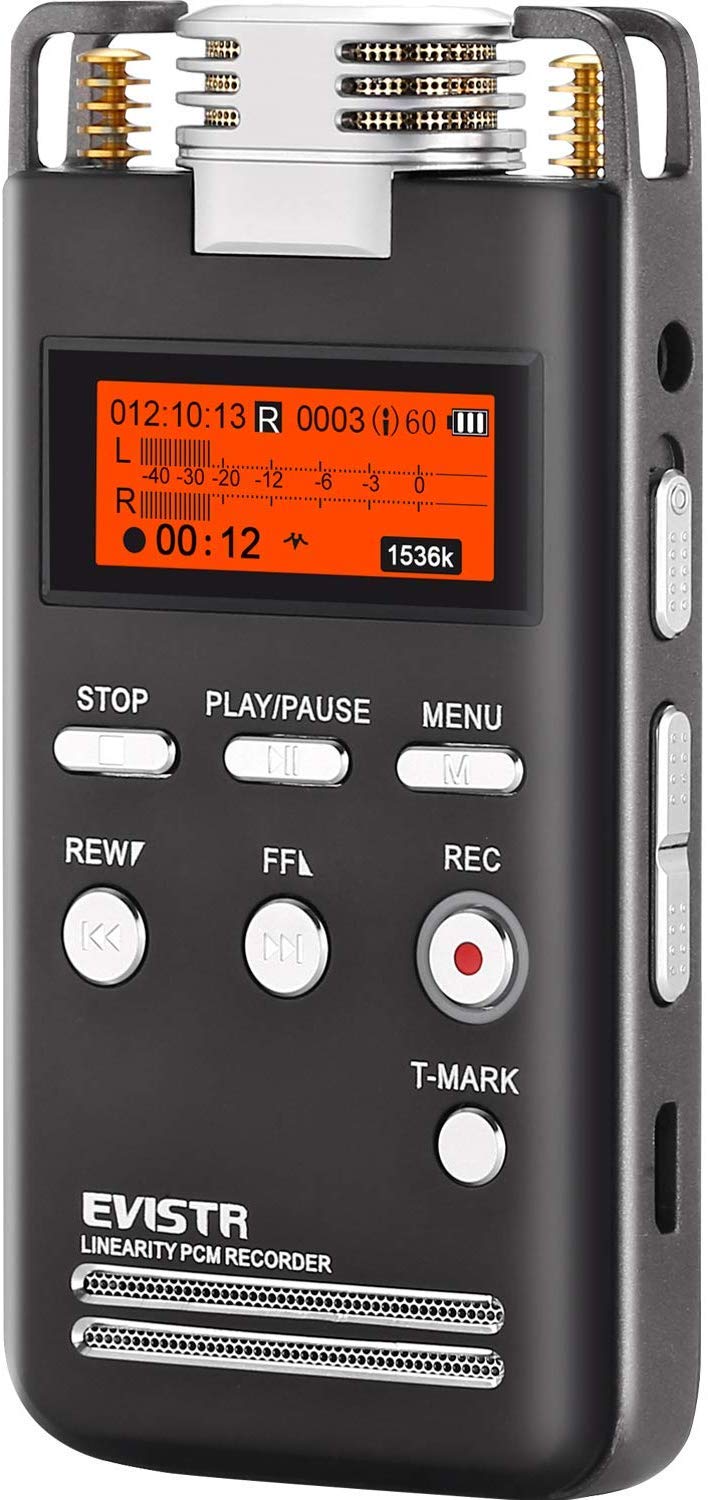
Image 1.1: EVISTR L53 Digital Voice Recorder. This image shows the compact design and main display of the device.
2. Package Contents
Verify that all items are present in the package:
- 1 x EVISTR Digital Voice Recorder
- 1 x User Manual
- 1 x Telephone Connection Adapter
- 1 x External Microphone
- 1 x Earphone
- 1 x USB Cable
- 1 x Line-in Cable
3. Setup
3.1. Charging the Device
Before first use, fully charge the recorder. Connect the device to a computer's USB port or a USB wall adapter using the provided USB cable. The battery indicator on the screen will show charging status.
3.2. Powering On/Off
- To Power On: Slide the 'ON/OFF' switch to the 'ON' position.
- To Power Off: Slide the 'ON/OFF' switch to the 'OFF' position. The device will automatically save any active recording before shutting down.
3.3. Language Settings
To set the device language:
- Press the MENU button.
- Navigate to 'System Settings' using the navigation buttons.
- Select 'Language' and choose your preferred language from the list.
3.4. Date and Time Settings
To set the date and time:
- Press the MENU button.
- Navigate to 'System Settings'.
- Select 'Date & Time' and adjust the year, month, day, hour, and minute using the navigation buttons.
4. Operating Instructions
4.1. Recording Audio

Image 4.1: Recorder controls for recording. The REC button initiates recording, and the STOP button saves the recording.
Normal Recording
- Ensure the device is powered on.
- Press the REC button to start recording. The recording indicator will illuminate.
- To pause recording, press the PLAY/PAUSE button. Press again to resume.
- To stop and save the recording, press the STOP button.
Voice Activated Recording (AVR)
AVR mode allows the recorder to start recording automatically when sound is detected and pause when silence occurs, saving memory space.

Image 4.2: Voice Activated Recording feature. The device captures audio only when sound is present, reducing silent portions in recordings.
- Press the MENU button.
- Navigate to 'Record Settings' and select 'AVR Mode'.
- Set 'AVR Mode' to 'Open'.
- Adjust 'AVR Level' (1-5). Level 1 is highly sensitive for quiet environments, while Level 5 is recommended for noisy environments to prevent unwanted activation.
- Exit the menu and press REC to start recording in AVR mode.
Noise Reduction
The device features an extra noise reduction unit to enhance clarity.

Image 4.3: Extra Noise Reduction Unit. This component helps to achieve clearer voice recordings by minimizing background noise.
To activate or adjust noise reduction, refer to the 'Record Settings' menu for 'Denoise' or 'Acoustic Noise Reduction' options.
T-MARK Function
During recording, press the T-MARK button to insert a timestamp or bookmark at important points in the audio. This allows for easy navigation during playback.
Auto Record
Schedule recordings to start and end at specific times.

Image 4.4: Auto Record feature. This screen displays options to set a scheduled start and end time for recordings.
- Press the MENU button.
- Navigate to 'Record Settings' and select 'Auto Record'.
- Set 'Record On/Off' to 'On'.
- Adjust 'Start Time' and 'End Time' as desired.
4.2. Playback

Image 4.5: Enjoy Music feature. The recorder can also be used for MP3 playback, allowing users to listen to audio files through earphones.
- From the main screen, navigate to the file list.
- Select the desired audio file using the navigation buttons.
- Press the PLAY/PAUSE button to start playback.
- Use the VOL +/- buttons on the side to adjust the volume.
- Press REW or FF to skip tracks or fast forward/rewind within a track.
- Press STOP to end playback.
A-B Repeat
This function allows you to repeat a specific segment of an audio file.
- During playback, press the A-B button (usually on the side or in the menu) at the start point (A).
- Press the A-B button again at the end point (B). The segment between A and B will repeat.
- Press A-B a third time to cancel the repeat function.
4.3. Managing Files
Deleting Files
To delete a file directly from the recorder:
- Navigate to the file list.
- Select the file you wish to delete.
- Press the ERASE button (usually on the side or in the menu).
- Confirm deletion when prompted.
Connecting to a Computer
Connect the recorder to a computer using the supplied USB cable. The device will appear as a removable disk, allowing you to transfer, copy, or delete files.
4.4. Telephone Recording
The device includes accessories for recording telephone conversations.

Image 4.6: Telephone Recording setup. This image illustrates how to connect the recorder to a landline telephone for recording calls using the provided adapter and cables.
Follow the instructions provided with the telephone connection adapter to connect the recorder to your landline phone. Ensure the recording source is set to 'Telephone' in the 'Record Settings' menu.
5. Maintenance
5.1. Cleaning
- Wipe the device with a soft, dry cloth.
- Do not use liquid cleaners or solvents.
5.2. Storage
- Store the device in a cool, dry place away from direct sunlight and extreme temperatures.
- Avoid dropping or subjecting the device to strong impacts.
5.3. Battery Care
- Charge the battery regularly, even if not in use, to maintain battery health.
- Avoid fully discharging the battery frequently.
6. Troubleshooting
| Problem | Possible Cause | Solution |
|---|---|---|
| Device does not power on. | Battery is depleted. | Charge the device for at least 30 minutes. |
| Cannot record audio. | Memory full; Recording mode not selected; Microphone not connected (if external). | Delete old files; Ensure 'Record' mode is active; Check microphone connection. |
| Poor recording quality. | Low recording quality setting; High background noise; Microphone too far from source. | Adjust recording quality to PCM or High Quality; Activate noise reduction; Position microphone closer to the sound source. |
| Device not recognized by computer. | Faulty USB cable; Driver issue; Incorrect connection. | Try a different USB cable or USB port; Restart computer and device; Ensure proper connection. |
| Playback has static or no sound. | Earphones not connected properly; Volume too low; Corrupted file. | Check earphone connection; Increase volume; Try playing another file. |
7. Specifications
| Feature | Specification |
|---|---|
| Model Number | L53 |
| Storage Capacity | 8 GB (Built-in Flash Memory) |
| Battery Type | 1 Lithium-metal (3.7V 800mAh integrated) |
| Average Battery Life | Up to 10000 Hours (standby/usage dependent) |
| Display Size | 1.1 Inches (128x48 dot matrix LCD) |
| Microphone Type | Built-in Stereo |
| Recording Formats | WAV, MP3 (PCM WAV Record up to 1536 Kbps) |
| Playback Formats | MP3, APE, FLAC, WAV (WAV up to 24bit/48KHz, APE/FLAC up to 16bit/48KHz) |
| Hardware Interface | USB |
| Headphone Jack | 3.5 mm |
| Product Dimensions | 10 x 3.8 x 1.2 cm |
| Product Weight | 104 Grams |
8. Warranty and Support
8.1. Warranty Information
The EVISTR L53 Digital Voice Recorder comes with a 1-year warranty. Additionally, a 60-day money-back guarantee is offered from the date of purchase.
8.2. Customer Support
For technical assistance, warranty claims, or any questions regarding your EVISTR L53 Digital Voice Recorder, please refer to the contact information provided in your product packaging or visit the official EVISTR website.


