
Introduction
Welcome to the user manual for your JUKI HZL-G220 Sewing Machine. This guide provides essential information for setting up, operating, and maintaining your machine to ensure optimal performance and longevity. Please read through these instructions carefully before first use to familiarize yourself with all features and safety precautions.
The JUKI HZL-G220 is designed for both novice and experienced sewers, offering a robust set of features for a wide range of projects, from delicate fabrics to heavy-duty materials.
Key Features
- Box Feed System: Experience superior stitch quality and powerful feeding with JUKI's industrial box feed technology. Unlike conventional oval motion, the box motion feed dog prevents material shrinking and shifting, ensuring accurate and beautiful seams on various fabric types.
- Versatile Material Handling: Sew effortlessly through a wide range of materials, from extra lightweight fabrics without shrinkage to multiple layers of heavy denim. The improved presser foot construction provides powerful feeding for challenging projects.
- Wide Sewing Space: Enjoy enhanced comfort and ease when working on large projects thanks to the generous underarm space of the HZL-G220 series.
- High-Quality Buttonholes: Create professional-looking buttonholes with ease. The HZL-G220 offers 8 different types of buttonholes, ensuring perfect results regardless of the material.
- Automatic Needle Threader: Simplify your setup with the automatic needle threader, which quickly and effortlessly threads the needle, saving time and reducing eye strain.
- Quick Bobbin Preparation: The machine features a user-friendly bobbin system that allows for quick preparation. Simply follow the integrated guide, eliminating the need to manually pull up the bobbin thread.
- Extensive Stitch Patterns: Access 180 diverse sewing patterns, including a full font of letters, to unleash your creativity and customize your projects.
- Additional Features: Benefit from convenient features such as an integrated LED Light for clear visibility, Fine Overcasting Stitch for neat finishes, and a Drop Feed mechanism for free-motion sewing.
Setup
1. Unpacking and Initial Inspection
Carefully remove the sewing machine from its packaging. Retain all packing materials for future transport or storage. Inspect the machine for any visible damage. Ensure all accessories listed in the packing list are present.

Figure 1: Front view of the JUKI HZL-G220 Sewing Machine, showcasing its compact design and accessible control panel.
2. Power Connection
Place the machine on a stable, flat surface. Connect the power cord to the machine's power input located on the side, then plug it into a suitable electrical outlet. Turn on the machine using the power switch, also located on the side.
3. Attaching the Wide Extension Table
For larger projects, attach the included wide extension table. Align the table with the free arm of the machine and slide it into place until it clicks securely. This provides an expanded work surface for better fabric support.

Figure 2: A detailed view of the extended sewing area on the JUKI HZL-G220, highlighting the integrated ruler for precise measurements and ample space for large projects.
4. Bobbin Winding and Insertion
- Place a spool of thread on the spool pin.
- Follow the bobbin winding guide indicated on the machine's top cover.
- Place an empty bobbin onto the bobbin winder shaft and push it to the right.
- Start winding by pressing the foot controller or start/stop button. The machine will automatically stop when the bobbin is full.
- Open the bobbin cover plate located on the needle plate.
- Insert the wound bobbin into the bobbin case, ensuring the thread unwinds in the correct direction as indicated by the arrows.
- Pull the thread through the tension spring and into the thread guide.
- Replace the bobbin cover plate.
5. Upper Threading
- Raise the presser foot lever.
- Place the thread spool on the spool pin.
- Follow the numbered threading path indicated on the machine. Ensure the thread is securely seated in all guides and tension discs.
- Bring the thread down to the needle area.
- Use the automatic needle threader by lowering the lever and guiding the thread as instructed. The threader will pass the thread through the needle eye.
- Pull a loop of thread through the needle eye and under the presser foot.
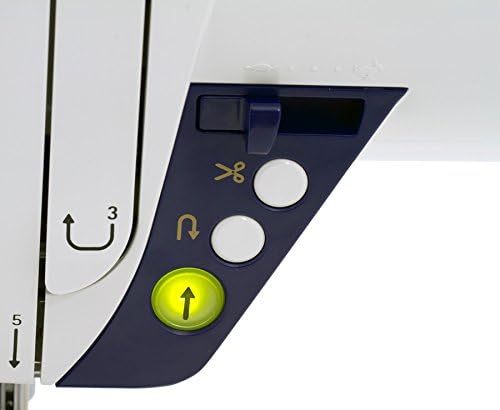
Figure 3: A close-up of the needle and presser foot area, showing the automatic needle threader lever and quick function buttons for efficient operation.
Operating Instructions
1. Stitch Selection
The HZL-G220 features a clear digital display and intuitive control panel for stitch selection. Use the arrow buttons to navigate through the 180 available stitch patterns. The selected stitch number and recommended settings will appear on the LCD screen.

Figure 4: The digital display and control buttons of the JUKI HZL-G220, used for selecting stitches, adjusting settings, and accessing memory functions.
2. Adjusting Stitch Length and Width
After selecting a stitch, you can adjust its length and width using the dedicated adjustment buttons on the control panel. The current settings will be displayed on the LCD. Refer to the stitch chart located under the top cover for recommended settings for various stitches.
3. Sewing Basics
- Place your fabric under the presser foot.
- Lower the presser foot lever.
- Gently press the foot controller or the start/stop button to begin sewing. The machine's box feed system will ensure smooth and consistent fabric feeding.
- Guide the fabric gently with both hands, maintaining an even pace. Do not pull or push the fabric forcefully.
- To reverse stitch (for securing seams), press and hold the reverse button.
- When finished, press the needle up/down button to raise the needle, then raise the presser foot lever and remove your fabric.
4. Using the Automatic Thread Cutter
The HZL-G220 is equipped with an automatic thread cutter. After completing a seam, simply press the thread cutter button to trim both the upper and bobbin threads neatly.
Maintenance
Regular maintenance ensures your JUKI HZL-G220 remains in excellent working condition.
1. Cleaning
- Before Cleaning: Always turn off the machine and unplug it from the power outlet.
- Feed Dog Area: Remove the needle, presser foot, and needle plate. Use the small brush provided with your machine to remove lint and dust from the feed dog area and bobbin case.
- Exterior: Wipe the exterior surfaces with a soft, dry cloth. Do not use harsh chemicals or abrasive cleaners.
2. Needle Replacement
Replace the needle regularly, especially after 8-10 hours of sewing or if it becomes bent or dull. A dull needle can cause skipped stitches or damage to fabric.
- Raise the needle to its highest position.
- Loosen the needle clamp screw.
- Remove the old needle.
- Insert a new needle with the flat side facing the back of the machine, pushing it up as far as it will go.
- Tighten the needle clamp screw securely.
Troubleshooting
This section addresses common issues you might encounter and provides solutions.
| Problem | Possible Cause | Solution |
|---|---|---|
| Skipped Stitches | Incorrect needle size/type, bent needle, improper threading, incorrect tension. | Replace needle with correct type/size. Re-thread machine completely. Adjust tension. |
| Thread Breakage | Incorrect threading, too much tension, damaged needle, poor quality thread. | Re-thread machine. Reduce upper thread tension. Replace needle. Use good quality thread. |
| Uneven Stitches | Incorrect tension, improper bobbin winding, lint in bobbin case. | Adjust tension. Rewind bobbin evenly. Clean bobbin case. |
| Machine Not Starting | Power not connected, power switch off, foot controller not connected. | Check power cord connection. Ensure power switch is ON. Verify foot controller is plugged in. |
Specifications
| Specification | Value |
|---|---|
| Product Dimensions | 17.52 x 8.78 x 11.5 inches (44.5 x 22.3 x 29.2 cm) |
| Item Weight | 26.4 pounds (11.97 kg) |
| Manufacturer | Juki |
| ASIN | B01LHUW0I6 |
| Item Model Number | HZL-G220 |
| Color | White |
| Date First Available | January 29, 2016 |
| Stitch Patterns | 180 (including 1 font of letters) |
| Buttonhole Types | 8 |


