
Skil LL0516 F0150516AC
SKIL LL0516 F0150516AC Cross Line Laser Set User Manual
Model: LL0516 F0150516AC
1. Introduction
Thank you for choosing the SKIL LL0516 F0150516AC Cross Line Laser Set. This manual provides important information on the safe operation, setup, maintenance, and troubleshooting of your new laser level. Please read this manual thoroughly before using the device and keep it for future reference.
The SKIL LL0516 F0150516AC is designed for precise leveling tasks, projecting bright horizontal and vertical laser lines. It features a range of 10 meters and a leveling precision of +/- 0.5 mm.
2. Safety Instructions
WARNING: Read all safety warnings and all instructions. Failure to follow the warnings and instructions may result in electric shock, fire and/or serious injury.
- Laser Radiation: Do not stare into the laser beam. Avoid direct eye exposure.
- Use only as intended: Use the laser level only for its specified purpose.
- Children: Keep the device out of reach of children.
- Environment: Do not operate the laser level in explosive atmospheres, such as in the presence of flammable liquids, gases or dust.
- Maintenance: Do not attempt to modify or repair the device yourself. Refer all servicing to qualified service personnel.
3. Package Contents
Carefully unpack all items and check for any damage. If any items are missing or damaged, please contact your retailer.
- SKIL LL0516 F0150516AC Cross Line Laser
- Tripod
- User Manual (this document)
- Batteries (if included)
4. Product Overview
Familiarize yourself with the components of your SKIL Cross Line Laser.
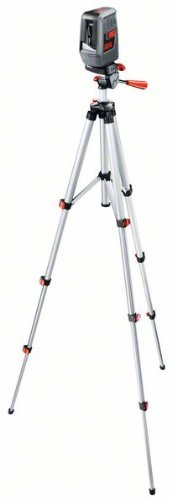
Figure 1: SKIL LL0516 F0150516AC Cross Line Laser and Tripod. This image shows the laser unit mounted on its adjustable tripod, ready for use in various leveling applications.
- Laser Aperture
- Power/Mode Button
- Battery Compartment
- Tripod Mounting Thread
- Tripod Legs
- Tripod Head Adjustment
5. Setup
5.1 Installing Batteries
- Open the battery compartment cover located on the back of the laser unit.
- Insert the required batteries (e.g., 2x AA) according to the polarity indicators (+/-).
- Close the battery compartment cover securely.
5.2 Mounting on Tripod
- Extend the tripod legs to the desired height and ensure they are stable on a flat surface.
- Align the tripod mounting thread on the bottom of the laser unit with the screw on the tripod head.
- Gently screw the laser unit onto the tripod until it is secure. Do not overtighten.
- Adjust the tripod head to roughly level the laser unit. The self-leveling function will fine-tune this.
6. Operating Instructions
6.1 Powering On/Off and Mode Selection
- Press the Power/Mode button to turn on the laser. The unit will typically start in self-leveling mode, projecting a horizontal line.
- Press the Power/Mode button again to cycle through different modes:
- Horizontal Line only
- Vertical Line only
- Cross Lines (Horizontal and Vertical)
- To turn off the laser, press and hold the Power/Mode button for a few seconds until the laser turns off.
6.2 Self-Leveling Function
The SKIL LL0516 F0150516AC features an automatic self-leveling system. When the unit is powered on and within its leveling range, the laser lines will blink until they are level. Once level, the lines will become solid. If the unit is outside its self-leveling range, the laser lines will continue to blink rapidly, indicating that manual adjustment of the tripod is required.
6.3 Using the Laser for Projects
- Wall Mounting: Use the horizontal line for mounting shelves, cabinets, or pictures at a consistent height.
- Tile Installation: Project cross lines to ensure tiles are laid perfectly straight and level.
- Framing: Use vertical lines for stud alignment and horizontal lines for ceiling or floor joists.
7. Maintenance
7.1 Cleaning
- Keep the laser aperture clean. Use a soft, lint-free cloth to wipe away dust or debris. Do not use abrasive cleaners or solvents.
- Clean the exterior of the device with a damp cloth.
7.2 Storage
- When not in use, store the laser level and tripod in their original packaging or a protective case.
- Remove batteries if the device will not be used for an extended period to prevent leakage.
- Store in a dry place, away from direct sunlight and extreme temperatures.
8. Troubleshooting
| Problem | Possible Cause | Solution |
|---|---|---|
| Laser does not turn on. | Dead or incorrectly inserted batteries. | Check battery polarity, replace batteries. |
| Laser lines are blinking rapidly. | Unit is outside its self-leveling range. | Adjust the tripod to bring the unit closer to level. |
| Laser lines are dim. | Low batteries or bright ambient light. | Replace batteries. Use in areas with less direct sunlight or bright artificial light. |
9. Specifications
- Model: SKIL LL0516 F0150516AC
- Laser Type: Cross Line Laser
- Working Range: 10 meters
- Leveling Precision: +/- 0.5 mm
- Self-Leveling Range: Approximately +/- 4 degrees
- Power Source: 2 x AA batteries (typical, not specified in input)
- Tripod Thread: 1/4 inch (typical, not specified in input)
Note: Specifications are subject to change without notice for product improvement.
10. Warranty and Support
For warranty information and customer support, please refer to the warranty card included with your product or visit the official SKIL website. Do not attempt to repair the device yourself, as this may void your warranty.
For technical assistance or spare parts, please contact SKIL customer service.
Related documentsLL0516 F0150516AC


Ask a question about this manual
Ask about setup, troubleshooting, compatibility, parts, safety, or missing instructions. Manuals+ will review the question and use this page’s manual context to help answer it.