
Introduction
This manual provides essential information for the proper installation, maintenance, and understanding of your Carlson H819 Disc Brake Pad. Designed for reliable braking performance, this component is crucial for vehicle safety. Please read these instructions thoroughly before proceeding with any installation or maintenance.
Safety Information
Working on vehicle braking systems requires specialized knowledge and tools. Improper installation or maintenance can lead to brake failure, resulting in serious injury or death. It is highly recommended that installation be performed by a qualified automotive technician.
- Always wear appropriate personal protective equipment, including safety glasses and gloves.
- Ensure the vehicle is securely supported on jack stands before working underneath it. Never rely solely on a jack.
- Disconnect the vehicle's battery before beginning work to prevent accidental electrical activation.
- Use only the correct tools for the job.
- Keep brake fluid away from painted surfaces, as it can damage paint.
- Do not reuse old brake hardware unless specifically instructed.
- After installation, pump the brake pedal several times to ensure proper brake fluid pressure is restored before driving.
- Perform a test drive in a safe area at low speeds to confirm proper brake function.
Package Contents
Verify that all components are present and undamaged before beginning installation.
- One (1) Carlson H819 Disc Brake Pad (or set, depending on application)
- Associated hardware (if included with the specific brake pad kit)

Figure 1: Example of caliper mounting bolts. These bolts secure the brake caliper to the vehicle's steering knuckle or axle housing, allowing the caliper to slide or pivot as the brake pads wear.
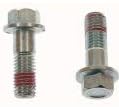
Figure 2: A closer view of the caliper mounting bolts, showing the threaded ends and hexagonal heads. These components are critical for the proper function and security of the brake caliper assembly.
Installation (Professional Installation Recommended)
The following steps outline a general procedure for disc brake pad replacement. Specific procedures may vary depending on vehicle make and model. Always consult your vehicle's service manual for detailed instructions.
- Prepare the Vehicle: Park the vehicle on a level surface, engage the parking brake, and block the wheels. Loosen lug nuts on the wheel(s) to be serviced.
- Lift and Secure: Safely lift the vehicle and support it with jack stands. Remove the wheel(s).
- Access Caliper: Locate the brake caliper. Depending on the design, you may need to remove caliper guide pins or mounting bolts to swing the caliper open or remove it entirely.
- Remove Old Pads: Once the caliper is accessible, carefully remove the old brake pads. Note their orientation.
- Inspect Components: Inspect the brake rotor for wear, scoring, or warping. Check the caliper for leaks or damage. Clean the caliper and caliper bracket thoroughly.
- Compress Caliper Piston: Use a C-clamp or specialized caliper piston compression tool to slowly push the caliper piston(s) back into the caliper bore. This creates space for the new, thicker brake pads.
- Install New Pads: Install the new Carlson H819 Disc Brake Pads into the caliper bracket, ensuring they are correctly seated and oriented. Apply a thin layer of brake lubricant to the caliper slide pins and any metal-to-metal contact points (excluding the pad friction material).
- Reassemble Caliper: Reinstall the brake caliper, securing it with the appropriate bolts and torqueing them to the manufacturer's specifications.
- Final Steps: Reinstall the wheel(s) and torque lug nuts to specification. Lower the vehicle.
- Brake Pedal Pump: Before driving, slowly pump the brake pedal several times until it feels firm. This seats the pads against the rotor and restores proper brake fluid pressure.
- Test Drive: Perform a cautious test drive in a safe area to ensure proper brake function and bedding-in of the new pads. Avoid hard braking for the first 100-200 miles to allow pads to properly seat.
Operating Principles
The Carlson H819 Disc Brake Pad functions as part of your vehicle's disc braking system. When the brake pedal is pressed, hydraulic pressure forces the caliper piston(s) to clamp the brake pads against the rotating brake rotor. This friction converts the vehicle's kinetic energy into heat, slowing and stopping the vehicle. The material composition of the brake pad is designed to provide consistent friction, heat dissipation, and wear resistance.
Maintenance
Regular inspection and timely replacement of brake pads are essential for maintaining vehicle safety and performance.
- Routine Inspection: Have your brake pads inspected by a qualified technician during every oil change or at least every 12,000 miles (20,000 km), or as recommended by your vehicle manufacturer.
- Wear Indicators: Many brake pads include wear indicators (small metal tabs) that produce a squealing sound when the pads are worn to a critical level, signaling the need for replacement.
- Pad Thickness: Replace brake pads when their friction material thickness reaches the manufacturer's minimum specification, typically around 2-3mm.
- Brake Fluid: Check brake fluid level regularly. A low fluid level can indicate worn pads or a leak in the system.
- Rotor Condition: Always inspect brake rotors when replacing pads. Rotors should be free of deep grooves, cracks, or excessive runout.
Troubleshooting Common Brake Issues
If you experience any of the following symptoms, have your braking system inspected immediately by a qualified technician.
- Squealing or Grinding Noise: Often indicates worn brake pads (squealing from wear indicators) or metal-on-metal contact (grinding, indicating severely worn pads).
- Vibration or Pulsation: May indicate warped brake rotors, which can be caused by excessive heat or improper installation.
- Soft or Spongy Pedal: Could be air in the brake lines, low brake fluid, or a faulty master cylinder.
- Vehicle Pulls to One Side: May indicate a seized caliper, uneven pad wear, or a hydraulic issue on one side of the vehicle.
- Increased Stopping Distance: A general reduction in braking effectiveness, often due to worn pads, contaminated pads, or issues with the hydraulic system.
Specifications
| Brand | Carlson |
| Manufacturer | Stromberg Carlson |
| Model Number | H819 |
| Material | Rubber (Note: This material specification might refer to a component of the pad or associated hardware, as friction material is typically ceramic, semi-metallic, or organic.) |
| Item Weight | 4.8 ounces |
| Product Dimensions | 9.99 x 9.99 x 9.99 inches |
| UPC | 085499192306 |
| ASIN | B01KHL19F6 |
Warranty and Support
Carlson products are manufactured to high-quality standards. For specific warranty information regarding your H819 Disc Brake Pad, please refer to the documentation included with your purchase or visit the official Carlson website. For technical support or inquiries, please contact Carlson customer service through their official channels.
Carlson Store Link: Visit the Carlson Store on Amazon