1. Introduction
This manual provides instructions for the proper use and maintenance of your AstroAI Digital Tire Pressure Gauge. This device is designed to accurately measure tire pressure for various vehicles, including cars, trucks, bicycles, and motorcycles, ensuring optimal tire performance and safety.

Image 1.1: AstroAI Digital Tire Pressure Gauge and included Presta valve adapter.
2. Safety Information
- Always ensure the gauge is clean and free from debris before use.
- Do not expose the device to extreme temperatures or direct sunlight for prolonged periods.
- Keep the device away from water or other liquids to prevent damage.
- Store the gauge in a safe place when not in use to prevent accidental activation or damage.
- Replace batteries promptly when the low battery indicator appears to ensure accurate readings.
3. Product Overview
The AstroAI Digital Tire Pressure Gauge features a robust design for reliable performance. Key components include:
- Illuminated Nozzle: For easy valve stem location in low-light conditions.
- Backlit LCD Screen: Provides clear and easy-to-read pressure measurements.
- One-Button Control: Simplifies operation for power, unit selection, and measurement.
- Ergonomic Design: Ensures a comfortable grip and ease of use.
- Automatic Shut-off: Conserves battery life by turning off after 30 seconds of inactivity.
- Presta Valve Adapter: Included for compatibility with Presta valves found on many bicycles.
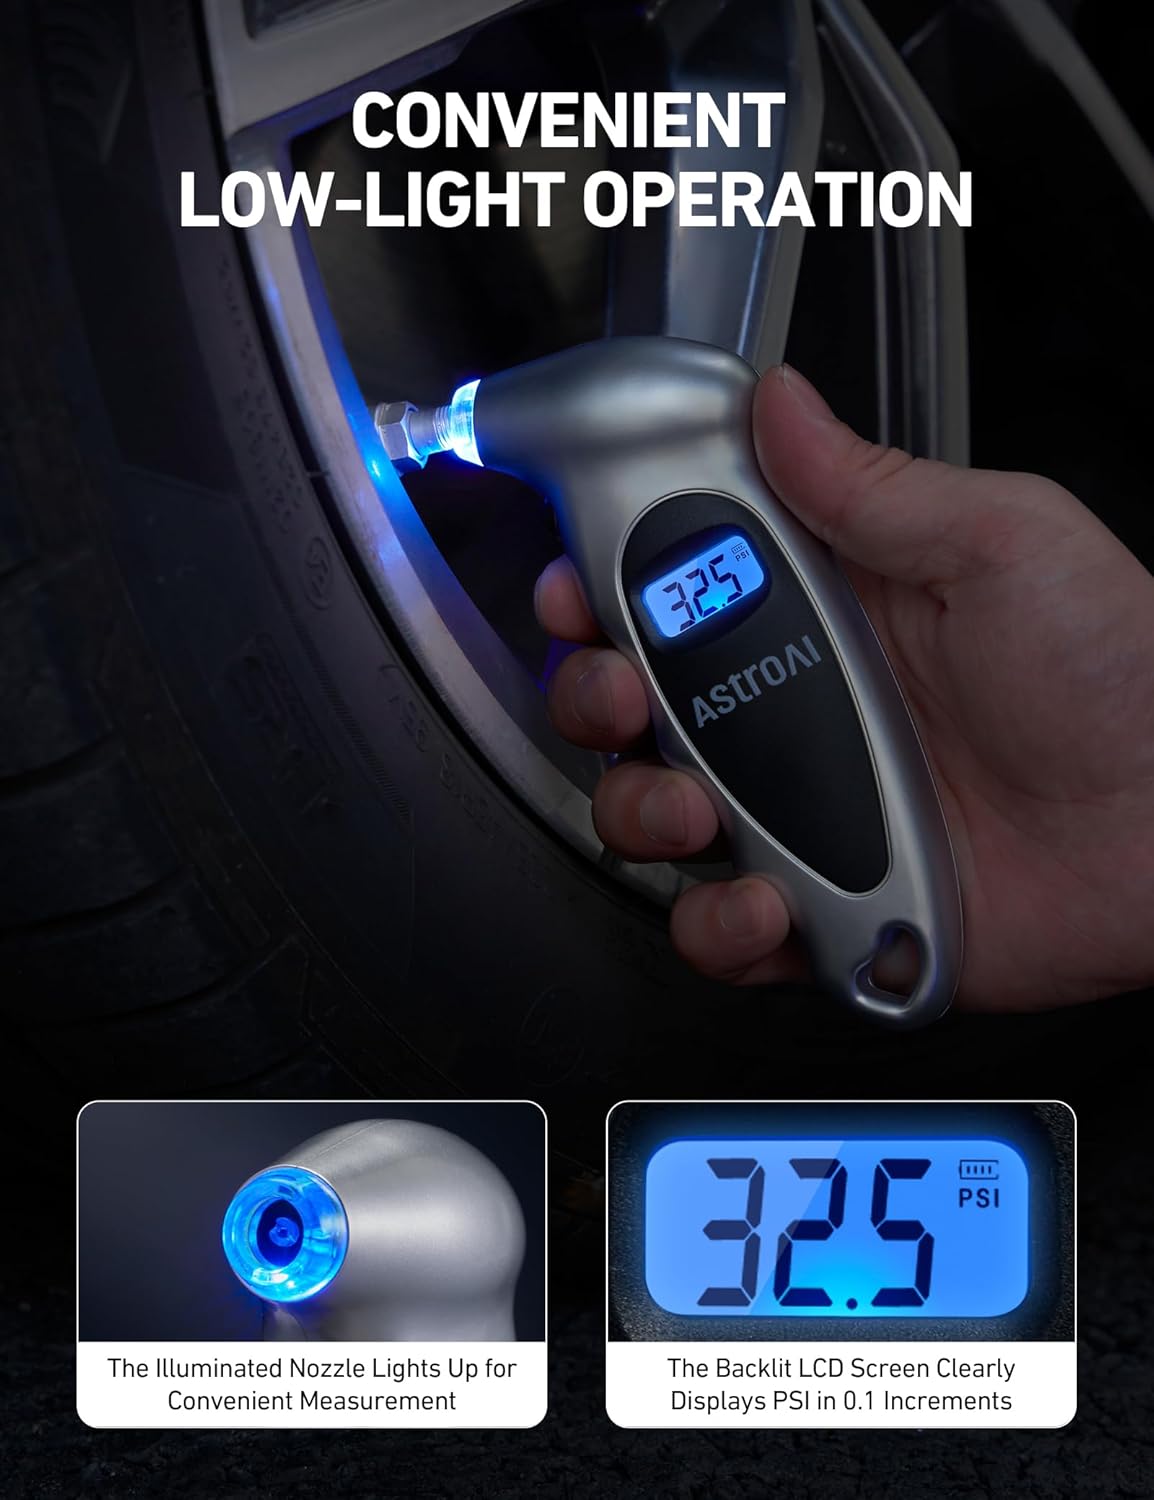
Image 3.1: The gauge features an illuminated nozzle and a backlit LCD for visibility in dim conditions.
4. Setup
4.1 Battery Installation
The AstroAI Digital Tire Pressure Gauge comes with 3 LR44 Alkaline batteries pre-installed. If replacement is needed:
- Locate the battery compartment on the back of the gauge.
- Slide the battery cover open.
- Remove the old batteries and insert three new LR44 Alkaline batteries, ensuring correct polarity (+/-).
- Close the battery cover securely.

Image 4.1: The battery compartment for LR44 battery replacement.
5. Operating Instructions
5.1 Powering On and Off
- To power on, press the ON/UNIT/OFF button once. The gauge will display "0.0" and calibrate for approximately 2 seconds.
- The gauge will automatically turn off after 30 seconds of inactivity to conserve battery life.
- To manually power off, press and hold the ON/UNIT/OFF button for 3 seconds.
5.2 Changing Measurement Units
The gauge supports four measurement units: PSI, BAR, KGF/CM², and KPA.
- With the gauge powered on, press the ON/UNIT/OFF button repeatedly to cycle through the available units. The selected unit will be displayed on the LCD screen.

Image 5.1: The gauge supports four measurement units for versatility.
5.3 Measuring Tire Pressure
- Ensure the tire is cold for the most accurate reading.
- Remove the valve cap from the tire stem.
- Press the ON/UNIT/OFF button to turn on the gauge.
- Firmly press the gauge's nozzle straight onto the tire valve stem. Ensure a tight seal to prevent air leakage. The illuminated nozzle assists in low-light conditions.
- Hold the gauge in place until the pressure reading stabilizes on the LCD screen.
- Remove the gauge from the valve stem. The reading will remain displayed for a few seconds before the gauge automatically shuts off or until manually turned off.
- Replace the valve cap.

Image 5.2: Step-by-step guide for measuring tire pressure.
5.4 Using the Presta Valve Adapter
For bicycles equipped with Presta valves:
- Unscrew the Presta valve cap and loosen the valve stem lock nut.
- Screw the included Presta valve adapter onto the Presta valve stem.
- Follow the steps in Section 5.3 to measure the tire pressure, pressing the gauge nozzle onto the adapter.
- After measurement, remove the gauge and the adapter, then tighten the Presta valve stem lock nut and replace the cap.
6. Maintenance
- Cleaning: Wipe the gauge with a soft, dry cloth. Do not use abrasive cleaners or solvents.
- Storage: Store the gauge in a cool, dry place, away from direct sunlight and extreme temperatures. Its compact size allows for convenient storage in glove boxes or tool kits.
- Battery Life: The automatic shut-off feature helps prolong battery life. Replace batteries when the low battery indicator appears on the display.

Image 6.1: The gauge features an energy-saving auto-shutoff function.
7. Troubleshooting
| Problem | Possible Cause | Solution |
|---|---|---|
| Gauge does not turn on. | Dead or incorrectly installed batteries. | Check battery polarity. Replace batteries if necessary (refer to Section 4.1). |
| Inaccurate readings. | Poor seal with valve stem; low battery; gauge not calibrated. | Ensure a tight seal. Replace batteries. Allow 2 seconds for calibration after power-on. |
| "LO" or "BAT" displayed. | Low battery power. | Replace batteries immediately (refer to Section 4.1). |
| Air leaks during measurement. | Improper connection to valve stem. | Press the nozzle firmly and straight onto the valve stem to create a secure seal. |
8. Specifications
| Feature | Detail |
|---|---|
| Brand | AstroAI |
| Model Number | GL-0801A |
| Measurement Range | 0-150 PSI / 0-10 BAR / 0-10 Kgf/cm² / 0-1000 KPA |
| Accuracy | ±1 PSI |
| Increments | 0.1 PSI |
| Material | Acrylonitrile Butadiene Styrene (ABS) |
| Dimensions (L x W x H) | 5.31 x 2.17 x 1.1 inches (13.5 x 5.5 x 2.8 cm) |
| Item Weight | 0.317 ounces (9 grams) |
| Batteries | 3 x LR44 Alkaline (included) |
| Special Features | Backlit LCD display, Lighted nozzle, Auto-shutoff, Presta valve adapter included |

Image 8.1: Physical dimensions of the gauge.
9. Warranty and Support
AstroAI is committed to providing high-quality products and customer satisfaction. This digital tire pressure gauge is manufactured from durable materials. If you encounter any issues due to manufacturing defects or transportation damage, please contact AstroAI customer service for assistance with returns or replacements.
For further support or inquiries, please visit the official AstroAI website or contact their customer service department.


