
1.0 Introduction
The Portta HDMI 4x1 Switcher is a high-performance device designed to connect multiple HDMI source devices to a single HDMI display. It features both manual key-press switching and IR remote control for convenient operation. The intelligent switching function allows the switcher to automatically detect and switch to a newly powered-on source device. This unit supports Full HD 1080p and 3D video formats, making it suitable for various home entertainment setups.

Figure 1: Front view of the Portta HDMI 4x1 Switcher. Shows the Portta logo, HDMI Switcher text, Select button, and LED indicators for inputs 1-4.
2.0 Package Contents
- Portta HDMI 4x1 Switcher (Main unit) x1
- IR Extender Receiver x1
- Remote Control x1
- User Manual (English Version) x1

Figure 2: Contents of the Portta HDMI 4x1 Switcher package, including the main unit, IR receiver, remote control, and user manual.
3.0 Specifications
| Feature | Description |
|---|---|
| Input DDC Signal | 5 volts p-p (TTL) |
| Maximum Single Link Range | 1920x1080p |
| Output Video | HDMI 1.3b |
| Vertical Frequency Range | 50/60Hz |
| Video Amplifier Bandwidth | 2.5Gbps/250MHz |
| Interlaced Resolutions (50&60Hz) | 480i, 576i, 1080i |
| Progressive Resolutions (50&60Hz) | 480p, 576p, 720p, 1080p |
| Operating Temperature | 0 ℃ to +70 ℃ |
| Operating Humidity | 10% to 85% RH (no condensation) |
| Storage Temperature | -10 ℃ to +80 ℃ |
| Storage Humidity | 5% to 90% RH (no condensation) |
| External Power Supply | No power needed (typically powered via HDMI, but optional DC 5V input available) |
| Power Consumption (Max) | 5W |
| Dimensions | 81mm (W) x 58mm (D) x 18mm (H) (approximate) |
| Weight | 1.92 ounces |

Figure 3: Top and rear views of the Portta HDMI 4x1 Switcher showing dimensions and port labels (Input1, Output, DC/5V, Input2, Input3, Input4).
4.0 Setup
- Connect HDMI Source Devices: Connect up to four HDMI source devices (e.g., Blu-ray player, gaming console, PC, streaming stick) to the HDMI Input ports (Input1, Input2, Input3, Input4) on the Portta HDMI Switcher using HDMI cables.
- Connect to Display: Connect the HDMI Output port of the switcher to the HDMI Input port of your display device (e.g., TV, monitor, projector) using an HDMI cable.
- Connect IR Extender (Optional): If using the IR remote control, plug the IR Extender Receiver into the "IR" port on the switcher. Position the IR receiver in a location where it can receive signals from the remote control.
- Power On: The switcher typically draws power from the connected HDMI sources. If additional power is required or if you experience signal instability, connect an optional 5V DC power adapter (not included) to the DC/5V port.
- Verify Connections: Ensure all HDMI cables are securely connected.
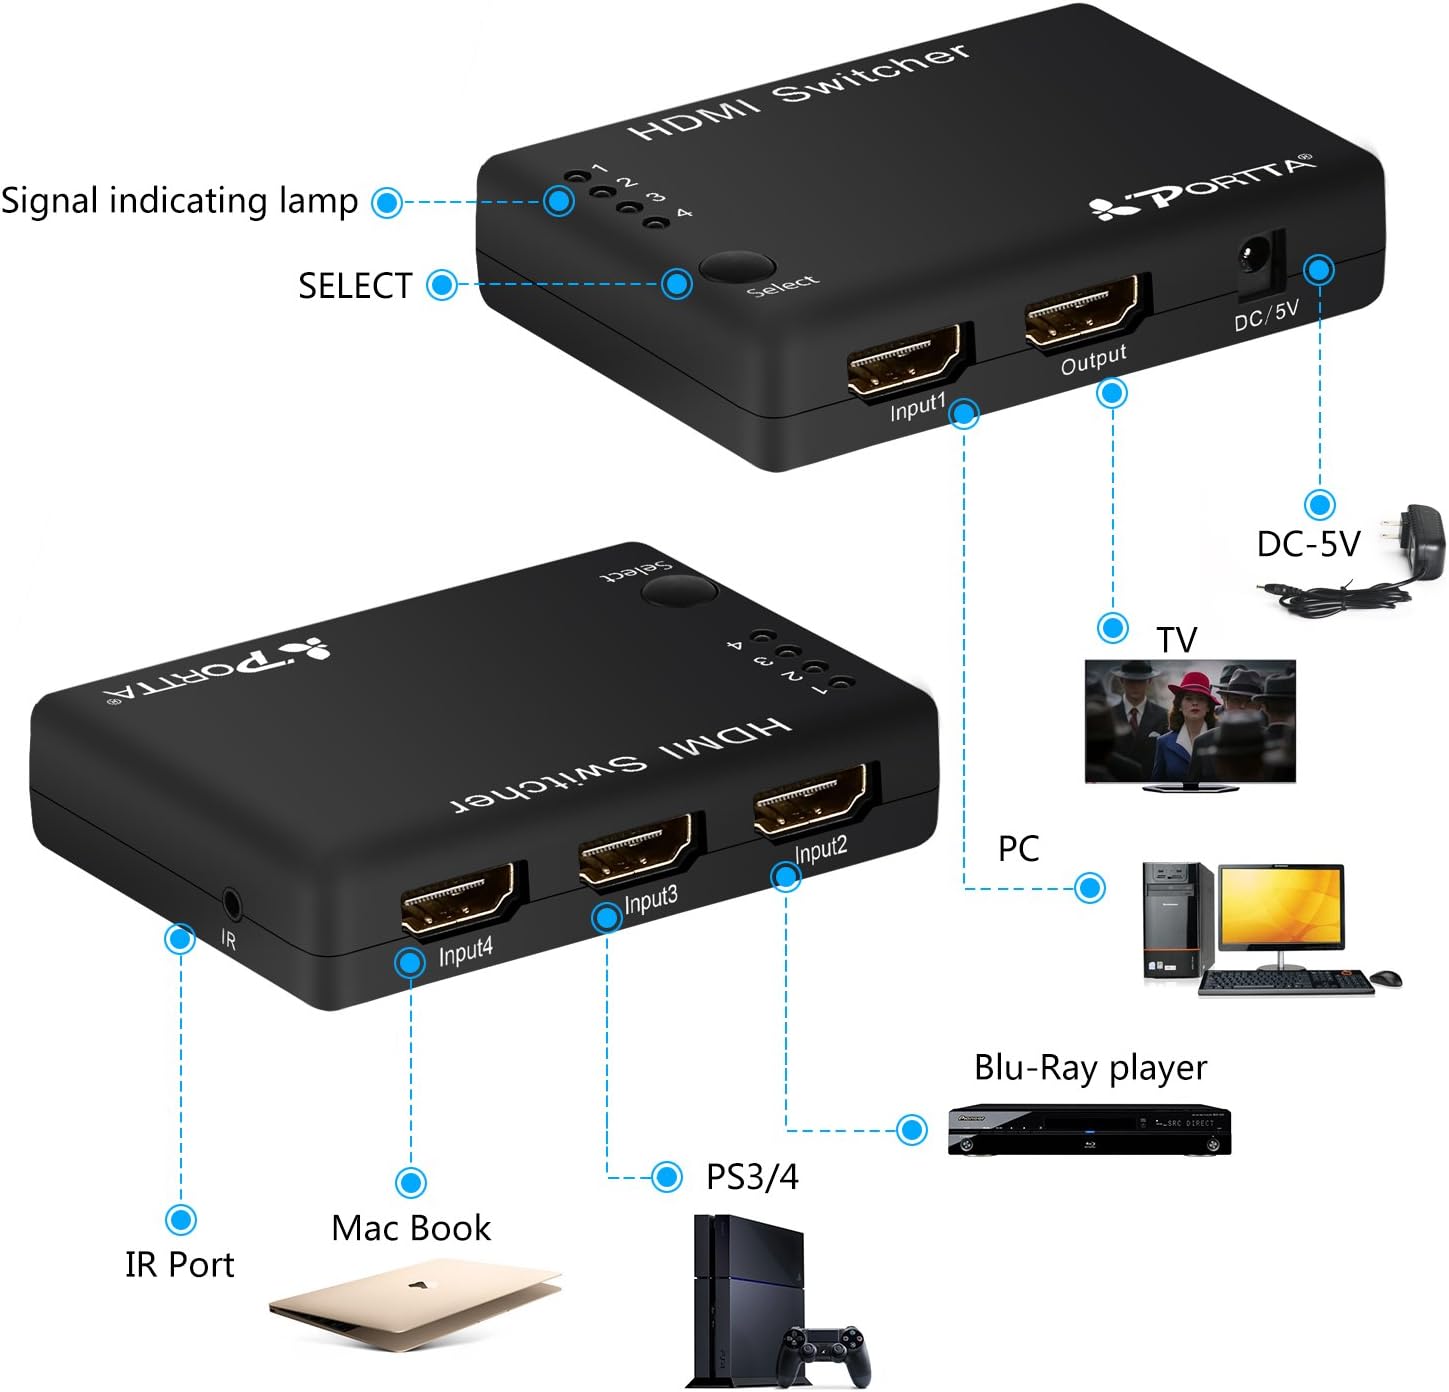
Figure 4: Connection diagram illustrating how to connect source devices (PC, PS3/4, Blu-Ray player, Mac Book) to the HDMI inputs, the switcher's output to a TV, and the optional DC 5V power and IR receiver.

Figure 5: Example setup showing the Portta HDMI 4x1 Switcher connected between a laptop and an external monitor.
5.0 Operating Instructions
5.1 Manual Switching
Press the "Select" button on the front panel of the HDMI switcher to cycle through the connected HDMI input sources (Input1, Input2, Input3, Input4). The corresponding LED indicator will illuminate to show the currently active input.
5.2 Remote Control Switching
Point the IR remote control towards the IR Extender Receiver (if connected) or the IR window on the switcher. Press the numbered buttons (1, 2, 3, 4) on the remote control to directly select the desired HDMI input source.

Figure 6: The Portta HDMI 4x1 Switcher shown alongside its included remote control.
5.3 Intelligent Switching
The switcher features an intelligent switching function. When a new HDMI source device is powered on, the switcher will automatically detect it and switch to that input. If the currently active source is turned off, the switcher may automatically switch to the next active input.
6.0 Maintenance
- Keep the device in a cool, dry place away from direct sunlight, high temperatures, and humidity.
- Do not expose the device to water or moisture.
- Clean the device with a soft, dry cloth. Do not use liquid or aerosol cleaners.
- Ensure proper ventilation around the unit to prevent overheating.
- Avoid dropping or subjecting the device to strong impacts.
7.0 Troubleshooting
| Problem | Possible Solution |
|---|---|
| No video output |
|
| Flickering or unstable video |
|
| Remote control not working |
|
| Automatic switching not functioning |
|
8.0 Warranty and Support
This Portta HDMI Switcher comes with a 5-year warranty. For technical support or warranty claims, please contact Portta customer service through their official website or the retailer where the product was purchased. Please retain your proof of purchase for warranty validation.
For more information, visit the Portta Store on Amazon.
