
MICROWARE ST415
VuPoint Solutions ST415 Handheld Magic Wand Portable Scanner User Manual
Model: ST415
Introduction
This manual provides comprehensive instructions for the setup, operation, and maintenance of your MICROWARE VuPoint Solutions ST415 Handheld Magic Wand Portable Scanner. Please read this manual thoroughly before using the device to ensure proper functionality and to maximize your scanning experience.
Key Features
- Portable handheld design for on-the-go scanning.
- High-resolution scanning up to 900 DPI.
- Supports JPG and PDF file formats.
- Color and monochrome scanning capabilities.
- Includes OCR (Optical Character Recognition) software for text-editable files (Windows only).
- Direct saving to Micro SD card (up to 32GB supported).
- USB connectivity for easy file transfer.
Package Contents
Please verify that all items are present in your package:
- VuPoint Solutions ST415 Handheld Scanner
- USB Cable
- 8GB Micro SD Card (or similar capacity as included)
- Carrying Pouch
- Cleaning Cloth
- OCR Software CD (Windows compatible)
- User Manual
- AA Batteries (2x)
Setup
1. Battery Installation
The scanner requires two AA batteries for operation. Ensure correct polarity when inserting.
- Locate the battery compartment cover on the scanner.
- Slide or push the cover open.
- Insert two AA batteries, matching the positive (+) and negative (-) terminals as indicated inside the compartment.
- Close the battery compartment cover securely.

Figure 1: Battery installation and other setup steps for the scanner. The image illustrates inserting batteries, connecting the USB cable, and the general scanning motion.
2. Micro SD Card Insertion
The scanner saves all scanned images to a Micro SD card. An 8GB card is typically included.
- Locate the Micro SD card slot on the side of the scanner.
- Insert the Micro SD card into the slot until it clicks into place. Ensure the card is oriented correctly.
- To remove, gently push the card further in until it springs out.

Figure 2: Detailed diagram highlighting the Micro SD card slot, USB port, DPI button, JPG/PDF switch, and other controls on the scanner.
3. Initial Power On
Press and hold the power button (usually labeled "SCAN" or "POWER") for a few seconds until the display screen illuminates.
Operating Instructions
1. Setting Scan Mode and Resolution
Before scanning, you can adjust the scan mode (Color/Mono) and resolution (DPI).
- Color/Mono Switch: Use the dedicated switch (often labeled "JPG/PDF" or similar, but controls color/mono) to toggle between color and monochrome scanning.
- DPI Setting: Press the "DPI" button to cycle through available resolutions: 300 DPI, 600 DPI, and 900 DPI. Higher DPI settings result in better image quality but larger file sizes.
- File Format: Use the "FORMAT" button or switch to select between JPG and PDF output formats.
2. Performing a Scan
To achieve optimal scan quality, maintain a steady and even motion.
- Place the document or image on a flat, stable surface.
- Position the scanner at the top edge of the item to be scanned, ensuring the scanning window is aligned.
- Press the "SCAN" button once to start scanning. The scan indicator light will illuminate.
- Slowly and steadily glide the scanner downwards across the document. Avoid tilting or lifting the scanner.
- Once you reach the end of the document, press the "SCAN" button again to stop scanning. The scan indicator light will turn off.
- The scanned image will be automatically saved to the Micro SD card.
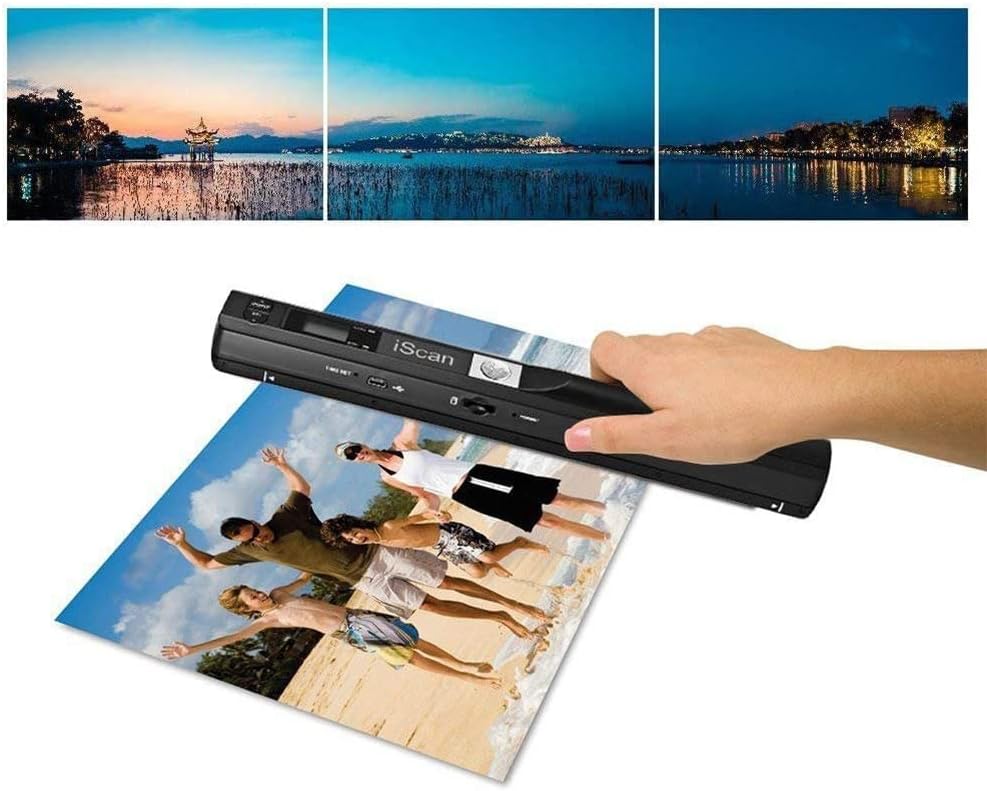
Figure 3: Demonstrates the handheld scanner in action, capturing a large photograph. The top portion of the image shows examples of scanned output.

Figure 4: The scanner positioned over a magazine page, illustrating its use for scanning documents and printed materials.
3. Transferring Scans to Computer
You can transfer your scanned files to a computer using the provided USB cable or by directly inserting the Micro SD card.
- Using USB Cable:
- Connect the smaller end of the USB cable to the scanner's USB port.
- Connect the larger end of the USB cable to an available USB port on your computer.
- The scanner will appear as a removable disk drive. You can then access and copy your scanned files.
- Using Micro SD Card:
- Remove the Micro SD card from the scanner.
- Insert the Micro SD card into a compatible card reader connected to your computer.
- Access the card as a removable drive to transfer files.

Figure 5: Illustration of the scanner's connectivity options, including the Micro SD card, USB cable, and a laptop, demonstrating how scanned files can be transferred.
4. Using OCR Software
The included Optical Character Recognition (OCR) software allows you to convert scanned documents into editable text files. Note: This software is Windows-only and not compatible with Mac OS.
- Install the OCR software from the provided CD or download link (if applicable) onto your Windows computer.
- Follow the software's instructions to import your scanned PDF or JPG documents.
- Use the OCR function to convert the images into searchable and editable text formats (e.g., TXT, DOC, XLS).

Figure 6: Visual representation of the OCR software's capability to convert scanned images (JPG, PDF) into editable text formats (TXT, Excel, Word).
Maintenance
1. Cleaning the Scanner
Regular cleaning ensures optimal scan quality.
- Use the included cleaning cloth or a soft, lint-free cloth to wipe the exterior of the scanner.
- For the scanning window, gently wipe with a clean, dry, soft cloth. Avoid abrasive materials or harsh chemicals.
- Ensure no dust or debris accumulates on the scanning lens.
2. Battery Care
- Replace batteries when the low battery indicator appears on the display.
- Remove batteries if the scanner will not be used for an extended period to prevent leakage.
- Use high-quality AA alkaline batteries for best performance.
3. Micro SD Card Management
- Periodically transfer scanned files to your computer to free up space on the Micro SD card.
- Format the Micro SD card occasionally (after backing up files) to maintain optimal performance. This can usually be done via the scanner's menu or a computer.
Troubleshooting
| Problem | Possible Cause | Solution |
|---|---|---|
| Scanner does not power on. | Low or dead batteries; incorrect battery insertion. | Replace batteries with fresh ones. Ensure correct polarity (+/-). |
| Scanned images are blurry or distorted. | Scanner moved too fast or unevenly; dirty scanning lens; item not flat. | Scan slowly and steadily. Ensure the document is flat. Clean the scanning lens with a soft cloth. Practice maintaining a steady hand. |
| Scanner not recognized by computer. | Loose USB connection; faulty USB cable; driver issue (unlikely for plug-and-play). | Ensure USB cable is securely connected. Try a different USB port or cable. Restart computer and scanner. |
| Cannot save scans. | Micro SD card full; card not inserted correctly; card error. | Transfer files to computer to free space. Reinsert Micro SD card. Try a different Micro SD card. Format the card (after backing up data). |
| OCR software not working. | Incorrect installation; incompatible operating system (Mac OS); corrupted files. | Ensure software is correctly installed on a Windows OS. Reinstall the software. Try scanning the document again. |
| Scan quality settings reset after power off. | This model may not retain certain settings after power cycle. | Re-select desired DPI and color mode before each scanning session. |
Specifications
| Feature | Detail |
|---|---|
| Model Name | ST415 |
| Brand | MICROWARE |
| Scanner Type | Photo, Text, Document |
| Optical Sensor Technology | CCD |
| Resolution | 300 DPI, 600 DPI, 900 DPI |
| Connectivity Technology | USB |
| Media Type | Slide, Photo |
| Sheet Size | Legal (up to 8.27 inches wide and 98 inches long) |
| Item Weight | 1.2 Pounds (approx.) |
| Product Dimensions | 12.38 x 8 x 2 inches (approx.) |
| Batteries | 2 AA batteries required |
| Storage | Micro SD card (up to 32GB supported) |
| File Formats | JPG, PDF |
| Minimum System Requirements | Windows 7 (for OCR software) |
Warranty and Support
Warranty Information
For specific warranty details, please refer to the warranty card included with your product or visit the official MICROWARE website. Warranty terms typically cover manufacturing defects for a specified period from the date of purchase.
Customer Support
If you encounter any issues not covered in this manual or require further assistance, please contact MICROWARE customer support. Contact information can usually be found on the product packaging, the manufacturer's website, or the warranty documentation.
When contacting support, please have your product model (ST415) and purchase information ready.
Ask a question about this manual
Ask about setup, troubleshooting, compatibility, parts, safety, or missing instructions. Manuals+ will review the question and use this page’s manual context to help answer it.